Adding Web Links to Your UG Session
|
You can create a menu command or toolbar to link to your favorite web site. There are already convenient links to useful sites for UG so why not add links to the Cadpo web site or i.get.it login? To do this, you will need write privileges to the directory UGS180\UGII\menus wherever Unigraphics is installed. You will want to be very careful when editing files in this directory. Do not delete any files and only make changes you are co 12312i820m nfident about. We'll discuss the necessary changes here in this tip. You may not have write privileges. During installation, these directories are often locked so you can't make changes that prevent Unigraphics from starting (which happens if you make an error). In either case, it's a good idea to discuss your plans with your system administrator. Making these changes will only take a few minutes and the toolbar and commands can be made available to other users. |
|||
|
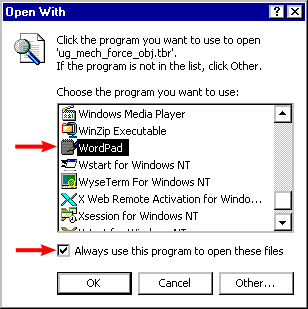
First, let's create a new menu in the Main menu of Unigraphics. Open the file UGS180\UGII\menus\ug_main.men. In the Windows® environment, right-click over the file and select Open With | Choose Program from the pop-up menu to display the Open With dialog. Scroll through the list and select a program to view this text file. WordPad is a good one since it doesn't change the file extension when you save a text file. Activating the option at the bottom of the dialog assigns files with the .men extension to WordPad. Then the next time you open a menu file, you only have to double-click it. |
|
||
|
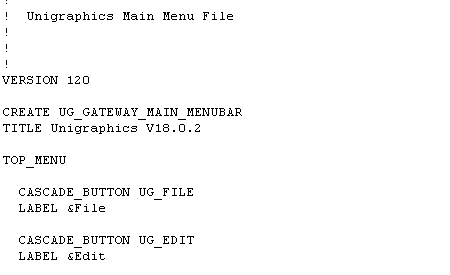
Once you have the file open, you can either add the commands to an existing menu or create a new one. Let's create a new menu. The very first section in this file is titled TOP_MENU. |
|||
|
|
|||
|
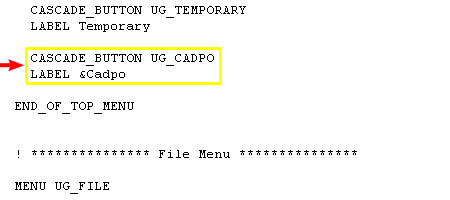
This section contains the menus along the top bar in Unigraphics - File, Edit, etc. These menus are in the order they display in UG. Scroll down a few lines until you see "END_OF_TOP_MENU." Just before this line, add two lines to create a new menu. This involves the commands CASCADE_BUTTON and LABEL that reference unique names. The latter reference is how the menu displays in Unigraphics. |
|||
|
|
|||
|
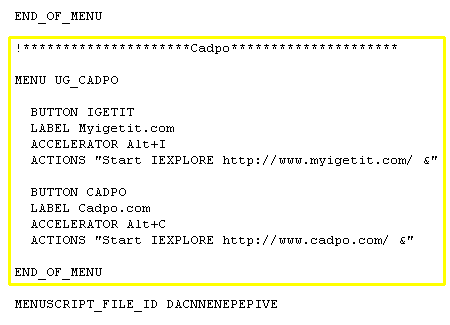
Next, scroll to the bottom of the file. After the last END_OF_MENU command, add the following text. The exclamation character (!) designates a comment line on which you can enter whatever you want. The actual menu is enclosed with a MENU command referencing the CASCADE_BUTTON titled above and another END_OF_MENU command. Each menu item must then have BUTTON, LABEL and ACTIONS commands. |
|||
|
|
|||
|
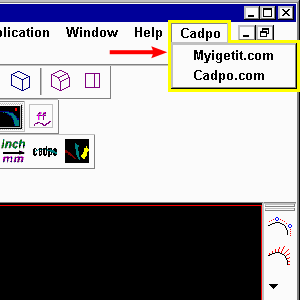
The BUTTON command refers to a unique name for the item. The LABEL command is the name that displays in Unigraphics. The ACCELERATOR is optional - be sure to search the menu file (using Edit | Find) for the accelerator you select to ensure that it is unique. For the ACTIONS command, the item is in quotations designating that something is to be executed from the operating system. IEXPLORE is the executable for Internet Explorer, with the web address immediately following. If you use Netscape®, the command should be: ACTIONS "Start NETSCAPE https://www.myigetit.com/ &" The next time you start UG, you'll notice the new menu. To make a web link on a toolbar, you will actually use a macro to reference the menu command you just created. Create a text file with a .tbr extension (if you want to use our toolbar, you can download it). If you already have a custom toolbar, you can modify that. |
|||
|
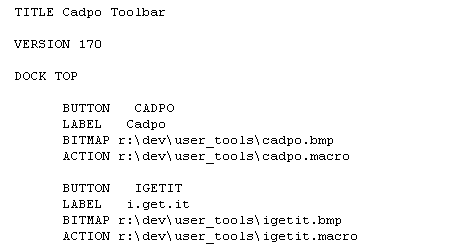
Again, you can use WordPad to edit .tbr file. This file should contain a TITLE and VERSION command. Even if you are using V18, enter for VERSION. For each item in the toolbar, you need a BUTTON, LABEL, BITMAP and ACTION command. BUTTON is the unique name while LABEL is the name that displays as a rollover for the icon. BITMAP refers to the image that is used as the icon. ACTION refers to the file to be executed - in this case a macro. |
|
||
|
|
|||
|
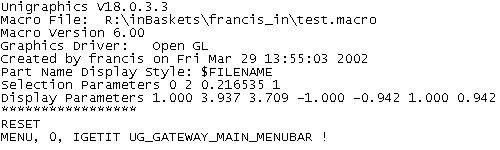
You can easily create a macro by selecting Tools | Macro | Start Record, selecting the command (in this case, Cadpo | Myigetit.com) and selecting Tools | Macro | Stop Record. The macro looks like this: |
|||
|
|
|||
|
Create your own image file using a graphics program such PhotoShop®. Save it as a bitmap file (.bmp). It should be 24 x 24 pixels in size. If it is larger, it will be reduced. |
|||
|
|||
|
|
|||
|