DynamicAccess
Managed PC Boot Agent (MBA)
User Guide
For Version 4.x
2.2 Edition

3Com Corporation n 5400
©3Com Corporation, 1999. All rights reserved. No part of this document may be reproduced in any form or by any means or used to make any derivative work (such as translation, transformation, or adaptation) without permission from 3Com Corporation.
3Com Corporation reserves the right to revise this documentation and to make changes in content from time to time without obligation on the part of 3Com Corporation to provide notification of such revision or change.
3Com Corporation provides this documentation without warranty of any kind, either implied or expressed, including, but not limited to, the implied warranties of merchantability and fitness for a particular purpose. 3Com may make improvements or changes in the product(s) and/or the program(s) described in this document at any time.
UNITED STATES GOVERNMENT LEGENDS:
If
you are a
For units of the Department of Defense:
Restricted Rights Legend: Use, reproduction or
disclosure by the government is subject to restrictions set forth in
subparagraph (c) (1) (ii) for Restricted Rights in Technical Data and Computer
Software clause at 48 C.F.R. 52.227-7013. 3Com Corporation, 5400
For civilian agencies:
Restricted Rights Legend: Use, reproduction or
disclosure is subject to restrictions set forth in subparagraph (a) through (d)
of the Commercial Computer Software - Restricted Rights clause at 48 C.F.R.
52.227-19 and the limitations set forth in 3Com Corporation's standard
commercial agreement for the software. Unpublished rights reserved under the
copyright laws of the
The software described in this documentation is furnished under a license agreement included with the product either as a separate document or on the software distribution diskette in a root directory file named LICENSE.TXT. If you are unable to locate a copy, please contact 3Com and a copy will be provided to you.
Unless
otherwise indicated, 3Com registered trademarks are registered in the
3Com®, the 3Com logo, Managed PC Boot Agent®, MBA®, Pre-OS® and DynamicAccess® are trademarks of 3Com Corporation or its subsidiaries.
Microsoft,
Windows, and Windows NT are registered trademarks of Microsoft Corporation. IBM
and OS/2 are registered trademarks of International Business Machines
Corporation. Novell, NetWare, and UNIX are registered trademarks of Novell,
Inc. Intel is a registered trademarks of Intel Corporation.
Other brands and trademarks may be registered trademarks of their respective holders.
April, 1999
CONTENTS iii
About This Guide vii
What's New in this Release viii
Chapter 1: Introduction
Manageable PCs 1
3Com Managed PC Solutions-Key Capabilities 1
Managed PC Boot Agent (MBA) 2
Features 3
Boot Image Editor 4
Documentation Overview: 4
Chapter 2: Installing MBA
PC Requirements 5
Quick Start 5
MBA ROM Installation 6
Types of MBA Installation 6
ROM Installation 6
Boot Image Editor Installation 9
Chapter 3: Configuring MBA
Programming Your MBA ROM Using MBAFLASH 11
MBA Base Code and UNDI Components 12
Setting the Boot Order on PCs with BBS BIOS 13
Configuring MBA's Options 14
Configuration Tables 15
Changing the Options 24
Using the MBA-Based Configuration 24
Using the MBACFG Utility 25
Changing Configuration Options Using a Configuration File 26
Changing Configuration Options from the MBACFG Command Line 28
Updating your MBA ROM 28
Updating to a Newer MBA Version 28
Restoring a Previously Backed-up Version 29
MBA on IA-64 PCs 30
MBA on Disk 30
Chapter 4: Using MBA Base Code
Boot Failure 34
Displaying Verbose Status Information (v or Ctrl+Alt) 34
Displaying MBA Information (Shift+Shift) 34
Troubleshooting 35
Compatibility Problems with Option ROMs for Hard Disk or SCSI Controllers 35
Using ROMSCAN for Troubleshooting and Diagnostics 35
Chapter 5: Using Pre-OS
Introduction 37
Pre-OS Framework 38
PC Pre-OS Bootup Sequence 39
Creating Pre-OS Boot Images 39
Defining Boot Image Content 40
Creating TCP/IP or PXE Pre-OS Boot Images 41
Creating NetWare Pre-OS Boot Images 42
Sample Pre-OS Frameworks 42
TCP/IP or PXE Pre-OS Sample 42
NetWare Pre-OS Sample 44
Technical Information 45
Chapter 6: Using MBA in TCP/IP Environments
Introduction 47
TCP/IP-Specific Features 47
Network Requirements 47
Quick Setup 48
Setting Up the Server 50
BOOTP Service 50
DHCP Service 50
TFTP Service 50
Setting Up the PC 50
Creating a Boot Diskette 51
Creating a Boot Image File Using Boot Image Editor 51
Boot Screen 52
Other Tools 53
UNDIS3C.DOS: 3Com Universal NDIS Driver 53
FREEMEM: Free RAM Disk Memory 57
BPPATCH: Supporting Replaceable Parameters 57
Application Notes 58
Using Memory Managers 58
Troubleshooting 59
Quick Fixes: What to Check First 59
MBA Messages 59
File Transfer Error Messages 59
Chapter 7: Using MBA in a Wired for Management Environment Using PXE
Introduction 61
Quick Setup 63
Boot Screen 63
Creating a PXE Boot Image File Using Boot Image Editor 64
Chapter 8: Using MBA in NetWare Environments
Introduction 65
Network Requirements 65
Quick Setup 66
Boot Screen 68
Creating a Boot Image File Using Boot Image Editor 68
Boot Using MBA 71
Supporting Different PCs with One Boot Image 71
Creating Additional Boot Image Files 72
Creating and Editing the BOOTCONF.SYS Boot Index File 72
Avoiding AUTOEXEC.BAT Conflicts in SYS:LOGIN 74
Using Boot Image Editor to Create Additional Boot Image Files 74
Selecting Different Images at Boot Time 74
Multiple Servers: How the MSD NLM Can Help 75
Installing MSD 76
MSD Command Line Options 76
NODEFAULT Mode 77
MSD Console Display 77
MSD PC Messages 77
Other Tools 78
CHKID: Conditional Execution Based on Node Address 78
Boot Image Editor: Edit and View Boot Image Files 79
ROMTYPE: Conditional Execution Based on MBA Type 79
Application Notes 80
Using Novell's Client 32 for DOS/Windows with MBA 80
Formatting Diskettes Using Windows 80
Transferring From the Boot Image to SYS:LOGIN 80
Troubleshooting 81
Quick Fixes: What to Check First 81
MBA Messages 81
Batch File Missing Messages and How to Avoid Them 83
Chapter 9: Using MBA in Remote Program Load Environments
Introduction 85
RPL-Specific Features 85
Quick Setup 86
Setting Up the NT Server 86
Boot Screen 87
Application Notes 88
Creating and Editing BootBlock and Configurations for NICs 88
Troubleshooting 89
Appendix A: Technical Support
Online Technical Services 91
World Wide Web Site 91
3Com Knowledgebase Web Services 91
3Com FTP Site 91
3Com Bulletin Board Service 92
3ComFacts Automated Fax Service 92
Support from Your Network Supplier 93
Support from 3Com 93
Returning Products for Repair 97
3Com Corporation LIMITED WARRANTY
Glossary
Index
The information in this guide is presented as follows:
Chapter 1 - An overview of MBA
Chapter 2 - How to install MBA
Chapter 3 - How to configure MBA for your requirements
Chapter 4 - Procedures involved when you bootstrap with MBA
Chapter 5 - An introduction to Pre-OS technology and its applications
Chapter 6 - Using MBA in TCP/IP environments
Chapter 7 - Using MBA in a Wired for Management environment using PXE
Chapter 8 - Using MBA on a Novell NetWare LAN
Chapter - Using MBA on RPL LANs, including Microsoft Windows NT, Microsoft LAN Manager, IBM LAN Server, IBM Warp Server, Digital Pathworks, and Artisoft LANtastic
Appendix A - Technical support
Glossary- A list of preboot technology terms
At the beginning of most chapters, you can find a Quick Setup list of instructions to assist experienced MBA users. Detailed instructions follow for less experienced users. Application Notes and Troubleshooting information are presented near the end of each chapter.
Since the previous release of this guide, MBA has been upgraded as shown in this section. The guide has been upgraded to explain the features made available by the following changes:
WfM 2.0 / PXE 2.0 support
The main enhancement to MBA 4.x is the addition of support for the new Wired for Management (WfM) Baseline 2.0 specification which was jointly developed by industry leaders including 3Com. PXE 2.0 adds the following:
![]() Boot image security using Boot Integrity
Services (BIS) when provided by the PC BIOS
Boot image security using Boot Integrity
Services (BIS) when provided by the PC BIOS
If your PC's BIOS has implemented BIS as specified in the WfM 2.0 specification, then the PXE functionality included in MBA will be compatible with it and use it if you have a BIS-enabled environment. Refer to the WfM 2.0 specification for more information on BIS.
![]() The ability to separate the NIC-specific UNDI
from the protocol-generic base code so the UNDI can be used with other base
codes ava 11311e412l ilable in the PC
The ability to separate the NIC-specific UNDI
from the protocol-generic base code so the UNDI can be used with other base
codes ava 11311e412l ilable in the PC
MBA 4.x is comprised of two components-the MBA base code and the Universal Network Device Interface (UNDI). The base code handles all the core functionality of MBA such as protocol handling, network boot failure handling, etc. The UNDI handles the interface with the specific NIC.
If your MBA is integrated into your PC's BIOS, then it may have been integrated using the new "split ROM" format. This means that the MBA base code is available in the BIOS and is separate from the UNDI. This allows another UNDI (e.g. existing on another NIC) to use the MBA base code from the BIOS and take advantage of MBA's functionality. Refer to Table 5: Startup Options for more information.
![]() PC Card support
PC Card support
MBA functionality is now available on PC Card NICs.
PXE is now the default boot method
With the popularity of the Wired for Management (WfM) initiative and the acceptance of the PXE specification, the default boot method has been changed to PXE. You can still change this to another boot method if PXE is not suitable for your environment.
New easy-to-use Windows-based Boot Image Editor
Boot Image Editor is a Windows-based utility that enables network administrators to create and manipulate TCP/IP, NetWare, and PXE boot images. The boot image files and menu boot files created with the Boot Image Editor allow network client PCs to boot from servers instead of local drives or to perform Pre-OS tasks before booting from the client PC's hard disk. Boot Image Editor combines and enhances the IMAGEGEN, IMGGEN, MAPGEN, and Multiple Image File Editor (MULTI_ED) DOS utilities previously available from Lanworks Technologies Co.
User selectable boot control
You can specify the mechanism for MBA to use, to allow itself to execute when the PC boots. This may be useful on some PCs when MBA cannot automatically detect which mechanism to use. Examples of boot control options are INT 18, INT 19, or BBS. Refer to Table 5: Startup Options for more information.
Network Service Boot (F12) functionality if not implemented in the BIOS
This function prompts the PC user to press the F12 key during the boot process to force a network boot. This is useful where the client PC normally boots from its local hard disk but must, on occasion, boot from the network server. Refer to Table 5: Startup Options for more information.
The following options are now available if PXE is the selected boot method:
![]() Default Boot Method
Default Boot Method
![]() Enable/Disable Local Booting
Enable/Disable Local Booting
![]() Message Timeout
Message Timeout
![]() Boot Failure Prompt
Boot Failure Prompt
![]() Boot Failure
Boot Failure
![]() Boot Messages
Boot Messages
Refer to Table 2: PXE Configuration Options for more information.
TCP/IP Image Filename
The default TCP/IP image filename is now MBA.IMG instead of BOOTWARE.IMG. You can now specify an alternative default image filename to be used instead of MBA.IMG, if the filename is not provided by the server. Refer to Table 1: TCP/IP Configuration Options for more information.
Thank you for choosing Managed PC Boot Agent (MBA), the world's best-selling network preboot solution for PC networks. MBA is a package of multi-protocol firmware and software tools that enables the network administrator to remotely administer software, operating systems, and applications over the network, eliminating the need to visit the client's desktop in person. MBA is a universal, easy to configure preboot solution that is compatible with today's client and network operating systems.
With MBA installed, your client PCs can boot from the network regardless of the contents of their local hard drives or, in some cases, without any local drives at all. MBA makes sure your users connect to the network every time.
It's true-You can't compute if you can't boot.
MBA enables new and existing PCs to take advantage of preboot management technology to perform operating system and application installations or upgrades as well as desktop disaster recovery. MBA includes the Wired for Management (WfM) standard PXE protocol, but goes beyond that to include legacy boot protocol support for networks such as NetWare and UNIX. MBA is the most universal, pervasive preboot solution available on the market today.
To take advantage of current and emerging Managed PC applications, companies need PCs that can cooperate in the management process. These PCs have management-ready network interface cards (NICs) with functions implemented in firmware, software, and hardware. While some features are applicable only to newer PCs, many can be implemented on existing PCs through a software download, flash ROM update or ROM upgrade.
In selecting management-ready PC NICs, companies can smooth the transition to a centrally-managed environment by choosing products that support the widest range of industry-standard protocols, existing network administration services and tools, and management applications. Wise choices will also help to future-proof investments for what is sure to be a period of emerging technology developments and rapid change.
3Com, the world's leading supplier of desktop and workgroup networking solutions, offers a full range of Managed PC features for Ethernet, Fast Ethernet, and Token Ring product lines. These products offer consumers a unique advantage: state-of-the-art management intelligence built into industry-leading 3Com NICs, which are known for their performance, reliability, and compatibility.
3Com's Managed PC solutions are compatible with leading
management applications, including those from Microsoft, ON Technology
Corporation, HP,
Currently, 3Com's product line supports three key network management capabilities: Remote Wake Up, Managed PC Boot Agent for remote preboot capabilities, and Desktop Management Interface 2.05 for advanced instrumentation discovery and configuration.
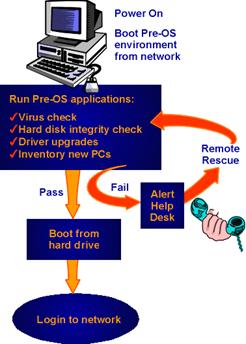
The Managed PC Boot Agent (MBA) enables a PC to boot from a remote server even if the local operating system (OS) is unable to boot or is nonexistent. It enables administrators to perform a wide range of preboot management tasks such as virus scanning, backups, disaster recovery, reconfiguration, and applications and OS installation and updates. MBA can also be used to compare desktop profiles to a centralized software image from a server. MBA can enable a multicast boot, bringing up hundreds of PCs simultaneously. All of these preboot processes are transparent to the user, since the PC behaves as if the boot took place from the local hard drive.
MBA improves IS productivity and responsiveness as well as end-user satisfaction by eliminating most of the need for on-site troubleshooting and disaster recovery. Instead, the vast majority of problems can be solved remotely and rapidly. Studies show that nearly half of all help desk calls are related to booting problems, which are normally impossible to solve remotely. Because boot failures typically make it impossible for users to connect with the network, even the most sophisticated enterprise management tools at the administrator's disposal are of no use.
MBA guarantees that every PC on the network-even those with damaged operating systems and new PCs with no OS and unformatted hard disks-will connect to the network. The ability to boot under management control also protects PCs when they are most vulnerable to boot sector viruses. In addition, MBA improves IS productivity by enabling administrators to configure or update any number of PCs very efficiently by making changes to a single image on a network server.
PCs can be configured to boot from a server using a combination of configuration files, boot image files, and (needed in most cases) software residing on the server's hard disk. MBA retrieves the required information (for example, an operating system, memory managers, network drivers) from these files on the server when the workstation starts. This process has commonly been described in the past as remoteboot.
Traditional remoteboot may not be adequate in establishing a complete work environment due to requirements imposed by today's GUI operating systems and applications. In this case, MBA can become a compelling administrative tool when configured to perform a Pre-OS boot prior to every local boot. Using MBA software and utilities including Pre-OS, a network administrator can make use of diagnostics, configuration, or maintenance tools prior to completing the local boot process.
MBA supports Wired for Management (WfM). It also supports all major boot protocols, including not only the new Preboot eXecution Environment (PXE) protocol originally defined in the Net PC specification, but also existing protocols such as BOOTP, DHCP, RPL, and NCP/IPX. 3Com customers thus have the flexibility to use NT Server or another specialized server that supports PXE, or to "roll their own" management solutions using the booting support built into other platforms such as NetWare, HP UX, Sun Solaris, and OS/2 WARP.
To implement the Managed PC Boot Agent you need:
![]() A NIC with preboot agent firmware (MBA). The
agent, which acts as an additional layer of BIOS, can also be installed on an
existing NIC as a chip in the Boot ROM socket or through a system BIOS flash
upgrade.
A NIC with preboot agent firmware (MBA). The
agent, which acts as an additional layer of BIOS, can also be installed on an
existing NIC as a chip in the Boot ROM socket or through a system BIOS flash
upgrade.
![]() A central boot configuration server
A central boot configuration server
Figure 1: How MBA Works
MBA includes the following features:
![]() Supports local and network operating systems
including DOS, Windows 3.x, Windows 9x, Windows NT, UNIX, Novell NetWare, and
others
Supports local and network operating systems
including DOS, Windows 3.x, Windows 9x, Windows NT, UNIX, Novell NetWare, and
others
![]() Fully configurable boot options to enable
client PCs to use MBA in various environments, with or without local hard
drives
Fully configurable boot options to enable
client PCs to use MBA in various environments, with or without local hard
drives
![]() Available as a network interface card (NIC)
ROM; also available as a BIOS update for motherboards which contain network
interface hardware. Can be in BIOS even if the PC has a separate NIC
Available as a network interface card (NIC)
ROM; also available as a BIOS update for motherboards which contain network
interface hardware. Can be in BIOS even if the PC has a separate NIC
![]() Supports flash ROM configuration and update
changes locally or over the network, depending on the NIC ROM or BIOS version
Supports flash ROM configuration and update
changes locally or over the network, depending on the NIC ROM or BIOS version
![]() Supports multiple boot protocols and network
environments such as traditional TCP/IP, NetWare, and RPL; also includes
support for all of today's most used protocols including DHCP, BOOTP, NCP/IPX
(802.2, 802.3, Ethernet II), and the Wired for Management specification Preboot
eXecution Environment (PXE)
Supports multiple boot protocols and network
environments such as traditional TCP/IP, NetWare, and RPL; also includes
support for all of today's most used protocols including DHCP, BOOTP, NCP/IPX
(802.2, 802.3, Ethernet II), and the Wired for Management specification Preboot
eXecution Environment (PXE)
![]() MBA can also be put onto a bootable floppy
disk. This allows MBA to be used with adapters that do not have boot ROM
capabilities such as a Card Bus PCCard or a USB Ethernet adapter. It also
provides a quick and easy method of doing a network boot without having to
alter BIOS settings, etc.
MBA can also be put onto a bootable floppy
disk. This allows MBA to be used with adapters that do not have boot ROM
capabilities such as a Card Bus PCCard or a USB Ethernet adapter. It also
provides a quick and easy method of doing a network boot without having to
alter BIOS settings, etc.
Boot Image Editor is a Windows-based utility that enables network administrators to create and manipulate TCP/IP, NetWare, and PXE boot images. The boot image files and menu boot files created with the Boot Image Editor allow network client PCs to boot from servers instead of local drives or to perform Pre-OS tasks before booting from the client PC's hard disk.
Boot Image Editor combines and enhances the IMAGEGEN, IMGGEN, MAPGEN, and Multiple Image File Editor (MULTI_ED) DOS-based utilities available from Lanworks Technologies Co. Although we encourage you to use Boot Image Editor, the DOS-based image utilities (IMAGEGEN, IMGGEN, MAPGEN, and MULTI_ED) are still available on the MBA Utility CD and on the EtherCD. The instructions for these utilities and for the BWLOADHI and UNRPLFIX utilities have been removed from this User Guide and placed into the file OLDUTILS.TXT on the MBA Utility CD and on the EtherCD.
With Boot Image Editor, you can:
![]() Create boot image files (from standard boot
diskettes) that contain standard startup files and reside on a server.
Create boot image files (from standard boot
diskettes) that contain standard startup files and reside on a server.
![]() View and modify the contents of boot image
files directly, without creating or accessing boot diskettes.
View and modify the contents of boot image
files directly, without creating or accessing boot diskettes.
![]() Create a menu boot file and designate a list
of boot options from which end-users can choose at boot time.
Create a menu boot file and designate a list
of boot options from which end-users can choose at boot time.
![]() Create special Pre-OS boot image files that
can execute third-party desktop management agents on the client PC before it
boots from the local drive.
Create special Pre-OS boot image files that
can execute third-party desktop management agents on the client PC before it
boots from the local drive.
![]() Configure boot image file options, such as
whether they are read-only or writeable or have extended or normal capacity.
Configure boot image file options, such as
whether they are read-only or writeable or have extended or normal capacity.
![]() Convert boot image files between environments,
such as TCP/IP images to NetWare images and vice versa.
Convert boot image files between environments,
such as TCP/IP images to NetWare images and vice versa.
Like Novell's legacy DOSGEN utility, the Boot Image Editor takes a snapshot of a boot diskette. Without Boot Image Editor, creating, examining, and modifying boot image files is a tedious exercise. Although the Boot Image Editor can be installed on any computer, it is usually implemented on a server or a network administration PC. For installation instructions, see "Boot Image Editor Installation " in Chapter 2 "Installing MBA."
The main source of information for Boot Image Editor is the Boot Image Editor online help. It covers the following subjects:
![]() Overviews
Overviews
![]() Option descriptions
Option descriptions
![]() Instructions for creating and defining the
contents of boot diskettes, boot image files, and menu boot files
Instructions for creating and defining the
contents of boot diskettes, boot image files, and menu boot files
![]() Instructions for maintaining and editing boot
image files and menu boot files
Instructions for maintaining and editing boot
image files and menu boot files
In some cases (such as when you define the contents of a NetWare boot diskette), you will be referred to this document.
This chapter contains a Quick Start section for those who are experienced with MBA installation, an MBA ROM Installation section that provides additional details, and a Boot Image Editor Installation section.
These MBA installation instructions are for MBA firmware which is available as a boot ROM that exists on a NIC or integrated into the PC system BIOS. MBA can also be made available as a bootable floppy disk. In this case, these installation instructions do not apply. Refer to "MBA on Disk" in Chapter 3 for more details.
MBA operates in all Intel-based PCs (386 or higher). Your PC must have a vacant memory region available in the BIOS ROM attachment area, usually located from C800:0h to E000:0h. The size of the required region varies with your NIC. We have gone to great lengths to ensure MBA memory requirements are as small as possible; ROM paging is used when supported by your NIC, and on PCI NICs, MBA shrinks its size after initialization to the smallest possible memory footprint.
When installed on a PCI or soft-configurable ISA NIC, MBA automatically configures itself to the NIC's settings.
These abbreviated instructions are for those who are experienced with general MBA installation.
Procedure
If you are installing an MBA ROM on the NIC start at step 1. If MBA is integrated into the PC system BIOS or if the ROM is pre-installed in the NIC, start at step 4.
Install the MBA ROM on the NIC, making sure
the ROM is not damaged by static discharge. Be absolutely certain the ROM is
installed so that Pin 1 of the ROM socket is aligned with Pin 1 of the
Enable the ROM socket of the NIC at a non-conflicting memory address:
|
Adapter Type |
Configuration |
|
PCI NICs and Plug and Play ISA NICs |
Often the PC automatically configures the NIC to enable the ROM to a non-conflicting address. However, sometimes you may need to run a utility to enable the ROM socket on the NIC. Refer to the NIC's user guide for information on how to set up the NIC. |
|
ISA (legacy, non Plug and Play) NICs |
Use either NIC configuration software or jumpers/switches to enable the ROM region to the desired memory address and size. |
If you have a 3C90Xx NIC such as 3C905C-TX, run the MBAFLASH.EXE utility (on the MBA Utility CD in the Update directory or on the EtherCD in the MBA subdirectory of the Installation directory). This utility programs the correct MBA software into the ROM for the specific NIC that you are using. Refer to "Programming your MBA ROM using MBAFLASH" in Chapter 3 for more details on this utility.
Use either the MBA-based configuration facility or the MBACFG utility to configure MBA's operating parameters.
To continue with PC and server installation, refer to the "Quick Setup" instructions in the chapter of this guide appropriate to your network environment (TCP/IP, PXE, NetWare, or RPL).
This section shows you how to install an MBA ROM on your NIC.
MBA is available on a PC in one of the following ways:
|
MBA Type |
Installation |
Additional Steps Required |
|
Integrated into the PC BIOS by the PC manufacturer * |
Not needed |
Go to Chapter 3 "Configuring MBA" |
|
Contained in a ROM that is pre-installed on the PC's NIC |
Not needed |
Go to Chapter 3 "Configuring MBA" |
|
Contained in a ROM that must be installed on the PC's NIC. |
Install the |
Go to Chapter 3 "Configuring MBA" |
Installing the MBA ROM is a straightforward task, but you must take care to ensure that components are not damaged. Be sure you understand the following instructions before installing MBA.
Caution: Risk of equipment damage
Before removing a NIC, attach an earth ground to the PC chassis. If an
earth ground is unavailable, ensure that the power is switched off and plug in
the PC's grounded AC power cord.
Wear an anti-static wrist strap when handling ROMs. As an additional measure,
do not touch the ROM's connectors. Leave the ROM in its conductive foam
packaging when not in use.
If you are installing MBA on a NIC that is already in your PC, remove the NIC from the PC. If you are not familiar with inserting and removing cards in your PC, refer to your NIC user guide for instructions.
Locate the boot ROM socket on your NIC. You may need to refer to the NIC's user guide to locate the correct ROM socket.
Depending on your NIC, you may have either a DIP socket (rectangular socket with two rows of pins), or a PLCC socket (small, square socket with pins on all sides). Follow the applicable procedure for either the DIP Socket Installation or the PLCC Socket Installation, then follow the procedure Installing the NIC into the PC.
DIP Socket Installation
The DIP socket should have a notch that can be indicated by a small half circle, a small triangle, or a small indentation at one end of the socket. The circuit board may also have a white rectangle around the socket which should have a notch indicated at the same end. This notch indicates the Pin 1 end of the socket. See Figure 2.
|
|
Figure 2: Inserting the DIP ROM
Look
at the MBA ROM while it is still in its protective foam. When the label on the
top of the ROM is right side up, you should see a small half circle at the left edge of the
Remove the MBA ROM from its protective foam. The pins on the ROM are very delicate, so be careful not to damage them. Align the notch on the top of the MBA ROM with the notch in the ROM socket on the NIC.
Caution: Risk
of equipment damage
If you install the MBA ROM backwards, you will destroy it! Make
sure the notch in the socket is lined up with the notch in the MBA ROM before doing anything else.
Align the pins on the ROM with the pin receptacles in the ROM socket. Press down gently and evenly on the ROM to ensure that it is seated correctly in the socket.
PLCC Socket Installation
The PLCC socket has three square corners and one angled corner. The angled corner of the ROM must be oriented to match the angled corner of the socket. See the top left corner in Figure 3.
|
|
Figure 3: Inserting the PLCC ROM
Remove the MBA ROM from its anti-static packaging, and align the angled corner of the MBA ROM with the angled corner of the ROM socket on the NIC.
Press down gently and evenly on the ROM to ensure that it is seated correctly in the socket.
Installing the NIC into the PC
Now that the ROM has been inserted into the NIC, you can install the NIC into the PC.
Insert the NIC into the PC. Refer to the NIC's user guide for installation instructions.
Some
NICs have a switch, jumper or software setting that needs to be changed to enable
the boot ROM socket; this is usually determined by the NIC's bus architecture:
|
Adapter Type |
Configuration |
|
PCI NICs and Plug and Play ISA NICs |
Often the PC automatically configures the NIC to enable the ROM to a non-conflicting address. However, sometimes you may need to run a utility to enable the ROM socket on the NIC. Refer to the NIC's user guide for information on how to set up the NIC. |
|
ISA (legacy, non Plug and Play) NICs |
Use either NIC configuration software or jumpers/switches to enable the ROM region to the desired memory address and size. |
The Boot Image Editor software can be found on the MBA Utility CD or on the MBA subdirectory on the EtherCD.
To install Boot Image Editor:
On the PC on which you want to use the Boot Image Editor (such as a server, a network administration PC, or any network client) create a directory (for example, IMGEDIT).
Copy the all the files from the IMGEDIT directory on the MBA Utility CD to the new directory.
Run the IMGEDIT.EXE application. The program detects that this is the first time it has been executed on the PC and takes you through a quick installation and configuration procedure, where you can select the appropriate network type and make file associations.
Refer to the Boot Image Editor online help for detailed installation information. Access the help from the Boot Image Editor windows or double-click the IMGEDIT.HLP file to open it.
Create a shortcut to the Boot Image Editor on your desktop or add the application to the Windows Start menu, if desired.
This chapter shows you how to configure MBA's options to suit your operating requirements.
If you are using a 3Com 3C90Xx NIC such as 3C905C-TX and if MBA was not preinstalled on the NIC, the ROM you installed must be programmed with the correct MBA software for your specific 3C90Xx NIC. To do this, run the MBAFLASH utility that is included in the UPDATE directory on the MBA Utility CD, or in the MBA subdirectory of the INSTALLATION directory on the EtherCD. MBAFLASH is the utility you use to program your boot ROM chip with MBA software. The MBA software is contained within MBAFLASH.EXE itself.
Note: If MBA is integrated into the PC BIOS you cannot update it with MBAFLASH.
Note: If you are using Windows, MBAFLASH operates only in MS-DOS real mode, not from a DOS window.
MBAFLASH detects which NIC you are using. If your NIC is one of the supported NICs, MBAFLASH displays three prompts. Use the following steps to respond to these prompts:
Step 1 - Read the License Agreement
To view the License Agreement press R to exit the program and return to DOS. Next run the BWVIEW utility found in the root directory on the MBA Utility CD or on the EtherCD in the MBA subdirectory and select the License Agreement menu item.
If you have reviewed and agree with the License Agreement, press A to continue the MBAFLASH process.
Step 2 - Back up your ROM software
Step 3 - Program your ROM
Answer Yes. MBAFLASH completes the process.
When MBAFLASH is complete run the MBACFG utility to verify that MBA options are correct for your requirements. Options are shown in the configuration tables in this chapter.
Command Line Options
Although you can use MBAFLASH interactively, you can also automate some of the process using command line options. This feature is helpful if you wish to use MBAFLASH as part of a batch file. The command line options are:
Usage: mbaflash [.ROM Filename] [/?] [/p] [/b]
options:
.ROM Filename - filename of a .ROM file that you wish to program into your ROM chip. Refer to "Updating your MBA ROM" later in this chapter. Required only if you want a different version of MBA than the one contained within MBAFLASH.EXE, e.g., to revert to the previous version using the .ROM file created by MBAFLASH in step 2 above.
/? - show this help
/p - display no prompts
/b - do not create a backup of current ROM contents
MBA 4.x is comprised of two components-the MBA base code and the Universal Network Device Interface (UNDI). The MBA base code handles all the core functionality of MBA such as protocol handling, network boot failure handling, etc. It is independent of the type of NIC being used. The UNDI handles the interface with the specific NIC. It provides NIC initialization, low-level transmit and receive functionality, etc. The MBA base code uses the UNDI to interface with the NIC. Other base code modules could also use the UNDI to obtain low-level transmit and receive functionality with the specific NIC.
In MBA 4.x, it is the UNDI that acts as the boot device. When executed, the MBA UNDI uses either of the following:
![]() The MBA base code that accompanies it when
both the UNDI and base code are included together in a ROM on a NIC or in the
PC's BIOS
The MBA base code that accompanies it when
both the UNDI and base code are included together in a ROM on a NIC or in the
PC's BIOS
![]() Another PXE-compliant base code that the MBA
UNDI tries to locate and use (which could reside in the PC's BIOS) if MBA is in
a ROM on a NIC and the MBA base code is disabled
Another PXE-compliant base code that the MBA
UNDI tries to locate and use (which could reside in the PC's BIOS) if MBA is in
a ROM on a NIC and the MBA base code is disabled
UNDI Execution
|
UNDI code in ROM with MBA base code in ROM on NIC enabled |
UNDI code in ROM with MBA base code in ROM on NIC disabled |
UNDI code in ROM with MBA base code in BIOS |
|
UNDI uses base code on NIC |
UNDI tries to locate and use another PXE-compatible base code (which could reside in BIOS) |
UNDI uses MBA base code in BIOS |
If your PC was purchased recently, it may be Plug
and Play BBS-BIOS (BIOS Boot Specification) compatible. A PC that supports Plug
and Play can automatically detect and set up devices such as CD-ROM drives, hard
disks, and NICs. The BBS specification (developed by Compaq,
Note: PC manufacturers may call their BBS support by other names such as Multiboot.
PCs that are Plug and Play BBS-BIOS compatible allow you to specify the boot order in the PC's BBS-BIOS Setup menus. Because these BIOSs can detect the existence of MBA UNDI, you can specify the position of MBA UNDI in the boot order with respect to the other boot devices. If you want the PC to always boot from the network first, be sure to put MBA UNDI at the top of the boot order list. You can also use the MBACFG utility to make MBA UNDI first in the BBS boot order. MBACFG provides a menu command that makes MBA UNDI the first boot device.
If the PC's BIOS is not BBS-compliant, MBA UNDI attempts to control the boot process (this behavior is configurable with MBA UNDI) and perform a network or local boot, depending on the configured options.
MBA has many operating options that you can configure. For a complete list of all possible options refer to the configuration tables in this chapter.
Some versions of MBA may not allow you to configure all the options listed in the tables, or a version of MBA may have some extra options for your specific NIC. Refer to the Configuration Supplement for a description of any exceptions or additions for your version of MBA. Configuration Supplements are text files that can be found on the Utility CD or in the MBA subdirectory in the Installation directory of the EtherCD. You can view them with the BWVIEW utility. If there is no Configuration Supplement for your NIC then there are no exceptions or additions. In this case, use the options exactly as listed in this guide.
With few exceptions, the current settings for the options are stored in the NIC's soft setup storage area (EEPROM) or they may be stored in the PC's CMOS memory if the MBA base code is integrated into the PC BIOS. One possible reason for the unavailability of some options is that the NIC or PC CMOS does not provide enough storage area to save all the options. In cases where some options are not available, as many options as possible are made configurable and the others are set to their default values. In the case where an option is not available, it is not displayed.
Tables on the following pages show the configuration options available for each boot method. To see the available options, select your boot method and go to the appropriate table.
|
Boot Method |
Go To |
|
TCP/IP |
Table 1: TCP/IP Configuration Options |
|
PXE |
Table : PXE Configuration Options |
|
NetWare |
Table 3: NetWare Configuration Options |
|
RPL |
Table : RPL Configuration Options |
In addition, MBA UNDI startup options are shown in Table 5: Startup Options.
Table 1: TCP/IP Configuration Options
|
Option Name |
Possible Values |
Description |
Default |
|
Protocol |
DHCP, BOOTP |
Choose the specific protocol for TCP/IP boot method. |
DHCP |
|
Default Boot |
Network |
Choose whether MBA will perform a network boot or a local hard disk boot by default. If Network boot is chosen as the default, the Local Boot Message is displayed at boot time (if a bootable device exists and Local Boot is enabled). If Local boot is chosen as the default, the Network Boot message is displayed at boot time. Not available with BBS-BIOS. |
Local |
|
Local Boot |
Enabled |
Choose between allowing or disallowing a local boot from a hard disk or diskette. When local booting is disabled, the PC is forced to boot from the network even if a bootable diskette is inserted in drive A:, or if the local hard disk contains an active partition. Not available with BBS-BIOS. |
Enabled |
|
Config Menu |
Enabled |
Choose whether to prevent access to the Configuration Screen that is built into the MBA ROM. When Disabled, the Configuration Message is not displayed. Also, when Disabled, the only method to modify the MBA options is by using the MBACFG utility. |
Enabled |
|
Config Message |
Enabled |
Choose whether to display or hide the message the MBA displays indicating to the user which hot keys to press to enter the MBA Configuration Screen, i.e. "Press Ctrl+Alt+B to configure.". You may want to hide this message so users do not know how to change MBA options, possibly making MBA function incorrectly in your environment. When the message is hidden, the hot keys can still be pressed to enter the Configuration Screen. To display the message, set this option to Enabled. To hide the message, set this option to Disabled. |
Enabled |
Table 1 continued: TCP/IP Configuration Options
|
Option Name |
Possible Values |
Description |
Default |
|
Message Timeout |
3 |
The
amount of time (in seconds) that the prompt message is displayed and waits
for user input. This includes messages such as the Configuration Message, the
Local and Network Boot Messages, and the Boot Failure Prompt. |
|
|
Boot Failure Prompt |
Wait
for Timeout |
If a network boot cannot be completed, choose whether MBA displays a message and then waits for the user to press a key before continuing or waits for 3 seconds before continuing. MBA continues by following the behavior specified by the Boot Failure option. |
Wait for Timeout |
|
Boot Failure |
Next
Boot Device |
If a network boot cannot be completed, choose whether MBA will reboot the PC or allow the PC to boot from the next boot device. On a PC with a BBS-compliant BIOS, the next boot device is the next device in the boot order list. On a PC that does not have a BBS-compliant BIOS, the next boot device is normally the hard disk. |
Next Boot Device |
|
TFTP Secure Mode |
Enabled |
Choose whether MBA uses the secure mode feature of TFTP. In secure mode, only the filename is sent to the TFTP Service. |
Disabled |
|
Booting Messages |
(User Defined) |
Choose the message text and hot key that is used to instruct the user how to boot locally when the Default Boot is set to Network, and how to boot from the network when the Default Boot is set to Local. Not available with BIOS-integrated MBA. |
"Press
H to boot from Hard Disk" |
|
TCP/IP Image Filename |
(User Defined) |
Default filename of the boot image file if a filename is not provided in either the DHCP or BOOTP response from the server. |
MBA.IMG |
Table 2: PXE Configuration Options
|
Option Name |
Possible Values |
Description |
Default |
|
Default Boot |
Network |
Choose whether MBA will perform a network boot or a local hard disk boot by default. If Network boot is chosen as the default, the Local Boot Message is displayed at boot time (if a bootable device exists and Local Boot is enabled). If Local boot is chosen as the default, the Network Boot message is displayed at boot time. Not available with BBS-BIOS. |
Local |
|
Local Boot |
Enabled |
Choose between allowing or disallowing a local boot from a hard disk or diskette. When local booting is disabled, the PC is forced to boot from the network even if a bootable diskette is inserted in drive A:, or if the local hard disk contains an active partition. Not available with BBS-BIOS. |
Enabled |
|
Config Menu |
Enabled |
Choose whether to prevent access to the Configuration Screen that is built into the MBA ROM. When Disabled, the Configuration Message is not displayed. Also, when disabled, the only method to modify the MBA options is by using the MBACFG utility. |
Enabled |
|
Config Message |
Enabled |
Choose whether to display or hide the message the MBA displays indicating to the user which hot keys to press to enter the MBA Configuration Screen, i.e. "Press Ctrl+Alt+B to configure.". You may want to hide this message so users do not know how to change MBA options, possibly making MBA function incorrectly in your environment. When the message is hidden, the hot keys can still be pressed to enter the Configuration Screen. To display the message, set this option to Enabled. To hide the message, set this option to Disabled. |
Enabled |
|
Message Timeout |
3 |
The
amount of time (in seconds) that the prompt message is displayed and waits
for user input. This includes messages such as the Configuration Message, the
Local and Network Boot Messages, and the Boot Failure Prompt. |
|
|
Boot Failure Prompt |
Wait
for Timeout |
If a network boot cannot be completed, choose whether MBA displays a message and then waits for the user to press a key before continuing or waits for 3 seconds before continuing. MBA continues by following the behavior specified by the Boot Failure option. |
Wait for Timeout |
Table 2 continued: PXE Configuration Options
|
Option Name |
Possible Values |
Description |
Default |
|
Boot Failure |
Next
BBS Device |
If a network boot cannot be completed, choose whether MBA will reboot the PC or allow the PC to boot from the next boot device. On a PC with a BBS-compliant BIOS, the next boot device is the next device in the boot order list. On a PC that does not have a BBS-compliant BIOS, the next boot device is normally the hard disk. |
Next BBS Device |
|
Booting Messages |
(User Defined) |
Choose the message text and hot key that is used to instruct the user how to boot locally when the Default Boot is set to Network, and how to boot from the network when the Default Boot is set to Local. Not available with BIOS-integrated MBA. |
"Press H to boot from Hard Disk" |
Table 3: NetWare Configuration Options
|
Option Name |
Possible Values |
Description |
Default |
|
Protocol |
802.2, 802.3, Ethernet II |
Choose the specific frame type for NetWare boot methods. |
|
|
Default Boot |
Network |
Choose whether MBA will perform a network boot or a local hard disk boot by default. If Network boot is chosen as the default, the Local Boot Message is displayed at boot time (if a bootable device exists and Local Boot is enabled). If Local boot is chosen as the default, the Network Boot message is displayed at boot time. Not available with BBS-BIOS. |
Local |
|
Local Boot |
Enabled |
Choose between allowing or disallowing a local boot from a hard disk or diskette. When local booting is disabled, the PC is forced to boot from the network even if a bootable diskette is inserted in drive A:, or if the local hard disk contains an active partition. Not available with BBS-BIOS. |
Enabled |
|
Config Menu |
Enabled |
Choose whether to prevent access to the Configuration Screen that is built into the MBA ROM. When Disabled, the Configuration Message is not displayed. Also, when disabled, the only method to modify the MBA options is by using the MBACFG utility. |
Enabled |
Table 3 continued: NetWare Configuration Options
|
Option Name |
Possible Values |
Description |
Default |
|
Config Message |
Enabled |
Choose whether to display or hide the message the MBA displays indicating to the user which hot keys to press to enter the MBA Configuration Screen, i.e. "Press Ctrl+Alt+B to configure.". You may want to hide this message so users do not know how to change MBA options, possibly making MBA function incorrectly in your environment. When the message is hidden, the hot keys can still be pressed to enter the Configuration Screen. To display the message, set this option to Enabled. To hide the message, set this option to Disabled. |
Enabled |
|
Message Timeout |
3 |
The
amount of time (in seconds) that the prompt message is displayed and waits
for user input. This includes messages such as the Configuration Message, the
Local and Network Boot Messages, and the Boot Failure Prompt. |
|
|
Boot Failure Prompt |
Wait
for Timeout |
If a network boot cannot be completed, choose whether MBA displays a message and then waits for the user to press a key before continuing or waits for 3 seconds before continuing. MBA continues by following the behavior specified by the Boot Failure option. |
Wait for Timeout |
|
Boot Failure |
Next
BBS Device |
If a network boot cannot be completed, choose whether MBA will reboot the PC or allow the PC to boot from the next boot device. On a PC with a BBS-compliant BIOS, the next boot device is the next device in the boot order list. On a PC that does not have a BBS-compliant BIOS, the next boot device is normally the hard disk. |
Next BBS Device |
|
MSD |
Enabled |
Choose whether to use the MSD functionality to direct a PC to boot from a particular server. Refer to "Multiple Servers: How the MSD NLM Can Help" for a further description on MSD. |
Enabled |
Table 3 continued: NetWare Configuration Options
|
Option Name |
Possible Values |
Description |
Default |
|
Scan BOOTCONF.SYS |
Enabled |
Choose whether MBA scans the BOOTCONF.SYS file to determine the boot image filename for the PC. If disabled, MBA uses the default boot image filename. |
Enabled |
|
NetWare Image Filename |
(User Defined) |
Default filename of the boot image file. The filename is used if no entry is found in BOOTCONF.SYS or if the file contents in BOOTCONF.SYS are not found. If this file is not found then NET$DOS.SYS is used. Not available with BIOS-integrated MBA. |
NET$DOS.SYS |
|
Booting Messages |
(User Defined) |
Choose the message text and hot key that is used to instruct the user how to boot locally when the Default Boot is set to Network, and how to boot from the network when the Default Boot is set to Local. Not available with BIOS-integrated MBA. |
"Press
H to boot from Hard Disk" |
Table 4: RPL Configuration Options
|
Option Name |
Possible Values |
Description |
Default |
|
Default Boot |
Network |
Choose whether MBA will perform a network boot or a local hard disk boot by default. If Network boot is chosen as the default, the Local Boot Message is displayed at boot time (if a bootable device exists and Local Boot is enabled). If Local boot is chosen as the default, the Network Boot message is displayed at boot time. Not available with BBS-BIOS. |
Local |
|
Local Boot |
Enabled |
Choose between allowing or disallowing a local boot from a hard disk or diskette. When local booting is disabled, the PC is forced to boot from the network even if a bootable diskette is inserted in drive A:, or if the local hard disk contains an active partition. Not available with BBS-BIOS. |
Enabled |
|
Config Menu |
Enabled |
Choose whether to prevent access to the Configuration Screen that is built into the MBA ROM. When Disabled, the Configuration Message is not displayed. Also, when disabled, the only method to modify the MBA options is by using the MBACFG utility. |
Enabled |
Table 4 continued: RPL Configuration Options
|
Option Name |
Possible Values |
Description |
Default |
|
Config Message |
Enabled |
Choose whether to display or hide the message the MBA displays indicating to the user which hot keys to press to enter the MBA Configuration Screen, i.e. "Press Ctrl+Alt+B to configure.". You may want to hide this message so users do not know how to change MBA options, possibly making MBA function incorrectly in your environment. When the message is hidden, the hot keys can still be pressed to enter the Configuration Screen. To display the message, set this option to Enabled. To hide the message, set this option to Disabled. |
Enabled |
|
Message Timeout |
3 |
The
amount of time (in seconds) that the prompt message is displayed and waits
for user input. This includes messages such as the Configuration Message, the
Local and Network Boot Messages, and the Boot Failure Prompt. |
|
|
Boot Failure Prompt |
Wait
for Timeout |
If a network boot cannot be completed, choose whether MBA displays a message and then waits for the user to press a key before continuing or waits for 3 seconds before continuing. MBA continues by following the behavior specified by the Boot Failure option. |
Wait for Timeout |
|
Boot Failure |
Next
BBS Device |
If a network boot cannot be completed, choose whether MBA will reboot the PC or allow the PC to boot from the next boot device. On a PC with a BBS-compliant BIOS, the next boot device is the next device in the boot order list. On a PC that does not have a BBS-compliant BIOS, the next boot device is normally the hard disk. |
Next BBS Device |
|
Booting Messages |
(User Defined) |
Choose the message text and hot key that is used to instruct the user how to boot locally when the Default Boot is set to Network, and how to boot from the network when the Default Boot is set to Local. Not available with BIOS-integrated MBA. |
"Press
H to boot from Hard Disk" |
The following startup options are available only when an MBA UNDI is used. If an UNDI developed by another vendor is used with the MBA base code, these options are not available.
Table 5 Startup Options
|
Option Name |
Possible Values |
Description |
Default |
|
Boot Control |
Auto
Detection |
Choose the method that MBA UNDI participates in the PC's booting process. All PCs have two system interrupts involved when the PC starts-Interrupt 18 (ROM BASIC/Boot Failure) and Interrupt 19 (Bootstrap Loader). Before the BBS specification was created, boot firmware such as MBA would take control of one or both of these interrupts so it would be executed during the PC boot process. With the BBS specification, this is no longer required and the PC's BIOS executes the boot device, such as MBA, as specified in the boot order. Choose Auto Detection to enable MBA UNDI to detect whether the PC has a BBS-compliant BIOS. If so, BIOS executes MBA UNDI as its position in the boot order dictates. If not, MBA UNDI takes over interrupt 18 and 19 and forces its execution when the PC boots. Choose Interrupt 18 or Interrupt 19 to have MBA take control of these settings. This may be necessary if MBA UNDI incorrectly detects that the PC has a BBS BIOS when in fact it does not. If either of these interrupts is selected on a PC that has a BBS BIOS, the BBS boot order is ignored and the PC is always booted using MBA UNDI. MBA behavior and options are present as though the PC does not have a BBS BIOS. Choose the BBS Boot Order setting to enable the MBA UNDI to execute as specified in the boot order of a BBS BIOS. This may be necessary if MBA UNDI incorrectly detects that the PC does not have a BBS BIOS when in fact it does. If this setting is selected on a PC that does not have a BBS BIOS, MBA UNDI will never be executed. You should be familiar with the technical aspects of the PC boot process before modifying these settings. |
Auto Detection |
|
ROM MBA Base Code |
Enabled |
If
your MBA is integrated in a ROM on a NIC and not integrated into the BIOS,
you can disable the MBA base code. When the MBA base code is disabled and the
MBA UNDI is executed (either by a BBS BIOS or by taking control of Interrupt
18 and/or 19), the MBA UNDI tries to locate another PXE-compatible base code
(which could reside in the PC's BIOS). This allows the MBA UNDI on a specific
NIC to use a base code that is different than the base code contained in the |
Enabled |
Table 5 continued: Startup Options
|
Option Name |
Possible Values |
Description |
Default |
|
Network Service Boot |
Enabled |
Network Service Boot (NSB) allows the user to force a network boot when the PC is booting up regardless of the position of MBA in the BBS boot order. When this option is enabled, MBA displays the message "Press F12 to boot from network". If the user presses F12, MBA will force a network boot. This is useful in the case where a client PC normally boots the operating system from its local hard disk, but on a specific occasion (when the user requires an operation at boot time to be performed remotely from a server) the user can press F12 to force a network boot. On a BBS-PC, if this option is used, then MBA should not be first in the BBS Boot order. If it is, then Network Service Boot is not needed since the PC normally boots from the network anyway. On a non-BBS PC, this option isn't applicable because Network booting and Local booting are controlled by the Default Boot and Local Boot options in MBA. On non-BBS PCs, this option is ignored. Some BIOSs have their own implementation of NSB. If these BIOSs are compliant with the System Management BIOS (SMBIOS) Reference Specification v2.3, they have an indication whether they have NSB functionality implemented. MBA checks for this indication and, if it indicates that NSB is implemented by the BIOS, MBA will not perform NSB functionality. The BIOS's NSB implementation takes precedence and MBA ignores this NSB option. In this case, you must enable or disable NSB via the BIOS's setup screen. If a BIOS has implemented NSB but does not have the indication (because it is not SMBIOS v2.3 compliant) then you should disable this NSB option in MBA and use the BIOS's implementation. Otherwise, you may get two messages that prompt the user to press F12, and the MBA and BIOS implementation may conflict if F12 is pressed. |
Disabled |
You can configure, view, and change the options in two ways:
![]() using the MBA-based Configuration Screen that
is built into the MBA base code. It is not available if the MBA base code is
disabled.
using the MBA-based Configuration Screen that
is built into the MBA base code. It is not available if the MBA base code is
disabled.
![]() using the MBACFG utility
using the MBACFG utility
Both methods are described in the following sections.
When the MBA is executed, it displays a configuration message as follows:
" Initializing MBA. Press Ctrl+Alt+B to configure."
If you press the hot keys while the message is displayed, you enter the MBA-based Configuration Screen.
You can specify the amount of time that the configuration message is displayed, whether the message should not be displayed, and whether access to the MBA-based configuration should be disabled.

Figure 4: MBA-Based Configuration Screen
For security reasons, not all options are available from the MBA-based Configuration Screen. However, all options are available to the administrator using the MBACFG utility (see the next section). The options that are available from the MBA-based configuration screen are:
![]() Boot Method
Boot Method
![]() Protocol
Protocol
![]() Default Boot
Default Boot
![]() Local Boot
Local Boot
![]() Configuration Message
Configuration Message
![]() Message Timeout
Message Timeout
![]() Boot Failure Prompt
Boot Failure Prompt
![]() Boot Failure
Boot Failure
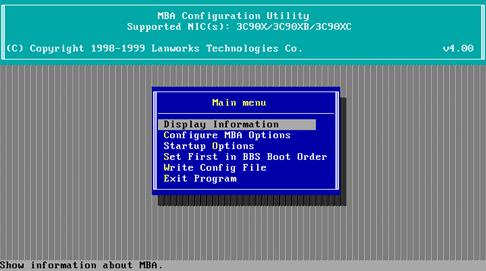
Figure 5: MBACFG Main Menu
This utility is located on the Utility CD in the Update directory or in the MBA subdirectory in the Installation directory of the EtherCD. All configurable options are available using MBACFG. When you use MBACFG, you may change MBA options in one of the following ways:
![]() Use MBACFG's menus interactively
Use MBACFG's menus interactively
![]() Specify options on MBACFG's command line
Specify options on MBACFG's command line
![]() Specify a configuration file that contains all
the options
Specify a configuration file that contains all
the options
Note: If you are using Windows, MBACFG operates only in MS-DOS real mode, not from a DOS window.
MBACFG syntax
Usage: mbacfg [/x] [/i] [/sX] [@configuration file | parameter list]
options:
/? - show this help
/x - reboot the PC after configuring with the new settings
/I - display ROM information
/sX - if multiple NICs with MBA are in the PC, select MBA number X in the list
When you execute MBACFG on a PC containing more than one NIC with MBA, MBACFG will display a selection menu which lists the MBAs that it finds. You can then select the MBA that you wish to configure. The selection menu will show some technical information on each MBA; such as the PCI Device and Vendor IDs, the PCI Bus and Slot numbers, and whether the MBA resides on a NIC or is integrated into the PC BIOS. You may use this information to identify the specific MBA that you wish to select. You may also use the /s command line option to automatically select a NIC from the selection menu list.
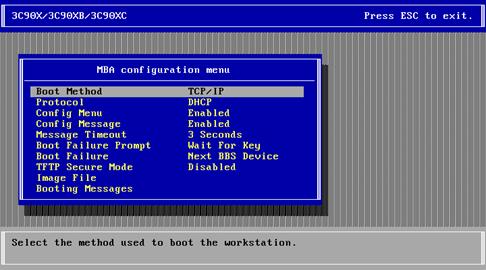
Figure 6: MBACFG Utility Screen
MBACFG can create a .CFG file that lists all configurable options and their possible settings supported by MBA. The .CFG file, named MBA.CFG, is NIC-specific. The following is an example of the format of the configuration file.
To select an option, remove the comment symbol (;) at the start of the line. When the .CFG file is created, the current settings are uncommented, allowing you to use the file to easily reprogram other ROMs to the same configuration.
;Boot Method
;Boot Method=TCP/IP
;Boot Method=NetWare
;Boot Method=RPL
;Boot Method=PXE
;NetWare Protocols
;Protocol=802.3
;Protocol=802.2
;Protocol=Ethernet II
;TCP/IP Protocols
;Protocol=BOOTP
;Protocol=DHCP
;General settings
;Boot Failure=Next Boot Device
;Boot Failure=Reboot
;Config Menu=Enabled
;Config Menu=Disabled
;Config Message=Enabled
;Config Message=Disabled
;Message Timeout=Forever
;Message Timeout=3 seconds
;Message Timeout=6 seconds
;Message Timeout=12 seconds
;Boot Failure Prompt=Wait for Timeout
;Boot Failure Prompt=Wait for Key
;Netware Options
;MSD=Enabled
;MSD=Disabled
;Scan BOOTCONF.SYS=Enabled
;Scan BOOTCONF.SYS=Disabled
;TCP/IP options
;TFTP Secure Mode=Disabled
;TFTP Secure Mode=Enabled
;Startup options
;Boot Control=Auto Detection
;Boot Control=Interrupt 19
;Boot Control=Interrupt 18
;Boot Control=BBS Boot Order
;ROM MBA Base Code=Enabled
;ROM MBA Base Code=Disabled
;Network Service
Boot=Disabled
;Network Service Boot=Enabled
;Text options
;Network prompt=H,Press H to
boot from hard disk.
;Network prompt=N,Press N to boot from network
;Boot file name=
To use the configuration file to re-configure MBA, include the filename on the MBACFG command line preceded by "@" as follows:
mbacfg @mba.cfg
MBA options can also be entered on the MBACFG command line, a convenience if you need to change only a few values. The option name is the same as shown in the previous sample configuration file. When typing the option on the command line, change all spaces to an underscore character, or enclose the option in quotes. For example, the default boot device could be entered as either of the following:
"default
boot=network"
or
default_boot=network
There are two main reasons why you would want to update your MBA ROM:
![]() To update to a newer version, or.
To update to a newer version, or.
![]() To restore a previous backed-up version
To restore a previous backed-up version
As operating systems, hardware platforms, and protocols evolve, you may need to update to a newer version of MBA that supports your environment. Also, when newer versions of MBA are released, you may want to upgrade to take advantage of enhanced functionality or problem resolution.
If your NIC supports updateable (i.e., flashable) ROMs, you can
update your ROM using the MBAFLASH utility. MBAFLASH contains the MBA software
within itself and will program your ROM chip with this software. Therefore, you
must obtain the MBAFLASH for the version of MBA that you want to program into
your
Note: You can only upgrade MBA when MBA is implemented in a ROM chip on a NIC. If your MBA is integrated into the system BIOS you must contact your PC vendor for updates.
Command Line Options
Although you can use MBAFLASH interactively, you can also automate some of the process using command line options. This feature is helpful if you wish to use MBAFLASH as part of a batch file. The command line options are:
Usage: mbaflash [.ROM Filename] [/?] [/p] [/b] [/0] [/sX]
options:
.ROM Filename - filename of a .ROM file that you wish to program into your ROM chip instead of using the MBA version that is within MBAFLASH.EXE
- show this help
/p - display no prompts
/b - do not create a backup of current ROM contents
- reset all MBA options to default values after updating MBA
/sX - if multiple NICs with MBA are in the PC, select MBA number X in the list
Note: If you are using Windows, MBAFLASH operates only in MS-DOS real mode, not from a DOS window.
If your NIC does not support updateable ROMs, you must remove the NIC from the PC and replace the ROM chip with a newer version.
When you execute MBAFLASH on a PC containing more than one NIC, MBAFLASH will display a selection menu which lists the NICs that it finds. You can then select the NIC that you wish to update with MBA software. The selection menu will show some technical information on each NIC; such as the PCI Device and Vendor IDs, the PCI Bus and Slot numbers, and the name of the NIC. You may use this information to identify the specific NIC that you wish to select. You may also use the /s command line option to automatically select a NIC from the selection menu list.
MBAFLASH contains within itself MBA software code that it programs into the ROM chip on your NIC. You can override this self-contained MBA software and instruct MBAFLASH to use another version of MBA software instead. To do this you must specify, on the command line, the filename of the .ROM file that contains the MBA software that you want MBAFLASH to use; for example:
mbaflash 8109401.ROM
This method is used to restore a backup version of ROM code that was created by MBAFLASH. When you use MBAFLASH to update your ROM, it asks you whether you wish to make a backup of the current software in your ROM before it programs your ROM with a different version. If you answer Yes to this prompt, MBAFLASH creates a .ROM file that contains the backup version. If you wish to go back to the backup version, you simply run MBAFLASH and specify the backup ROM file that MBAFLASH created.
MBA .ROM filenames used by MBAFLASH are in the following format:
xyyyzzz.ROM
Where
![]() x is the protocol (7=Tri-protocol, 8=MBA)
x is the protocol (7=Tri-protocol, 8=MBA)
![]() yyy is the unique MBA type number corresponding
to the PC's NIC
yyy is the unique MBA type number corresponding
to the PC's NIC
![]() zzz is the MBA version number
zzz is the MBA version number
PCs based on 64-bit Intel Architecture (IA-64 or Itanium) have an interface between operating systems and platform firmware called Extensible Firmware Interface (EFI).
When a 3Com NIC with MBA is used in a PC with EFI, the following conditions occur:
![]() EFI contains the boot ROM base code.
Depending on the PC manufacturer, EFI may contain MBA base code or may contain
only PXE base code. If EFI contains MBA base code, most MBA options will still
be available. If EFI contains only PXE base code, the MBA base code is not
used. In this case, the PXE base code in EFI will use only the UNDI portion of
MBA to perform network booting. As a result, all MBA Options are unavailable,
i.e. PXE is the only available boot method and all other configurable MBA
options (e.g. Boot Failure Prompt, Boot Failure, Config Menu, etc.) are
unavailable. For more information on MBA base code and UNDI, refer to "MBA Base Code and UNDI Components" earlier in
this chapter.
EFI contains the boot ROM base code.
Depending on the PC manufacturer, EFI may contain MBA base code or may contain
only PXE base code. If EFI contains MBA base code, most MBA options will still
be available. If EFI contains only PXE base code, the MBA base code is not
used. In this case, the PXE base code in EFI will use only the UNDI portion of
MBA to perform network booting. As a result, all MBA Options are unavailable,
i.e. PXE is the only available boot method and all other configurable MBA
options (e.g. Boot Failure Prompt, Boot Failure, Config Menu, etc.) are
unavailable. For more information on MBA base code and UNDI, refer to "MBA Base Code and UNDI Components" earlier in
this chapter.
![]() In most cases, depending on the PC
manufacturer, DOS cannot be executed IA-64 PCs. Therefore, all DOS-based MBA
utilities (described in later chapters) and MBA pre-OS functionality are
unavailable.
In most cases, depending on the PC
manufacturer, DOS cannot be executed IA-64 PCs. Therefore, all DOS-based MBA
utilities (described in later chapters) and MBA pre-OS functionality are
unavailable.
Typically, MBA is available as a NIC-specific option ROM or integrated as part of the PC's main BIOS. However, it also also available via a universal floppy (or CD) disk-based boot agent. This disk-based boot agent is called MBA on Disk and supports a wide variety of 3Com network adapters.
Why a Disk-Based Boot Agent?
![]() A simple and universal means to provide the
client PC requirements needed to perform remote desktop OS deployment/disaster
recovery; no need to change PC or NIC-specific settings (no need to enable MBA
on the NIC or make network boot the highest priority boot device within the
BIOS)
A simple and universal means to provide the
client PC requirements needed to perform remote desktop OS deployment/disaster
recovery; no need to change PC or NIC-specific settings (no need to enable MBA
on the NIC or make network boot the highest priority boot device within the
BIOS)
![]() MBA on Disk is the only Wired for Management
2.0-compliant tool available that enables:
MBA on Disk is the only Wired for Management
2.0-compliant tool available that enables:
PCs with a LAN CardBus PC Card that does not
contain a boot
PCs with a LAN CardBus PC Card that does contain a boot ROM, but the PC BIOS does not enable the CardBus when the PC is booting resulting in the PC Card being inaccessible.
PCs with USB but lacking a NIC.
The installed based of legacy 3C509(B) ISA NICs.
![]() For those who require the latest version of
MBA but have an older version of MBA or PXE embedded in the system BIOS and
can't wait for a PC manufacturers' BIOS update, disk-based MBA can get you up
and running with the new version right away.
For those who require the latest version of
MBA but have an older version of MBA or PXE embedded in the system BIOS and
can't wait for a PC manufacturers' BIOS update, disk-based MBA can get you up
and running with the new version right away.
Differences Compared to Firmware-Based MBA
You cannot use the following MBA utilities with MBA on Disk: MBACFG, MBAFLASH, ROMSCAN, ROMTYPE, and CHKID.
The following MBA configuration options are not available with MBA on Disk: Default Boot, Local Boot, Config Menu, Config Message, Message Timeout, Boot Failure Prompt, Boot Failure, and Booting Messages.
Configuring MBA options: All configuration of MBA options (e.g., boot protocol) are done using the Windows-based disk generator application (MBADISK.EXE). When a client PC is booted using the created disk, the MBA options that were set up in the generator application when the disk was created will be in effect. The configuration methods available with an MBA boot ROM, such as using the Ctrl+Alt+B hot key at boot time and using the DOS-based MBA configuration utility (MBACFG.EXE) utility, are not applicable with disk-based MBA.
Finally, if you fail to boot with disk-based MBA, control will not return to the BIOS-an error message will appear and no other devices in your boot order list will be attempted.
Generating an MBA Boot Floppy Disk
To generate an MBA boot floppy disk, you first run the Windows-based MBA disk creator application, MBADISK (included on the MBA Utility CD in the Utils subdirectory or in the MBA subdirectory on the EtherCD). Next, using the Configuration dialog box, you need to configure the MBA options such as selecting the desired boot method (PXE, NetWare, TCP/IP, RPL), boot protocol, etc. Finally, you insert a blank disk into your floppy disk drive and click on the Create Disk button and a disk will be created.
The MBA boot floppy can be readily made into a bootable CD using popular CD authoring applications such as Adaptec's Easy CD Creator (ISO9660 must be selected as the file system and ensure the Bootable option is selected).
Supported NICs
MBA on Disk supports most 3Com NICs. For a list of supported adapters, run Windows-based MBA disk creator application, MBADISK, and click on the Adapter List button.
When you turn on your PC, the following sequence of events occur:
![]() Your PC performs its usual initial tests and
setup, such as a memory test.
Your PC performs its usual initial tests and
setup, such as a memory test.
![]() MBA displays its configuration message
"Initializing MBA. Press Ctrl+Alt+B to configure.".
MBA displays its configuration message
"Initializing MBA. Press Ctrl+Alt+B to configure.".
![]() The subsequent events vary depending on
whether your PC contains a BBS-compliant BIOS.
The subsequent events vary depending on
whether your PC contains a BBS-compliant BIOS.
With a non-BBS BIOS
![]() If a diskette is detected in drive A:, and
local boot options are enabled, drive A: is treated as the boot device without
any intervention from the user. MBA removes itself from the system memory at
this point.
If a diskette is detected in drive A:, and
local boot options are enabled, drive A: is treated as the boot device without
any intervention from the user. MBA removes itself from the system memory at
this point.
![]() The message: "Type H to boot from Hard disk"
or "Type N to boot from Network" appears (depending on how MBA is configured,
and whether there is a hard disk present in the PC). You have a period of time
(based on the Message Timeout option) to press the appropriate key before the
default boot device is selected automatically. At this point you can press any
key other than H or N to tell MBA to boot from the default boot device without
waiting the full time period.
The message: "Type H to boot from Hard disk"
or "Type N to boot from Network" appears (depending on how MBA is configured,
and whether there is a hard disk present in the PC). You have a period of time
(based on the Message Timeout option) to press the appropriate key before the
default boot device is selected automatically. At this point you can press any
key other than H or N to tell MBA to boot from the default boot device without
waiting the full time period.
![]() If the hard disk is chosen as the boot device,
MBA removes itself from the system memory. If the network is chosen as the boot
device, MBA attempts to transfer the boot files from the network server and
then transfer control to these boot files.
If the hard disk is chosen as the boot device,
MBA removes itself from the system memory. If the network is chosen as the boot
device, MBA attempts to transfer the boot files from the network server and
then transfer control to these boot files.
With a BBS BIOS
![]() If "MBA UNDI" is positioned first in the boot
order (refer to "Setting the
Boot Order on PCs with BBS BIOS"
in Chapter 3), MBA attempts to transfer the boot files from the network server
and then transfer control to these boot files.
If "MBA UNDI" is positioned first in the boot
order (refer to "Setting the
Boot Order on PCs with BBS BIOS"
in Chapter 3), MBA attempts to transfer the boot files from the network server
and then transfer control to these boot files.
![]() If "MBA UNDI" is not positioned first in the
boot order, it is executed only if the devices that preceded MBA UNDI in the
boot order fail to boot.
If "MBA UNDI" is not positioned first in the
boot order, it is executed only if the devices that preceded MBA UNDI in the
boot order fail to boot.
At this point, if MBA attempts to perform a network boot and fails, it may be because you have not set up your server to support network booting. See the appropriate chapter of this guide for your network protocol.
If network booting is unsuccessful (for example the server is down), MBA's behavior depends on the current settings of the Boot Failure Prompt and Boot Failure options.
Before MBA performs any action, it will check the current setting of the Boot Failure Prompt option. If the option is set to Wait for Key, MBA will display a message indicating what the next action will be (i.e. either reboot or continue), prompt the user to press a key, and then wait for a key to be pressed. If the option is set to Wait for Timeout, MBA will wait for 3 seconds and then perform the action.
The action MBA takes is based on the current setting of the Boot Failure option. MBA will either reboot the PC or allow the PC to boot from the next boot device. On a PC with a BBS-compliant BIOS, the next boot device is the next device in the boot order list. On a PC that does not have a BBS-compliant BIOS, the next boot device is normally the hard disk.
During a normal boot, MBA displays minimal information on the screen. If an error occurs during the boot process, an error message is displayed. However, if you wish to see more status information during the boot process you can set MBA to a special verbose mode.
To display more status information, press and hold the v key or Ctrl+Alt before MBA begins to execute. On most PCs, you can do this immediately after the completion of the memory test. Release the key(s) once MBA has started to execute.
You can have MBA display information about itself; such as internal version numbers and settings. This information is useful when reporting any problems to technical support.
To display MBA information, press and hold both Shift keys
simultaneously before MBA begins to execute. On most PCs, you can do this
immediately after the completion of the memory test. MBA displays a green
information screen.
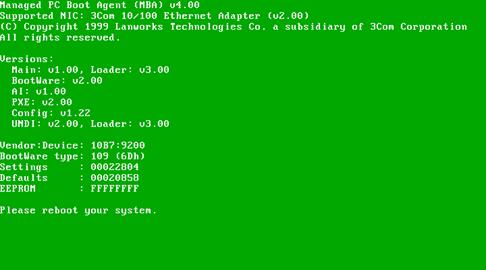
Figure 7: MBA Information Screen
The following troubleshooting notes apply to all MBA environments.
If your PC's BIOS is not BBS-compatible, then compatibility problems may arise when using MBA in PCs that contain certain types of hard disk controller or SCSI controllers, specifically those that have BIOS option ROMs on board.
MBA uses the same method as the hard disk or SCSI controller to control the PC's boot process. The device that initiates this method last controls the boot process for the PC and the other device is not usable. This is not a problem for PCs with a BBS-compatible BIOS. Selecting Interrupt 19 or Interrupt 18 boot control may solve these problems. Refer to Table 5: Startup Options for more information.
The ROMSCAN utility is valuable when troubleshooting MBA installations. By using ROMSCAN prior to configuring your NIC, you can discover the areas in the ROM Autoscan region that are already occupied by ROM or RAM options.
Run ROMSCAN after MBA is installed to verify whether your NIC's ROM base (and ROM enable) options were set correctly, and that no memory conflicts exist. On a NetWare network, ROMSCAN also reports your PC's network and node address if an ODI driver is loaded.
ROMSCAN can also be used to identify which version of MBA you have when calling for technical support.
When you run ROMSCAN after MBA is correctly installed in your NIC, ROMSCAN displays a screen similar to Figure 8:
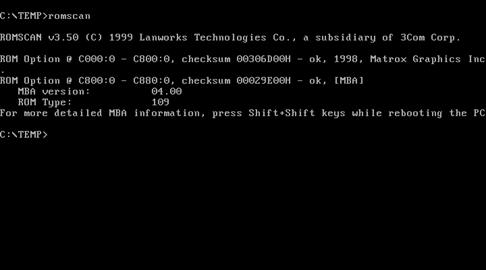
Figure 8: ROMSCAN screen
In this example, ROMSCAN located the ROM from a VGA adapter and an MBA ROM.
For detailed capabilities information, run ROMSCAN with the "/c" command line option.
ROMSCAN Cannot Find MBA
There could be a number of reasons for this:
![]() ROM
installed backwards: Ensure that you put the MBA ROM in the socket
correctly, verifying the notch in the socket lined up with the notch in the
ROM
installed backwards: Ensure that you put the MBA ROM in the socket
correctly, verifying the notch in the socket lined up with the notch in the
![]() ROM not
enabled: On some NICs, when you install a ROM in the ROM socket, you must
also run configuration software to enable the ROM region. Other (older) NICs
require the ROM region to be enabled by changing a switch setting or installing
a jumper. Refer to the NIC's documentation.
ROM not
enabled: On some NICs, when you install a ROM in the ROM socket, you must
also run configuration software to enable the ROM region. Other (older) NICs
require the ROM region to be enabled by changing a switch setting or installing
a jumper. Refer to the NIC's documentation.
![]() ROM
pin(s) bent: Check carefully
that all of the MBA ROM's pins are securely installed in the ROM socket.
Sometimes one or more of the pins is bent in or out, and does not make a good
connection with the socket. If any pins are bent, remove the ROM, carefully
straighten the pins, and insert the MBA ROM into the socket once again.
ROM
pin(s) bent: Check carefully
that all of the MBA ROM's pins are securely installed in the ROM socket.
Sometimes one or more of the pins is bent in or out, and does not make a good
connection with the socket. If any pins are bent, remove the ROM, carefully
straighten the pins, and insert the MBA ROM into the socket once again.
![]() Memory
conflict: It could be that you have set up your NIC memory base to conflict
with another option in your system, or you have selected a base address in the
E000:0 range. You cannot use the E000:0h range in most PCs. Try configuring
your NIC for another memory base address.
Memory
conflict: It could be that you have set up your NIC memory base to conflict
with another option in your system, or you have selected a base address in the
E000:0 range. You cannot use the E000:0h range in most PCs. Try configuring
your NIC for another memory base address.
MBA Not Executing
Your MBA may not seem to be executing at all. If you do not see general MBA messages displayed on the screen such as "Managed PC Boot Agent (MBA)", the MBA version number, and the Lanworks copyright statement, it may be because your PC has a BBS-compliant BIOS and the MBA is not positioned properly in the boot order. Refer to "Setting the Boot Order on PC's with BBS BIOS" for an explanation of how to do this. You may also have the Base Code disabled. See "Table 5: Startup Options."
Pre-OS software, included with MBA, enables a PC to download and execute centrally-administered desktop management agents from a network server prior to actually loading the client operating system from the local hard drive. This is accomplished by the PC remotebooting using any of the MBA protocols except RPL. After loading and executing the remote operating system, agents and other software, the PC can exit the Pre-OS boot and boot from its local hard disk.
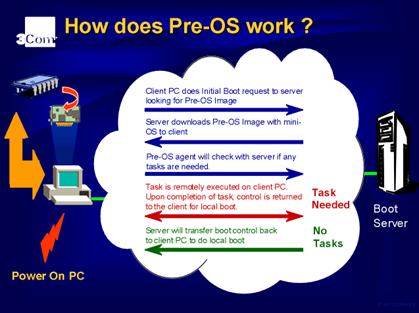
Figure 9: How Pre-OS works
Agents from the popular desktop management applications could perform a variety of tasks including:
![]() Initial installation of the operating system
and applications to the PC hard drive (including initial formatting and
partitioning if required)
Initial installation of the operating system
and applications to the PC hard drive (including initial formatting and
partitioning if required)
![]() Scanning for and eradicating local hard disk
viruses
Scanning for and eradicating local hard disk
viruses
![]() Searching the hard disk for file system
inconsistencies. If critical components are missing or damaged, they can be
retrieved and replaced; alternatively, the desktop management software allows
an administrator to perform a remote rescue by examining the crippled client
environment and fixing it from their management console
Searching the hard disk for file system
inconsistencies. If critical components are missing or damaged, they can be
retrieved and replaced; alternatively, the desktop management software allows
an administrator to perform a remote rescue by examining the crippled client
environment and fixing it from their management console
![]() Updating outdated drivers found on the client
hard drive with newer ones located on the file server
Updating outdated drivers found on the client
hard drive with newer ones located on the file server
![]() Scanning for changes in PC hardware and
software components, and logging them centrally
Scanning for changes in PC hardware and
software components, and logging them centrally
Once all desktop management agents complete execution the PC continues booting as usual from its local hard drive. No user awareness or intervention is required.
|
|
Figure 10: What Pre-OS Does
In the past, client PCs using remoteboot ROMs could boot in only
one of two ways: from a server-based boot image file or from their hard drives.
The Pre-OS approach is a hybrid; the centrally-booted operating system is not
the ultimate operating system but rather a temporary environment created for
executing management applications. Ultimately, clients exit the Pre-OS
environment and continue to boot from their local hard drive. Exiting the
Pre-OS environment is similar to executing a very soft Ctrl+Alt+
This entire concept, which we call "Pre-OS managed booting", or simply "Pre-OS", is based on existing MBA firmware capabilities, extended by any desktop management agents contained in a special boot image file.
The Pre-OS framework is essentially a DOS client with optional network connectivity. The Pre-OS boot image is executed as a drive A: RAM disk residing in extended memory.
Most Pre-OS environments use a network connection to map network drives. Regular network drivers may be loaded from the Pre-OS image, and this in no way affects the Pre-OS environment or RAM drive operation.
If any network login is needed during the Pre-OS phase, it is typically as a guest user, so that the user is not prompted to provide login name or password information.
Pre-OS desktop management agents themselves may reside either within the image, or may be executed in place from a mapped network drive.
Pre-OS environments are supported by MBA configured for either TCP/IP (BOOTP, DHCP), PXE, or NetWare protocol configurations. RPL configurations are not supported.
Boot image files that create a Pre-OS connection cause the PC to:
Load a temporary version of DOS
Perform the specified maintenance tasks
Unload DOS
Resume (with the PBOOT utility rather than user intervention) loading the operating system from the hard drive whatever form that operating system takes
Connection, in a way, is like booting from a floppy drive, removing the boot floppy, and then rebooting from a hard drive.
From the user's point of view, the sequence is as follows:
The end-user powers on or restarts the client PC.
A Pre-OS connection is created by the boot image file on the server. No end-user intervention or awareness is required.
The specified desktop maintenance applications are executed and the required actions can be taken.
Control is passed from the Pre-OS image to the hard drive.
The PC loads the end-user's operating system from the local hard drive.
The end-user logs into the network as usual.
Creating Pre-OS boot image files involves two steps very similar to creating remoteboot images:
![]() Copying needed files onto a DOS-formatted
system diskette
Copying needed files onto a DOS-formatted
system diskette
![]() Taking a snapshot of this disk with the Boot
Image Editor
Taking a snapshot of this disk with the Boot
Image Editor
Refer to the Boot Image Editor online help for instructions.
Figure 11: Creating pre-OS boot images
The Windows-based Boot Image Editor contains a feature that you can use to create boot image files with Pre-OS capabilities. To use this feature, select the Pre-OS checkbox in the Options area of the appropriate Create Image File dialog box. The Boot Image Editor utility is included with MBA. To install Boot Image Editor, see "Boot Image Editor Installation" in Chapter 2 "Installing MBA."
Another tool, PBOOT.EXE, is always used as the
last file in the Pre-OS AUTOEXEC.BAT file. PBOOT can be used to terminate (soft
Ctrl+Alt+
Pre-OS Boot Image is based on a DOS boot disk. Within the Pre-OS environment you may load memory managers, network drivers, virus checkers, backup routines, software updating agents and other executables. You may also map network resources and execute any of this software from the network.
Note: When loading HIMEM.SYS, be sure to specify the /TESTMEM:OFF parameter, otherwise the boot image RAM drive in extended memory may become corrupted.
Pre-OS executables may be loaded and executed from the boot image (mapped to A: drive during boot), or they may be executed in place from a network drive, or a combination of the two. Executables loaded from drive A: have read/write access but have limited disk space available for the boot image. Executables loaded from the network usually have only read access but have no size restrictions for disk space.
To terminate the Pre-OS image and directly boot another OS from the hard drive, the PBOOT command must be the last command in the AUTOEXEC.BAT file executing within the boot image.
The command line for PBOOT.EXE is as follows:
Usage: pboot [?] [/nologo] [/pboot | /reboot | /shutdown]
options:
/? - displays help information
/nologo - to suppress the display of the large Pre-OS banner
/pboot - exit the Pre-OS environment and boot from local media
/reboot - reboot the system
/shutdown - power off the system (only if BIOS supports APM)
Only one of the /pboot, /reboot, and /shutdown options can be used at any time. The /pboot option is the default behavior when none are specified.
For both TCP/IP and NetWare environments, refer to Sample Pre-OS frameworks in this chapter.
For NetWare environments, you should use 16-bit NetWare clients in Pre-OS environments.
For PCs booting from NT Server, we recommend that you use the Microsoft Network Client Version 3.0 for MS-DOS configured for TCP/IP support. Other DOS-based clients could be built using NFS servers and DOS client software that usually consists of TCP/IP-based TSRs and packet drivers. Examples of these clients are:
![]() PC TCP/IP from FTP software
PC TCP/IP from FTP software
URL: https://www.netmanage.com/products/pctcp5
![]() NFS Maestro from Hummingbird Communications
NFS Maestro from Hummingbird Communications
URL: https://www.hummingbird.com/products/maestro/
Once you have prepared a Pre-OS diskette, use Boot Image Editor to take a snapshot of the diskette and create a Pre-OS boot image.
To specify a Pre-OS image, use the Boot Image Editor Pre-OS option. See the Introduction section of the Boot Image Editor online help for details.
Place Pre-OS executables or agents not present within the Pre-OS image file into a network directory that is accessible to the guest username during the Pre-OS phase.
On the server, you must have either DHCP or BOOTP boot services enabled, and also TFTP (Trivial File Transfer Protocol).
If you are using DHCP, you must configure DHCP option 67 (Bootfile Name) to provide the image file name to MBA. If you are using DHCP in a PXE environment, you can use a BINL service to provide the boot image file name. Refer to the documentation for your DHCP or BINL server.
Once you have prepared a Pre-OS bootable diskette, use Boot Image Editor to take a snapshot of the diskette and create a Pre-OS boot image on the server's hard disk. To specify a Pre-OS image, use the Boot Image Editor Pre-OS option. See the Introduction section of the Boot Image Editor online help for details.
Unless you've named your boot image file NET$DOS.SYS, the default NetWare boot image file name, you need to edit BOOTCONF.SYS to map a specific PC address to a given boot image file. Follow instructions provided in Chapter 8 "Using MBA in NetWare Environments."
Skeletal frameworks are provided for both TCP/IP and NetWare environments. These samples show how to load network drivers, run Pre-OS applications, and finally, terminate the Pre-OS phase.
In the following examples, the Pre-OS framework is used to detect and correct differences in a critical file on the PC's hard drive.
CONFIG.SYS:
device=himem.sys /TESTMEM:OFF
device=emm386.exe noems
dos=high,umb
files=60
device=\net\ifshlp.sys
lastdrive=z
AUTOEXEC.BAT:
cd\net
net initialize
netbind.com
umb.com
tcptsr.exe
tinyrfc.exe
nmtsr.exe
emsbfr.exe
rem assumes username = "preos", password = "password", mapped drive = z:
net logon preos password /savepw:no /yes
rem Pre-OS agents are loaded here.
fc /b c:\windows\system.dat z:\critical\systems.dat > c:\temp\compare.txt
find /i "no difference encountered" c:\temp\compare.txt >nul
if errorlevel 2 echo Error in string search. Cannot report if matches found.
if errorlevel 1 goto CriticalFilesDifferent
if errorlevel 0 goto CriticalFilesNotDifferent
:CriticalFilesDifferent
echo Critical files have changed. Restoring files now.
copy z:\critical\system.dat c:\windows\system.dat /v /y
goto END
:CriticalFilesNotDifferent
echo Critical Files intact.proceeding to local disk boot.
:END
delete c:\temp\compare.txt
pboot
Note: Access to drive z: in this example is based on mapping that drive before image file creation. Drive mappings are stored when using the MS Network Client for MS-DOS v3.0.
SYSTEM.INI:
[network]
sizworkbuf=1498
filesharing=no
printsharing=no
autologon=yes
computername=PREOS
lanroot=A:\
username=PREOS
workgroup=WORKGROUP
reconnect=yes
dospophotkey=N
lmlogon=0
logondomain=WORKGROUP
preferredredir=basic
autostart=basic
maxconnections=8
[network drivers]
netcard=el90x.dos
transport=tcpdrv.dos,nemm.dos
devdir=A:\
LoadRMDrivers=yes
[386enh]
TimerCriticalSection=5000
UniqueDosPSP=TRUE
PSPIncrement=2
[Password Lists]
*Shares=A:\Shares.PWL
PREOS=A:\PREOS.PWL
PROTOCOL.INI:
[network.setup]
version=0x3110
netcard=tcm$el90x,1,TCM$EL90X,1
transport=tcpip,TCPIP
lana0=tcm$el90x,1,tcpip
[TCPIP]
NBSessions=6
SubNetMask0=255 0 0 0
IPAddress0=0 0 0 0
DisableDHCP=0
DriverName=TCPIP$
BINDINGS=TCM$EL90X
LANABASE=0
[protman]
DriverName=PROTMAN$
PRIORITY=MS$NDISHLP
[TCM$EL90X]
DriverName=el90x$
CONFIG.SYS:
device=himem.sys /TESTMEM:OFF
device=emm386.exe noems
dos=high,umb
files=60
buffers=20,0
lastdrive=z
AUTOEXEC.BAT:
set NWLANGUAGE=English
lsl.com
3c90x.com
ipxodi.com
vlm.exe
fc /b c:\windows\system.dat f:\login\critical\systems.dat > c:\temp\compare.txt
find /i "no difference encountered" c:\temp\compare.txt >nul
if errorlevel 2 echo Error in string search. Cannot report if matches found.
if errorlevel 1 goto CriticalFilesDifferent
if errorlevel 0 goto CriticalFilesNotDifferent
:CriticalFilesDifferent
echo Critical files have changed. Restoring files now.
copy f:\login\critical\system.dat c:\windows\system.dat /v /y
goto END
:CriticalFilesNotDifferent
echo Critical Files intact.proceeding to local disk boot.
:END
delete c:\temp\compare.txt
pboot
NET.CFG:
Link Driver 3C90X
frame ETHERNET_802.2
NetWare DOS Requester
FIRST NETWORK DRIVE = F
NETWARE PROTOCOL = NDS BIND
PREFERRED SERVER = LANTECH 1
The following specification applies to the Pre-OS phase only.
![]() Memory requirements: Available conventional
memory is reduced by 3 KB, and available extended memory is reduced by the size
of the boot image.
Memory requirements: Available conventional
memory is reduced by 3 KB, and available extended memory is reduced by the size
of the boot image.
With the introduction of the Internet and Windows NT Server, the TCP/IP networking protocol is common in today's networking environments. The features and utilities included with MBA allow it to operate successfully in TCP/IP networks.
![]() Supports network booting of operating systems
such as DOS and Windows from any TCP/IP network which has a BOOTP or DHCP and a
TFTP service
Supports network booting of operating systems
such as DOS and Windows from any TCP/IP network which has a BOOTP or DHCP and a
TFTP service
![]() Includes Boot Image Editor and other utilities
for creating, examining, and editing boot image files on the server
Includes Boot Image Editor and other utilities
for creating, examining, and editing boot image files on the server
![]() Includes BPPATCH utility to insert BOOTPTAB or
DHCP fields into text and batch
files
Includes BPPATCH utility to insert BOOTPTAB or
DHCP fields into text and batch
files
MBA requires that a BOOTP or DHCP Service or daemon exists on the server to provide the IP address assignment and the filename and location of the boot image file. MBA also requires a TFTP server to enable the transfer of the boot image file to the PC.
Figure 12: MBA in Traditional TCP/IP Environments
How MBA Works in a TCP/IP Environment
To boot the PC, the MBA ROM first sends a broadcast to all of the servers on the network to see if one of them is running a BOOTP or DHCP service and has the required information for the PC (PC's IP address and boot image file name). The response from the server provides the PC with its IP address, the name of the boot image file and the IP address of the server that has the image file.
The PC then sends a TFTP request to the server to transfer a copy of the boot image file. This image file is stored in the PC's memory as a RAM disk. When the entire file is received, MBA passes control over to the downloaded file. The PC boots just as it would from a diskette.
After the PC has fully booted and connected to the network, the FREEMEM utility can be used to remove the boot RAM disk, and restore drive A: to the local floppy drive, if it exists.
These abbreviated instructions are for those who are experienced with MBA installation in TCP/IP environments; refer to information presented later in this chapter for more detailed instructions. Complete the steps under "Quick Start" in Chapter 2 before moving on to this section.
At the server
Check that BOOTP and TFTP services, or DHCP and TFTP services are installed on the designated server. Install them if necessary.
When setting up TFTP, create a directory for all boot image files. The suggested directory name is TFTPBOOT.
If you are using a DHCP service or daemon, you must configure option 67 (Bootfile Name) with the file name of the boot image. Refer to the documentation of your DHCP server for instructions.
If you are using a BOOTP service, it uses a file (normally called BOOTPTAB) which contains information for all PCs. Make sure this file contains at least the IP address and boot image file name for each PC that will be booting with MBA.
Note: Steps 3 and 4 above are not required if the boot image file name is MBA.IMG or is the same as the file name specified by the TCP/IP image file name option in MBA.
At any PC
Create boot image files for each PC (or group of PCs):
Create a boot diskette that is capable of booting a PC, including DOS system files, memory managers, and network drivers.
rem network drivers load here
rem NFS or other drive mapping command here
init.bat
set comspec = e:\dos\command.com
freemem
rem other commands may load now
Run the Boot Image Editor to create the server boot image. See "Working with Boot Image Files for TCP/IP Environments" in the Boot Image Editor online help for details.
Ensure the boot image file is readable so the TFTP service can access it.
Verify the PC boots correctly by booting the PC, noting whether the desired server and boot image file are accessed.
If the PC has problems booting, follow the detailed steps in this section, and if problems persist, read "Application Notes" and "Troubleshooting" at the end of this chapter.
Before a PC can use MBA for network booting, you must set up a server to provide the PC with the information it needs.
If there are multiple servers on the network, only one of them needs to be set up for remote booting. This server must have the following services installed:
![]() BOOTP or DHCP service
BOOTP or DHCP service
![]() TFTP service
TFTP service
The BOOTP or DHCP service provides the PC with its IP address and the name of the image file to boot. The Trivial File Transfer Protocol (TFTP) service is used during the transfer of the boot file to the PC.
The BOOTP service may be included with the server TCP/IP package; check your documentation. If you do not have the service, contact technical support for your operating system to see if it is available.
The BOOTP service uses a file (normally called BOOTPTAB) which contains information for all PCs. This file must contain at least the IP address and boot image file name for each PC.
A DHCP service may have been provided with your server software. Servers providing this MBA-compatible service include Sun Solaris, Windows NT Server, OS/2 Warp Server, and Red Hat Linux.
The boot image file is transferred to the PC using TFTP. The TFTP service should be included with your TCP/IP package, but may be disabled; see your TCP/IP documentation for information.
When setting up TFTP you should create a directory for all of the image files. The suggested directory name is TFTPBOOT.
Before you can use MBA in a PC, you must first create a regular boot diskette, the same as you would if you were to boot from that PC's floppy drive.
The next step involves taking a snapshot of the boot diskette, capturing its contents and creating an image file that will reside on the file server's hard disk.
Format a diskette as a DOS system diskette.
Copy all the files to the boot diskette that are needed to connect the PC to the network.
Note: If you are using a memory manager see "Using Memory Managers" in this chapter, as some restrictions may apply.
Here is a sample AUTOEXEC.BAT file mapping the /PUBLIC directory, on the server called TEST, to local drive E:
lsl
fasteth (or whatever your ODI driver is named)
odipkt
ethdrv
idrive
idmnt unix test /public e: pcnfs nobody
e:
init
At the end of this AUTOEXEC.BAT file, control is transferred to another .BAT file (INIT.BAT) located on the network drive. This second .BAT file should change the DOS COMSPEC variable so that DOS can find a copy of COMMAND.COM after the image is released from memory. The FREEMEM program is then executed to release all the memory used during booting and to restore drive A: as a local drive. FREEMEM must be run from a network drive. For additional information see "FREEMEM: Free RAM Disk Memory" under "Other Tools."
set comspec = e:\dos\command.com
freemem
Following FREEMEM, you may run any other commands needed to start the PC.
Once the boot diskette is created, boot the PC using this disk to confirm that it is working correctly. When you are confident the boot diskette is correct you can use it to create the image file.
When creating boot image files, it is necessary to ensure that each PC booting with MBA has a licensed copy of the operating system being used (e.g. DOS).
Boot Image Editor is a utility that creates a boot image file from the contents of a boot diskette. You can find Boot Image Editor on the MBA Utility CD or the MBA subdirectory on the EtherCD.
Use the procedures in "Working with Boot Image Files for TCP/IP Environments" in the Boot Image Editor online help to copy the contents of a boot diskette to a directory on a file server. These procedures may be completed on any PC on the network that has a floppy drive. The image file can also be created on a hard disk in a PC that is not connected to the network, then transferred to the server on a diskette.
When you have copied the boot image file, ensure the file is readable so the TFTP service can access it, then store the boot diskette you have just created in a safe place; it may be required at a later date. The PC can now be booted using MBA.
You have now created a single boot image file that any PC with MBA can load and boot from the network (assuming the PCs are using the same type of NIC). If there are PCs on your LAN using MBA that require different boot configurations (e.g. different NICs, different CONFIG.SYS options), you will need to create additional boot image files. If the server does not provide an image filename on the DHCP or BOOTP reply, MBA uses MBA.IMG for the default filename.
You can now reboot the PC to make sure the image file was built correctly.
When booting with MBA, the PC screen looks similar to Figure 13 or 14.
If the PC does not boot correctly, see "Troubleshooting" at the end of this chapter.
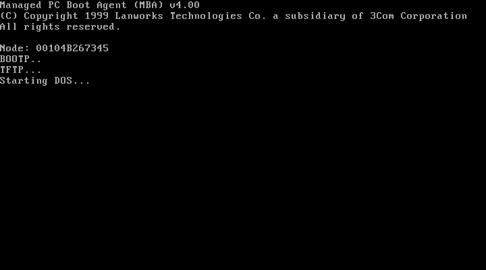
Figure 13: Normal TCP/IP boot screen
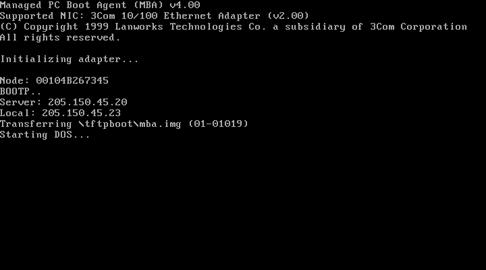
Figure 14: Verbose TCP/IP boot screen
In addition to the TCP/IP-specific tools mentioned in this chapter, the MBA Utility CD or the EtherCD MBA subdirectory includes other tools that help simplify the installation and use of MBA. These tools are outlined in this section.
What is the 3Com Universal NDIS Driver?
The 3Com Universal NDIS (Network Device Interface Specification) Driver is a NDIS 2 specification compliant driver that resides upon the UNDI (Universal Network Driver Interface) layer. It performs network operations defined in the NDIS 2 specification by calling the UNDI layer API functions defined in the PXE (Preboot Execution Environment) specification v2.1. The upper side of the 3Com Universal NDIS driver is bound to a protocol driver while on the lower side it is bound to UNDI layer.
The 3Com Universal NDIS driver replaces NDIS 2 common NIC-specific drivers by utilizing UNDI NIC-specific functions, which ultimately means it can support any NIC that includes a PXE-compliant boot ROM.
Many 3rd-party client management products utilize a Universal NDIS driver in their pre-OS stage of client management. This is typically done during remote operating system installations, workstation and/or application deployments. Also, the Universal NDIS driver can be included in boot images created by IT managers to perform specific pre-OS tasks.
What is needed to use the 3Com Universal NDIS Driver
![]() A NIC with MBA or a PXE-compliant boot
ROM. MBA or PXE can be included on the
NIC or integrated into the system BIOS.
A NIC with MBA or a PXE-compliant boot
ROM. MBA or PXE can be included on the
NIC or integrated into the system BIOS.
![]() 3Com Universal NDIS driver file
UNDIS3C.DOS. This file is located in the TCPIP subdirectory on the MBA Utility
CD and on the EtherCD.
3Com Universal NDIS driver file
UNDIS3C.DOS. This file is located in the TCPIP subdirectory on the MBA Utility
CD and on the EtherCD.
![]() A server with DHCP, BOOTP, RPL or PXE
Services enabled.
A server with DHCP, BOOTP, RPL or PXE
Services enabled.
PROTOCOL.INI Parameters
Along with common NDIS 2 parameters supported in PROTOCOL.INI file (e.g. NETADDRESS), 3Com Universal NDIS driver supports following unique keywords in the driver binding section of PROTOCOL.INI file:
VERBOSE=[YES] [NO]
YES: Displays driver build number, hardware information (Vendor/Device ID etc.), UNDI Version, UNDI Code, Data location and Size.
NO: Default
GETSTATE=[YES] [NO]
YES: Invokes UNDIGetState function during Initialization to check what state UNDI is in. See Intel PXE Specification 2.1 or greater
NO: Default
An example of a PROTOCOL.INI file:
[GEN_NDIS]
DRIVERNAME=UNDIS3C$
VERBOSE=YES
GETSTATE=YES
A sample PROTOCOL.INI file is also located in the TCPIP subdirectory on the MBA Utility CD and on the EtherCD.
Loading the 3Com Universal NIS Driver
The 3Com Universal NDIS driver can be loaded from both CONFIG.SYS and from a batch file (usually AUTOEXEC.BAT). When using NDIS Protocol Manager, SYSTEM.INI file is required.
Adding 3Com's Universal NDIS Driver to a Boot Image
Adding 3Com's Universal NDIS driver to a boot image file involves three steps:
Copying needed files onto a DOS system diskette.
Taking a snapshot of the disk with 3Com's Boot Image Editor utility. This utility is included on the MBA Utility CD or in the MBA subdirectory on the EtherCD.
Inserting the 3Com Universal NDIS driver into the boot image.
In this example, the boot image is based on a Microsoft Client boot disk, which allows you to load network drivers, and map to network resources. The boot disk can be created using the MS Network Client Administrator. Other DOS-based clients could be built using NT capable NFS servers and DOS client software that usually consists of TCP/IP-based TSR's and packet drivers.
Examples of these clients are:
PC TCP/IP from FTP software
URL: https://www.ftp.com/product/pctcp/pctcp4.htm
NFS Maestro from Hummingbird Communications
URL: https://www.hummingbird.com/products/maestro/
Once you have prepared a client boot diskette, use the Boot Image Editor to take a snapshot of the diskette and create a boot image.
![]() To specify a Pre-OS image, Choose Pre-OS under options
To specify a Pre-OS image, Choose Pre-OS under options
![]() Under Advanced choose the option to Keep UNDI
in Memory. (Without this option selected, the Universal NDIS driver will fail.)
Under Advanced choose the option to Keep UNDI
in Memory. (Without this option selected, the Universal NDIS driver will fail.)
Sample Boot Image
CONFIG.SYS:
device=himem.sys /TESTMEM:OFF
device=emm386.exe noems
dos=high,umb
files=60
device=ifshlp.sys
REM Loading the Universal NDIS driver
device=a:\net\undis3c.dos
lastdrive=z
AUTOEXEC.BAT:
path=a:\net
a:\net\net initialize
a:\net\netbind.com
a:\net\umb.com
a:\net\tcptsr.exe
a:\net\tinyrfc.exe
a:\net\nmtsr.exe
a:\net\emsbfr.exe
a:\net\net start
net use z: \\SYS1\Utilities
z:
SYSTEM.INI:
[network]
sizworkbuf=1498
filesharing=no
printsharing=no
autologon=yes
computername=TEST1
lanroot=A:\
username=Administrator
workgroup=WORKGROUP
reconnect=yes
dospophotkey=N
lmlogon=0
logondomain=WORKGROUP
preferredredir=basic
autostart=basic
maxconnections=8
[network drivers]
netcard=UNDIS3C.DOS
transport=tcpdrv.dos,nemm.dos
devdir=A:\
LoadRMDrivers=yes
[386enh]
TimerCriticalSection=5000
UniqueDosPSP=TRUE
PSPIncrement=2
[Password Lists]
*Shares=A:\Shares.PWL
PREOS=A:\PREOS.PWL
PROTOCOL.INI:
[network.setup]
version=0x3110
netcard=tcm$UNDIS3C,1,TCM$UNDIS3C,1
transport=tcpip,TCPIP
lana0=tcm$UNDIS3C,1,tcpip
[TCPIP]
NBSessions=6
SubNetMask0=255 0 0 0
IPAddress0=0 0 0 0
DisableDHCP=0
DriverName=TCPIP$
BINDINGS=UNDIS3C
LANABASE=0
[protman]
DriverName=PROTMAN$
PRIORITY=MS$NDISHLP
[UNDIS3C]
DriverName=UNDIS3C$
VERBOSE=YES
GETSTATE=NO
FREEMEM releases all the memory used to transfer the boot image file from the server after the PC has booted. It also changes drive A: back to the local floppy drive (drive A: is used as a RAM disk while the PC is booting from the image file).
Note:
![]() Before you can use FREEMEM you must
change your DOS COMSPEC variable to a DOS directory on the network, otherwise
you will get an error when DOS tries to reload COMMAND.COM after FREEMEM
terminates.
Before you can use FREEMEM you must
change your DOS COMSPEC variable to a DOS directory on the network, otherwise
you will get an error when DOS tries to reload COMMAND.COM after FREEMEM
terminates.
![]() FREEMEM can not be included in the image
file; it must be executed from a network drive (or local hard drive).
FREEMEM can not be included in the image
file; it must be executed from a network drive (or local hard drive).
![]() After
using FREEMEM you should have about 2 KB less memory available than you have
when you boot from the diskette used to create the image file.
After
using FREEMEM you should have about 2 KB less memory available than you have
when you boot from the diskette used to create the image file.
The BPPATCH program is used to replace parameters from the BOOTP/DHCP reply packet into text files. This allows one common image file to be used by several PCs, with the parameters unique to each PC (like the IP address) being specified in the BOOTPTAB file on the server and replaced in the image file when the PC boots.
Note: BPPATCH must be run before FREEMEM.
Using BPPATCH
To use BPPATCH you must first put tags into your text files (batch files, configuration files etc.) to indicate which BOOTP fields you want to replace. You then run BPPATCH and specify the files to be patched on the command line. You can specify more than one file at a time. For example if you want to patch the files START.BAT and PCTCP.INI, your command line is:
bppatch start.bat pctcp.ini
Note: To patch parameters for commands in your AUTOEXEC.BAT file you must place these commands in a second batch file, so you can run BPPATCH before the second batch file is executed. For example, if you put all the commands in a file called START.BAT, your AUTOEXEC.BAT file would be as follows:
bppatch start.bat
start
Tags
All tags begin with the character sequence "#@" followed by a three character tag name. Following the tag name are additional # characters used to specify the tag length. The total tag length is counted from the first # character to the last # character. It is important to make the tag large enough to contain all the characters that may be in the field. If the field is smaller than the tag length, the field is padded with spaces. If the field is larger than the tag length then it is truncated.
For definitions of tags that can be used with BPPATCH, view the file BPPATCH.TXT on the MBA Utility CD or in the MBA subdirectory on the EtherCD. The test file BPTEST.TXT (found on the MBA Utility CD) includes all tags. Use this file as an example, and for testing BPPATCH on your system.
This section lists some techniques for using MBA in TCP/IP environments.
Currently the only supported memory manager is EMM386.
If you are using EMM386 with Windows 3.x you must add the "/y" command line option. The "/y" option allows you to specify a path for EMM386 after the PC has booted. If you try to run Windows after booting from the network you get an "Invalid path for EMM386" message. This is because Windows needs access to the EMM386 file and, since the PC was booted from the network, the original file is no longer available. Using the "/y" option you can specify a network path so Windows can access EMM386 from the network. For example:
device=emm386.exe /y=e:\dos\emm386.exe
If you are using MSDOS 6.2 or higher you must use the "/TESTMEM:OFF" option with HIMEM.SYS to disable the extended memory RAM test. The resulting command line is:
device=himem.sys /TESTMEM:OFF
When things do not work, the best way to diagnose problems is to interpret MBA's PC screen using MBA's verbose mode. See "Displaying Verbose Status Information" in Chapter 4. Refer to the following section for explanations of MBA screen messages.
BOOTP
DHCP
If the PC has stopped at this prompt and the progress dots (..) are increasing, it means that no reply has been received from the BOOTP or DHCP service on the server, and you should check the following:
![]() A proper connection to the file server. Try to
connect to the server if you boot from a floppy or hard drive.
A proper connection to the file server. Try to
connect to the server if you boot from a floppy or hard drive.
![]() (BOOTP case only) Your server is running a
BOOTP service. You may want to try running the service in stand-alone mode to
see if it is getting the request from the PC. The service should also have a
debug mode where it displays information on the screen for each request it gets
and replies to.
(BOOTP case only) Your server is running a
BOOTP service. You may want to try running the service in stand-alone mode to
see if it is getting the request from the PC. The service should also have a
debug mode where it displays information on the screen for each request it gets
and replies to.
Transferring boot image file (x-y) (only in verbose mode)
The two numbers in the brackets, x and y, indicate retries and packet number respectively. During a normal transfer the first number, the retries, should remain at 1 and the second number, the packet number, should increase.
If the retry count is increasing but the packet number is not, it indicates the PC is not receiving any packets from the TFTP service. If the packet number remains at 1 make sure your server is running TFTP.
If both the retry count and the packet number are increasing it indicates the transfer is progressing correctly, but the PC is not receiving packets as quickly as it can process them. This normally indicates a busy network.
Most file transfer errors originate at the server. Some common file transfer errors are:
File transfer error:
File transfer error: File not found
File transfer error: Access violation
File transfer error: Image file too large
Error: Not enough extended memory for image
MBA supports the Preboot eXecution Environment (PXE 2.x), as specified in the Wired for Management (WfM V2.0) and Microsoft PC 98 and PC 99 guidelines. PXE software allows PCs to communicate with server-based workstation management applications, which adhere to WfM specifications, to perform such tasks as:
![]() Software installation
Software installation
![]() Configuration
Configuration
![]() Administration
Administration
![]() Problem diagnostics and resolution
Problem diagnostics and resolution
The PCs can be normal legacy PCs (upgraded with MBA ROMs), new Managed PCs, or Net PCs.
Figure 15: MBA in a WfM PXE environment
How MBA Works in a Wired for Management Environment using PXE
The MBA ROM first sends a broadcast to all of the servers on the network to see if one of them is running a DHCP service and has the required information for the PC (i.e. the PC's IP address). The response from the DHCP service provides the PC with its IP address. Also, a Proxy DHCP service running on a Boot Server will respond to the PC with the IP address of the Boot Server.
The PC then sends a special DHCP request to the Boot Image Negotiation Layer (BINL) service running on the Boot Server, to get the filename of the network bootstrap program. The BINL Service replies with the filename.
The PC then sends a TFTP request to the Boot Server to transfer a copy of the bootstrap file that is stored in the PC's memory as a RAM disk. When the entire file is received, MBA passes control over to the downloaded file. The bootstrap then performs the function that it was programmed to do-this may include downloading further files from the server using TFTP.
Note: A WfM transaction works in a manner that is similar to a traditional TCP/IP environment using DHCP, as described in Chapter 6. However, WfM provides a mechanism to include a separate Boot Server into the transaction. This Boot Server contains the services that provide the bootstrap filename and transfers the file to the PC. If the DHCP Service provides the filename of the bootstrap program in its initial reply then the PC will download the file through TFTP and execute it, skipping the steps that involve the DHCP proxy and BINL Services. In this case, the WfM transaction is the same as that of traditional TCP/IP using DHCP.
When configured for PXE, MBA should be used in conjunction with a workstation management application such as:
![]() ON Command CCM from ON Technology.
ON Command CCM from ON Technology.
![]() Unicenter TNG from Computer Associates
International, Inc.
Unicenter TNG from Computer Associates
International, Inc.
![]() LANDesk Configuration Manager from Intel
Corporation and Platinum Technology Inc.
LANDesk Configuration Manager from Intel
Corporation and Platinum Technology Inc.
![]() AutoConfigure from Platinum Technology Inc.
AutoConfigure from Platinum Technology Inc.
![]() LANClient Control Manager from IBM
LANClient Control Manager from IBM
Refer to the documentation for the management application for instructions regarding proper setup, configuration, and image file creation.
When booting with MBA your screen looks similar to Figure 16.
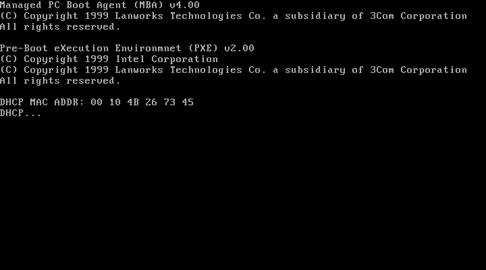
Figure 16: PXE boot screen
To create a PXE boot image file using the Boot Image Editor, see "Working with Boot Images for Wired for Management Environments" in the Boot Image Editor online help. To install Boot Image Editor, see "Boot Image Editor Installation" in Chapter 2 "Installing MBA."
MBA has the following features when used in NetWare environments:
![]() Supports all current versions of NetWare
Supports all current versions of NetWare
![]() Supports all current versions of DOS
Supports all current versions of DOS
![]() Does not require RPL.NLM to be loaded on the
server; boots using a native, routable protocol
Does not require RPL.NLM to be loaded on the
server; boots using a native, routable protocol
![]() Handles multiple file servers on the network;
optional MSD NLM (included) directs boot requests to the correct file server
and image file
Handles multiple file servers on the network;
optional MSD NLM (included) directs boot requests to the correct file server
and image file
![]() Allows the selection of different boot images
for each PC at boot time
Allows the selection of different boot images
for each PC at boot time
![]() Includes boot management utilities
Includes boot management utilities
![]() Includes Boot Image Editor and other utilities
for creating, examining, and editing boot image files on the server
Includes Boot Image Editor and other utilities
for creating, examining, and editing boot image files on the server
MBA supports all current versions of NetWare using NCP/IPX protocol and transport layers. Unlike RPL-style ROMs, MBA for NetWare communicates using native, routable NetWare protocols and does not require any NLMs to be loaded at the server to support network booting. This ensures complete compatibility with all current versions of NetWare, and Ethernet frame-type independence.
Most Ethernet versions of MBA are configurable to support 802.3, 802.2, or Ethernet II (type-8137) frame types. For version 3.12 and higher of NetWare, 802.2 is the default frame type; older versions of NetWare default to the 802.3 frame type. Make sure the Ethernet frame type selected by MBA is also supported at the file server used to boot the PC.
Figure 17: MBA in NetWare Environments
These abbreviated instructions are for those who are experienced with MBA installation in NetWare environments; refer to information presented later in this chapter for more detailed instructions. Complete the steps under "Quick Start" in Chapter 2 before moving on to this section.
Step 1 - Create a boot image file
Format a bootable diskette, and copy to it all the files needed to make a boot diskette. Alternatively, you may copy an existing boot image file and modify it using the Boot Image Editor utility (found on the MBA Utility CD or MBA subdirectory on the EtherCD). To install Boot Image Editor, see "Boot Image Editor Installation" in Chapter 2 "Installing MBA."
If you are using Windows 3.x and loading EMM386 in CONFIG.SYS, be sure to add the "/y=" option to define the network path where EMM386.EXE is located. If your NIC has a memory-mapped RAM region, be sure to exclude this region from your memory manager.
In AUTOEXEC.BAT, ensure that RPLODI.COM is loaded immediately after LSL.COM (if using the Boot Image Editor Loader option, RPLODI is not required).
If you are supporting more than one boot image, rename AUTOEXEC.BAT to a different name, and create a new AUTOEXEC.BAT that contains only this unique .BAT file name. This avoids problems with sharing the same AUTOEXEC.BAT in the LOGIN directory.
In the .BAT file that invokes the network shell such as VLM.EXE or Client32, add the following statements just before VLM:
set path=
set comspec=x:command.com
Using Boot Image Editor (located on the MBA Utility CD or MBA subdirectory on the EtherCD), or Novell's DOSGEN.EXE, create a boot image file in the SYS:LOGIN directory. If using DOSGEN, copy the .BAT file that invokes the network shell from the diskette to the SYS:LOGIN directory.
Step 2 - Add PC information to BOOTCONF.SYS
Step 3 - Verify the PC boots correctly
Boot the PC, noting whether the desired file server and boot image file are being accessed.
If the PC has problems booting, follow the detailed steps provided in the following section. If problems persist, read the "Application Notes" and "Troubleshooting" sections at the end of this chapter.
When booting with MBA, your screen looks similar to Figure 18 or 19:
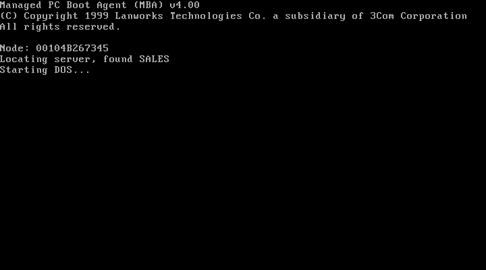
Figure 18: Normal NetWare boot screen
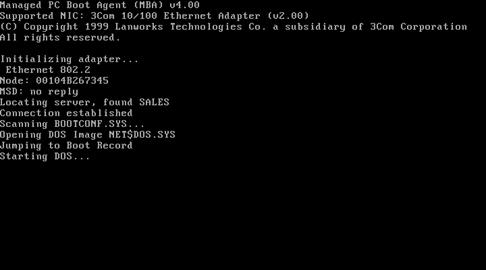
Figure 19: Verbose NetWare boot screen
The first step in creating a boot image file is to create a regular boot diskette, much the same as you would to boot the PC from a floppy drive.
The next step involves taking a snapshot of the boot diskette, capturing its contents and creating an image file that will reside on the file server's hard disk.
Step 1 - Create a boot diskette
Format a diskette as a DOS system diskette.
Copy needed files to the boot diskette. Copy all required device drivers, NetWare client drivers, and any other files you would normally place on a boot diskette.
If using EMM386 along with Windows 3.x, be sure to add the "/y=" option to define the network path where EMM386.EXE is located. For example,
device=emm386.exe /y=x:\dos\v6.20\emm386.exe
When using the VLM client for your network shell, copy the Novell RPLODI.COM file onto your boot diskette, and modify your AUTOEXEC.BAT file so that RPLODI is loaded immediately after LSL. Alternatively, you may use the Loader option in Boot Image Editor.
Add the following SET statements to your AUTOEXEC.BAT file, just before the network shell statement:
set path=
set comspec=x:command.com
When using the VLM client for your network shell, verify that your AUTOEXEC.BAT file on the boot disk looks similar to the following:
Comments
lsl
rplodi must be used with all odi drivers
fasteth or whatever your odi driver is called
ipxodi
set path=
set comspec=x:command.com
vlm or netx
f: drive letter of first network drive
login
Step 2 - Run Boot Image Editor
Create a boot image file using the Boot Image Editor. See "Working with Boot Image Files for NetWare Environments" in the Boot Image Editor online help for details.
Check to make sure the boot image file exists in the SYS:LOGIN directory.
The .BAT file that loads VLM.EXE (or
NETX.EXE) must be copied from the diskette to the LOGIN directory. If not
copied, you will see a "Batch File Missing" message as VLM or NETX transfers
from drive A: to SYS:LOGIN but does not find the .BAT file that was running on
drive A:.
|
|
Figure 20: Copying Batch Files to the Login Directory
Store the boot diskette you have just generated in a safe place, as it may be required at a later date.
The PC can now be booted using MBA. Perform the following steps as needed:
In order for multiple PCs to boot using this file, it must be flagged as shareable. When Boot Image Editor creates an image file it automatically flags the file as shareable. If you need to set it manually (e.g. if you created the image with DOSGEN), use the NetWare FLAG command:
flag net$dos.sys sh (for netware 4.x and 5.x)
or
flag net$dos.sys s (for netware 3.x)
If your network has more than one file server, copy the boot image file and AUTOEXEC.BAT to each server's SYS:LOGIN directory. If you use the optional MSD NLM, you do not need to worry about copying these files across all file servers. See "Multiple Servers: How the MSD NLM Can Help" in this chapter.
You have now created a single boot image file that any PC with MBA installed can load and boot from the network. If your MBA-equipped PCs have different booting requirements, there are two ways to meet these requirements:
![]() You may use the CHKID and ROMTYPE utilities
(provided with MBA) which allow you to load drivers conditionally based on node
address or NIC type.
You may use the CHKID and ROMTYPE utilities
(provided with MBA) which allow you to load drivers conditionally based on node
address or NIC type.
![]() You may have to create additional boot image
files if different operating systems are used. See "Supporting Different PCs with One Boot Image", and "Creating Additional Boot Image Files."
You may have to create additional boot image
files if different operating systems are used. See "Supporting Different PCs with One Boot Image", and "Creating Additional Boot Image Files."
Although boot image files may be shared by many identical PCs, you may wish to create additional boot image files for other PCs which require different drivers to be loaded either in CONFIG.SYS or AUTOEXEC.BAT.
Using the CHKID and ROMTYPE utilities provided with MBA, you can avoid having to create additional boot image files by steering through CONFIG.SYS and AUTOEXEC.BAT based on the PC's node address and NIC type.
For example:
![]() Using CHKID you could specify that a certain
CONFIG.SYS driver is loaded only for one or more PC node addresses. CHKID may
also be used within AUTOEXEC.BAT.
Using CHKID you could specify that a certain
CONFIG.SYS driver is loaded only for one or more PC node addresses. CHKID may
also be used within AUTOEXEC.BAT.
![]() Using ROMTYPE in AUTOEXEC.BAT, you could
support many different ODI drivers within one boot image, automatically loading
the one appropriate for each of your PCs.
Using ROMTYPE in AUTOEXEC.BAT, you could
support many different ODI drivers within one boot image, automatically loading
the one appropriate for each of your PCs.
Refer to "Other Tools" for information on CHKID and ROMTYPE.
Although many PCs can boot from the same boot image file, it is likely that more than one boot image file will be required to suit the differing needs of the PCs on your network, especially if different operating system versions need to be supported. Supporting multiple boot images requires an understanding of three important issues:
![]() Creating/editing the BOOTCONF.SYS boot index
file
Creating/editing the BOOTCONF.SYS boot index
file
![]() Avoiding AUTOEXEC.BAT conflicts in SYS:LOGIN
Avoiding AUTOEXEC.BAT conflicts in SYS:LOGIN
![]() Using Boot Image Editor to create different
boot images
Using Boot Image Editor to create different
boot images
The default boot image file is NET$DOS.SYS. When you need to support more than one boot image file, you must name these files in a special boot index file called BOOTCONF.SYS.
The BOOTCONF.SYS file is an index of all the boot image file names and the network address and node address of each PC that must access those files. This file must be in the SYS:LOGIN directory.
MBA (or the MSD NLM, if loaded) scans the contents of BOOTCONF.SYS during PC boot, and if no entry is found which matches the PC's network and node address, the default boot image file is used.
The BOOTCONF.SYS file may be created and edited in the following ways:
![]() Using the BOOTEDIT utility (provided with MBA)
ensures correct syntax, offers search/sort capabilities, and other helpful
features. BOOTEDIT must be used when loading the optional MSD NLM. See "Multiple Servers: How the MSD NLM Can Help."
Using the BOOTEDIT utility (provided with MBA)
ensures correct syntax, offers search/sort capabilities, and other helpful
features. BOOTEDIT must be used when loading the optional MSD NLM. See "Multiple Servers: How the MSD NLM Can Help."
![]() Using an ASCII editor (such as the MS-DOS
editor, EDIT). This is recommended only in emergencies, or when BOOTCONF.SYS
contains only a few entries. Avoid using EDIT when MSD is being used, because
BOOTCONF.SYS must be sorted.
Using an ASCII editor (such as the MS-DOS
editor, EDIT). This is recommended only in emergencies, or when BOOTCONF.SYS
contains only a few entries. Avoid using EDIT when MSD is being used, because
BOOTCONF.SYS must be sorted.
BOOTEDIT is the BOOTCONF.SYS editor supplied with MBA. This editor hides all BOOTCONF.SYS syntax requirements and offers helpful features such as searching, sorting, undo, automatic address insertion, and more. BOOTEDIT conforms to the extended BOOTCONF.SYS syntax requirements of the MSD NLM options supported by MBA.
BOOTEDIT has the following syntax:
Usage: bootedit [servername] [/mono]
If the file server name is omitted, the current file server is used. BOOTEDIT automatically detects monochrome screen modes, but this mode may be forced with the "/mono" parameter. BOOTEDIT uses the full height of a screen or window (i.e. 43 rows); the minimum required size is 80x25 characters.
When BOOTEDIT loads BOOTCONF.SYS, any errors detected in the data format are displayed and BOOTEDIT will not enter the edit mode. If any PC entries with comments over 40 characters long are found, a warning is displayed.
BOOTEDIT has a capacity of approximately 3,000 records, depending on the amount of free conventional memory.
For further information on using BOOTEDIT, refer to online help information by pressing F1 from within BOOTEDIT.
Each line of BOOTCONF.SYS should be entered using the following format:
0x[network],[node]=[image file name]
where if the network number is 1, the node address is 00A024D6055F, and the boot image filename is WRKSTN2.SYS, then the appropriate syntax is:
0x1,00a024d6055f=wrkstn2.sys
Note: The first character of a BOOTCONF.SYS entry is a ZERO (not the letter O). Although most node addresses are 12 digits long, you do not need to include the leading zeros.
To avoid confusion and problems related to network numbers you should enter wild cards for the network number followed by the node address which can be obtained from the NIC. To use wildcards insert eight question marks (?) instead of the network numbers as follows:
0x????????,[node]=[image file name]
Entries in this format must be generated for each PC that needs a boot file other than the default NET$DOS.SYS.
Wild cards can also be used for the node address. This allows several workstations to use the same image file. A common use of wildcards in the node address is to use question marks for the last 6 characters of the address. This will allow all NICs from the same manufacturer to use the same image (the first 6 characters of the node address indicate the NIC manufacturer). The placement of the wild card entries is important; they should be at the end of the file so they do not override any specified addresses. In Figure 21, all NICs that have the first 6 characters 00104B will use SALES.SYS, except for 00104B267345, because it has it's own entry above the wild card entry.
Note: To find the PC's node address, check the MBA boot screen or use the configuration program that comes with your NIC.
You may put comments on each line entry in BOOTCONF.SYS, as long as there is at least one space separating the boot image file name and the comment. In general, it is a good idea to keep comments reasonably short, as MBA must scan through them. Too many comments may delay the PC's boot procedure.
|
0x00000020,0000c0516776=image1.sys Paul's boot image 0x00000021,00c0f987b345=ron.sys Ron's boot image 0x00000021,00000f456787=steve.sys Steve's boot image 0x????????,00104b267345=george.sys George's boot image 0x????????,00104b??????=tsg.sys Default image for tsg 0x????????,????????????=win.sys Default image |
Figure 21: Sample BOOTCONF.SYS
When more than one boot image file exists in a server's SYS:LOGIN directory, you must take care to avoid conflicts with AUTOEXEC.BAT files. When a PC executes VLM or NETX during its boot sequence, the remainder of the currently running .BAT file is loaded from the SYS:LOGIN directory, not from the boot image.
The easiest way to avoid any problems is to ensure that each boot image file executes VLM or NETX from a uniquely named .BAT file, not from AUTOEXEC.BAT.
Within each boot diskette or boot image:
Rename the original AUTOEXEC.BAT to a unique .BAT filename.
Note: Using the same name as the image file helps you keep track of which boot image file a .BAT file belongs to.
Create a new AUTOEXEC.BAT within the boot image or boot disk that invokes this uniquely named .BAT file. Refer to Figure 22.
|
|
Figure 22: Using unique batch files
When VLM (or NETX) is loaded from IMAGE1.BAT in the image file, it continues executing from IMAGE1.BAT in SYS:LOGIN. Each image disk can have its own batch file name to avoid conflicts in SYS:LOGIN.
See "Working with Multiple NetWare Boot Image Files" in the topic "Working with Boot Image Files for NetWare Environments" in the Boot Image Editor online help.
Select a file name that helps you remember something about the contents of the image file, (for example MSDOS62.SYS). If no file extension is specified, .SYS is the default.
Note: We recommend using the .SYS extension for boot image files.
See "Working with Multiple NetWare Boot Image Files" in the topic "Working with Boot Image Files for NetWare Environments" in the Boot Image Editor online help for details.
Note: Be sure to modify the PC's entry in BOOTCONF.SYS to refer to the menu boot filename in place of the original boot image filename. If BOOTCONF.SYS is not used, name your menu boot file NET$DOS.SYS.
When multiple servers exist on a network, MBA must know the server from which to obtain the boot information.
To indicate which server is to be used, MBA includes an optional server NLM called MSD (Multi Server Director). If the MSD option is enabled in the MBA configuration, MBA attempts to locate a server running the MSD NLM. If located, this server directs MBA to the proper server and image to boot from.
If a server running MSD NLM cannot be located or the MSD option is disabled, MBA locates the nearest server and attempts to boot from that server.
Because of the random nature of finding a particular server (it depends on how busy a server is, and how quickly it responds), it is absolutely necessary that you copy all boot image files, AUTOEXEC and other .BAT files, and BOOTCONF.SYS files across all file servers in your internetwork. Failure to do so may cause MBA to occasionally issue an "Error Opening Boot File" message as it connects to a server that doesn't contain the required boot image files.
With the MSD NLM option, you can specify the file server(s) from which an MBA-equipped PC will boot, and maintain boot image files only on the designated servers.
A full-featured MSD NLM is provided with MBA. This version is unrestricted and includes activity logging.
How MSD Works
At boot time, MBA-equipped PCs first broadcast a "Get nearest MSD" request. See Figure 17. One or more file servers reply with the address of the nearest MSD NLM. MBA then sends a request to the MSD NLM asking for the name of the server and image file. Upon receiving this request, the NLM looks for the PC's boot information in the BOOTCONF.SYS file. If a matching entry is found, MSD replies to the MBA PC with the information.
If no matching PC entry is found, MSD replies with the name of a boot image file which is specific to the PC's type of NIC (except in cases where the NODEFAULT option is used). You can obtain the ROMTYPE number from the MBA Information screen. Also see "Other Tools: ROMTYPE: Conditional Execution based on MBA Type" in this chapter.
If the PC receives no reply from the MSD NLM in two seconds, MBA defaults to its normal mode of operation and attempts to boot from the nearest file server.
The MSD NLM is installed on a NetWare 3.x or 4.x file server, although the boot image files themselves may exist on any file server in the network.
Copy the file MSD NLM from the MBA Utility CD or MBA subdirectory on the EtherCD to the SYSTEM directory on the SYS: volume of the server that is used to load the MSD NLM.
The MSD NLM requires the following additional Novell NLMs:
![]() AFTER311.NLM (on NetWare 3.x servers)
AFTER311.NLM (on NetWare 3.x servers)
![]() CLIB.NLM (must be version 3.12 or higher)
CLIB.NLM (must be version 3.12 or higher)
Note: If you are using NetWare 3.x you must load AFTER311.NLM before MSD. CLIB.NLM is loaded automatically by MSD.
MSD is loaded using the LOAD command on the System Console on your NetWare server. You must have access to the System Console screen of the server, either directly at the server, or through RCONSOLE.
There are several command line parameters that can be specified when loading MSD:
Usage: msd <msd_name> [max=] [nodefault] [log]
options
[max=] - sets the maximum number of workstations which MSD will accept when processing BOOTCONF.SYS. The default number is 512. Each entry requires about 100 bytes of server memory, so the more entries you allow, the more memory MSD will require.
[nodefault] - tells MSD not to reply to any workstations that are found in the BOOTCONF.SYS file
[log] - tells MSD to create a log file of all its activities
The first parameter specifies the unique name to be assigned to this instance of MSD; if no name is specified, MSD assumes the name of the server on which it is running.
Add a line to your server AUTOEXEC.NCF to load MSD when the server is started. The following are examples of valid MSD command lines:
load msd
Loads MSD, assumes the name of the server it is running on, and uses the default maximum number of 512 workstation entries.
load msd main
Loads MSD, names it "main" and uses the default maximum number of 512 workstation entries.
load msd main max=1024
Loads MSD, names it "main" and sets a maximum number of 1024 workstation entries.
load msd test log max=100 nodefault
Loads MSD, names it "test", creates a status log file, sets a maximum of 100 workstation entries, and tells MSD to use nodefault mode.
MSD may be unloaded from your server at any time with the NetWare "unload" system console command:
unload msd
If MSD does not find a PC entry in the BOOTCONF.SYS file, it normally responds with a boot image file name based on the MBA type code for the ROM in the PC. This default image name has the format MSD$<type>.SYS. For example, the default image file name for a PC with an NIC which has a MBA type code of 003 would be MSD$003.SYS. This allows you to create boot image files based on the NIC type, without adding an entry in the BOOTCONF.SYS file.
If you do not want MSD to respond with these default image filenames, use the "NODEFAULT" command line option. In NODEFAULT Mode MSD responds to the PC with an error message instead of an image filename. This is a security feature and prevents any PC that is not defined in BOOTCONF.SYS from booting.
For a full description of the MSD console display, view the file MSD.TXT on the MBA Utility CD or MBA subdirectory on the EtherCD.
There are several messages related to MSD operation that may appear at an MBA-equipped PC.
MSD: no reply: (only in verbose mode)
MSD: [msdname] Found server <servername>:
MSD: [msdname] Server <servername> is unavailable:
In addition to the NetWare-specific tools mentioned in this chapter, the MBA Utility CD or MBA subdirectory on the EtherCD includes other tools that help simplify installation and use of MBA. These tools are outlined in this section.
The CHKID utility is useful when sharing a boot image file among several PCs. Depending on their node addresses, one or more PCs can load or bypass commands in CONFIG.SYS or AUTOEXEC.BAT.
Using CHKID within CONFIG.SYS
CHKID compares node addresses on the command line with the node address of the local PC. If the local address matches the address on the command line, the next line in the CONFIG.SYS file is executed. If the address does not match, the next line is not executed.
Copy the file CHKID.EXE from the MBA Utility CD or MBA subdirectory on the EtherCD into the boot image file(s) which require it.
The command syntax for CHKID is:
Usage: device=chkid.exe [v] [x] id
options:
v - verbose mode
x - reverse address checking condition
There are two optional parameters; "v" and "x". The "v" (verbose) parameter displays messages on the status of CHKID while it is executing. This is used only during testing of a system using CHKID.
The "x" parameter reverses the condition of the address checking. Normally the next line of the CONFIG.SYS is executed only if the addresses match; if you include the "x", the next CONFIG.SYS line is NOT executed for the address(es) matched.
Examples:
If a PC's node address is 0123456789AB and CONFIG.SYS included:
device=chkid.exe 0123456789AB
device=himem.sys
HIMEM.SYS is loaded only on the PC with address 0123456789AB.
By adding the "x" parameter, as follows:
device=chkid.exe x 0123456789AB
device=himem.sys
HIMEM.SYS is not loaded on the PC with node address 0123456789AB, but is loaded at all other addresses.
Using CHKID within .BAT files
The CHKID command can be issued within a .BAT file (e.g. AUTOEXEC.BAT) with a node address. CHKID checks the network to determine if the current PC address matches the address specified on the command line, and sets the DOS ERRORLEVEL as follows:
![]() If matched, ERRORLEVEL is set to 0
If matched, ERRORLEVEL is set to 0
![]() If not matched, ERRORLEVEL is set to 1
If not matched, ERRORLEVEL is set to 1
![]() If syntax error, ERRORLEVEL is set to 2
If syntax error, ERRORLEVEL is set to 2
Based on the ERRORLEVEL value, the flow of the .BAT file may be redirected as required by the PC.
A sample .BAT file, AUTOID.BAT is provided on the MBA Utility CD or MBA subdirectory on the EtherCD. This file gives a sample structure for an AUTOEXEC.BAT-type batch file using the CHKID command.
If you have never used the batch file ERRORLEVEL command before, note that you must test for the highest value of ERRORLEVEL first. If you test for an error level=0, you will match ALL THREE conditions. The correct method is to test for an error level=2 first, and to branch based on this condition.
Note: When using CHKID you must ensure that you do not use the Loader option when creating your boot image in the Boot Image Editor.
Boot Image Editor allows you to examine or edit the contents of DOS boot image files. For details see the Boot Image Editor online help. To install Boot Image Editor, see "Boot Image Editor Installation" in Chapter 2 "Installing MBA."
ROMTYPE is a utility that you can use to identify the type of ROM in a PC. This information can be used in a batch file to load the correct driver for the NIC. A sample batch file, ROM.BAT is included on the MBA Utility CD or MBA subdirectory on the EtherCD.
There are two methods for using ROMTYPE to identify the ROM:
![]() If you are using a PCI NIC, you can check the
NIC's PCI Vendor ID and Device ID by specifying the Vendor ID and Device ID of
the NIC that you wish to test on the command line as a combined value.
If you are using a PCI NIC, you can check the
NIC's PCI Vendor ID and Device ID by specifying the Vendor ID and Device ID of
the NIC that you wish to test on the command line as a combined value.
Usage: romtype [VendorIDDeviceID]
romtype 10b79200
![]() If no command line arguments are specified,
ROMTYPE returns the type code of the ROM. All ROMs are assigned a type code
based on the specific NIC that the ROM supports. For a list of current type
codes see the file ROMTYPE.TXT on the MBA Utility CD or MBA subdirectory on the
EtherCD.
If no command line arguments are specified,
ROMTYPE returns the type code of the ROM. All ROMs are assigned a type code
based on the specific NIC that the ROM supports. For a list of current type
codes see the file ROMTYPE.TXT on the MBA Utility CD or MBA subdirectory on the
EtherCD.
For both methods, if a ROM is not present, ROMTYPE returns an error level of 0. Also, if you include the "-t" command line switch, ROMTYPE displays the Vendor ID and Device ID or the type code, depending on which method is used.
This section lists some techniques for using MBA in NetWare environments:
Proceed as follows when using Novell's 32-bit client for DOS/Windows (updated information may be available from Lanworks or 3Com):
![]() When loading Windows 3.x, NIOS.EXE attempts to
reload itself from the default boot drive. In MBA's case, this is drive A:, and
since the boot image no longer exists, an error message is displayed,
preventing Windows from loading in enhanced mode. Unlike EMM386, NIOS does not
support an optional path parameter to facilitate the reload process. One
solution is to map a network drive containing NIOS.EXE to drive A:, which would
allow Windows to load.
When loading Windows 3.x, NIOS.EXE attempts to
reload itself from the default boot drive. In MBA's case, this is drive A:, and
since the boot image no longer exists, an error message is displayed,
preventing Windows from loading in enhanced mode. Unlike EMM386, NIOS does not
support an optional path parameter to facilitate the reload process. One
solution is to map a network drive containing NIOS.EXE to drive A:, which would
allow Windows to load.
When you boot with MBA, Windows does not allow you to format a diskette in drive A:; if you try, the message, "Cannot format the MS-DOS startup drive" appears. As a preventive measure, Windows does not allow you to format a diskette in the drive from which you booted.
The easiest way to format a diskette is in a DOS box. If you want to format a bootable diskette with system tracks, you need a diskette with a copy of DOS on it. The format program prompts you to insert this diskette so it can copy the system tracks from it.
This section describes the interactions between VLM (or NETX) and MBA, and how it affects .BAT file execution.
When you execute VLM from image disk, you are normally doing so from within a .BAT file such as AUTOEXEC.BAT. DOS sees this .BAT file as a text file containing command lines of variable length. After reading a command line from the .BAT file, DOS remembers the starting position (or file offset) of the next line in the file. After completing execution of the current command line, execution in the .BAT file continues at the previously retained offset.
When you execute VLM (or NETX) from the image disk batch file, VLM senses that MBA was used to boot the PC, and tells MBA to clean up. After MBA does some housekeeping and removes itself from memory, the image file is closed, and drive A: is restored. VLM (or NETX) then transfers control to the same .BAT file in SYS:LOGIN, at the point where it left off in the image disk. In this guide, this is called the "VLM Transfer Point". Understanding this transfer point is important in solving problems with missing batch files, and in supporting more than one boot image file in the SYS:LOGIN directory.
When things do not work, check the following situations to resolve the most likely problems:
![]() If you are not using the Boot Image Editor
Loader option, check that RPLODI is loaded after LSL.COM and before the ODI
driver. If RPLODI is not loaded, the boot image hangs while loading the ODI
driver, or shortly afterwards.
If you are not using the Boot Image Editor
Loader option, check that RPLODI is loaded after LSL.COM and before the ODI
driver. If RPLODI is not loaded, the boot image hangs while loading the ODI
driver, or shortly afterwards.
![]() Check that the Ethernet frame type configured
in MBA is the frame type that is loaded at the file server.
Check that the Ethernet frame type configured
in MBA is the frame type that is loaded at the file server.
![]() Within an image file, check for explicit
references to drive A: within any pathname; avoid explicit drive A: references.
Within an image file, check for explicit
references to drive A: within any pathname; avoid explicit drive A: references.
![]() DOS 6.x sets COMSPEC to A:\COMMAND.COM, and
may set PATH to A:\. Just before loading VLM, clear PATH and change the COMSPEC
variable to the DOS search drive that is established after login, as follows:
DOS 6.x sets COMSPEC to A:\COMMAND.COM, and
may set PATH to A:\. Just before loading VLM, clear PATH and change the COMSPEC
variable to the DOS search drive that is established after login, as follows:
set path=
set comspec=x:command.com
vlm
![]() If the PC hangs at the "Jumping to Boot
Record" message, it could be one of the following:
If the PC hangs at the "Jumping to Boot
Record" message, it could be one of the following:
The diskette you used to create the boot image file was infected with a boot sector virus. Check the original diskette, or use Boot Image Editor to map the image to drive A: and scan for virus infections.
When the "invalid path for EMM386" error message is displayed while loading Windows 3.x, add the "/y" parameter to the EMM386 command line in the boot image file to define the network path where EMM386.EXE is located. For example,
device = emm386.exe /y=x:\dos\v6.22\emm386.exe
This section describes all of the MBA for NetWare generic messages. There may be other error messages specific to your version of MBA.
MSD: no reply (only in verbose mode)
This is not an error message, but merely an indication that MBA could not locate the optional MSD NLM on your network. See "Multiple Servers: How the MSD NLM Can Help" for further information.
File server could not be found
The file server is either down or not responding to connection requests. Check that your PC is connected to an active network cable segment.
Error opening boot file
The main reason why this message could appear is that you have more than one file server on your network, and some of them do not have the needed boot files in their SYS:LOGIN directories. See "Multiple Servers: How the MSD NLM Can Help" for further information.
It is also possible that the file exists, but it is open and locked by another PC. Check that the file exists and is flagged as shareable. Load the MONITOR NLM on the file server console to check if the file is in use by another connection.
Another reason could be that you've run DOSGEN to generate your boot image file (NET$DOS.SYS or equivalent), but you generated this file in the SYS:SYSTEM directory. All boot image files need to be in the SYS:LOGIN directory.
Error reading boot diskette file
An error occurred while reading the boot image file. This problem is usually a hardware-related difficulty or a virus infection that caused the read to fail after many retries, and earlier error messages. If other messages were displayed, refer to their explanation for suggestions on what the problem could be.
Rx2 (only in verbose mode)
This message may appear when in the verbose mode during the boot process on a heavily congested network. There is no cause for alarm if you see several of these messages in a row, but if many of them appear consecutively, it usually indicates a network problem.
Rx2 indicates that MBA timed out while waiting for a packet. If you have an Ethernet version of MBA, this message may appear continuously, indicating that the Ethernet frame type MBA is using to communicate is not supported at the server.
With some ODI drivers, you may see Rx2 messages if you have forgotten to load RPLODI before loading the ODI driver; check that RPLODI.COM is being loaded. In other cases, Rx2 may appear, indicating an improper network cable connection.
"<", ">"
The ">" and "<" messages appear only after IPXODI.COM (or your board-specific ODI driver) has loaded, but before VLM or NETX has finished loading. The ">" indicates that the IPX layer had problems transmitting data on the network, while the "<" indicates that there was a problem with receiving data from IPX. Since MBA has managed to get this far in the boot sequence, it is usually a configuration mismatch between your NIC and IPX that is causing the problem.
There are several reasons why the ">" message could appear: either you have loaded the wrong ODI driver (perhaps for a different NIC), or the driver you have loaded does not match your NIC's configuration. If the version of MBA you are using does not use interrupts, check that the NIC's interrupt jumper is set to that expected by the ODI driver.
If the "<" message appears repeatedly on an Ethernet PC, it is likely that the Ethernet frame type for which the ODI driver is configured is not loaded at the server.
A cause of the "Batch file missing" message is a user login script which changes the mapping of the first network drive from the SYS:LOGIN to some other directory. You can avoid this problem by leaving the first network drive mapped to SYS:LOGIN throughout the entire LOGIN script.
The LOGIN script supports a command called EXIT, which can be used to run a .BAT file upon exiting from the LOGIN script. If you are running the LOGIN command from a .BAT file in SYS:LOGIN, and there are further command lines in this file, then you EXIT from your login script with a .BAT file specified, the remainder of the SYS:LOGIN .BAT file is processed and only then is your EXIT .BAT file processed.
Remote Program Load (RPL) is a protocol originally defined by IBM that allows PCs to start by downloading files from a file server.
Servers that support the RPL boot protocol include:
![]() Microsoft Windows NT Server
Microsoft Windows NT Server
![]() Microsoft LAN Manager
Microsoft LAN Manager
![]() IBM LAN Server
IBM LAN Server
![]() IBM Warp Server
IBM Warp Server
![]() Digital Pathworks
Digital Pathworks
![]() Artisoft LANtastic
Artisoft LANtastic
Note: The RPL protocol within MBA does not support the Novell NetWare RPL protocol. NetWare users should use MBA for NetWare.
Throughout this chapter, information is provided for using MBA in Microsoft NT Server environments, the most popular RPL server. For information on other RPL servers, refer to documentation provided by the server vendor.
![]() Supports Microsoft Windows NT Server,
Microsoft LAN Manager, IBM LAN Server, IBM Warp Server, Digital Pathworks,
Artisoft LANtastic
Supports Microsoft Windows NT Server,
Microsoft LAN Manager, IBM LAN Server, IBM Warp Server, Digital Pathworks,
Artisoft LANtastic
![]() Supports remoteboot of DOS, Windows 9x and
OS/2 (network operating system dependent)
Supports remoteboot of DOS, Windows 9x and
OS/2 (network operating system dependent)
Figure 23: MBA in RPL Environments
Because of the diversity and complexity of RPL environments, we are unable to provide brief instructions in this guide. Instead, see the file NTRPL.TXT on the MBA Utility CD or MBA subdirectory on the EtherCD. This file contains abbreviated instructions for those who are experienced with MBA installation in NT server RPL environments. For more detailed instructions, refer to information presented later in this chapter. Remember to complete the steps under "Quick Start" in Chapter 2 before moving on to this section.
The Windows NT Remoteboot Service supports PCs running MS-DOS and Windows 3.1 clients. Windows NT does not support Windows For Workgroups (due to inconsistencies with Windows 3.11 networking components), Windows NT Workstation, or OS/2 clients.
The Remoteboot Service works by providing two resources at the server:
![]() A boot block which contains all the information needed to
start the client when it boots.
A boot block which contains all the information needed to
start the client when it boots.
![]() The remoteboot profile which defines the operating system environment
of the client after it boots.
The remoteboot profile which defines the operating system environment
of the client after it boots.
The boot sequence (DOS, Windows 3.1 clients) for Windows NT works as follows:
![]() When a remoteboot client starts, the NIC
initializes and broadcasts a FIND frame.
When a remoteboot client starts, the NIC
initializes and broadcasts a FIND frame.
![]() The Remoteboot Service receives the FIND
frame, which contains the client's NIC ID. The Remoteboot Service checks the
remoteboot database on the server to see if a PC record already exists.
The Remoteboot Service receives the FIND
frame, which contains the client's NIC ID. The Remoteboot Service checks the
remoteboot database on the server to see if a PC record already exists.
![]() If a record does not exist and the NIC's
prefix is recognized by the Remoteboot Service, the service records this NIC ID
but does not boot the client. To boot the client, you must convert this NIC ID
record to a PC record using Remoteboot Manager. If a PC record does exist with
this NIC ID, the Remoteboot Service sends a FOUND frame containing the server's
NIC ID to the MBA ROM on the client.
If a record does not exist and the NIC's
prefix is recognized by the Remoteboot Service, the service records this NIC ID
but does not boot the client. To boot the client, you must convert this NIC ID
record to a PC record using Remoteboot Manager. If a PC record does exist with
this NIC ID, the Remoteboot Service sends a FOUND frame containing the server's
NIC ID to the MBA ROM on the client.
![]() MBA accepts the first FOUND frame it receives
and returns the SEND FILE REQUEST frame to the NIC ID of the server that sent
it.
MBA accepts the first FOUND frame it receives
and returns the SEND FILE REQUEST frame to the NIC ID of the server that sent
it.
![]() When the Remoteboot Service receives the SEND
FILE REQUEST frame, it uses FILE DATA RESPONSE frames to send a boot block to
MBA. The PC record in the remoteboot database specifies which boot block to
send (MS-DOS or Windows 3.1). When MBA receives the last FILE DATA RESPONSE
frame, it clears the screen and transfers execution to the entry point of the
boot block.
When the Remoteboot Service receives the SEND
FILE REQUEST frame, it uses FILE DATA RESPONSE frames to send a boot block to
MBA. The PC record in the remoteboot database specifies which boot block to
send (MS-DOS or Windows 3.1). When MBA receives the last FILE DATA RESPONSE
frame, it clears the screen and transfers execution to the entry point of the
boot block.
![]() MBA boots the operating systems specified by
the boot block as appropriate for the client. For an MS-DOS or Windows 3.1
client, this completes the basic boot process.
MBA boots the operating systems specified by
the boot block as appropriate for the client. For an MS-DOS or Windows 3.1
client, this completes the basic boot process.
When booting with MBA, the PC displays a screen similar to Figure 24.

Figure 24: RPL boot screen
This section lists some techniques for using MBA in RPL environments:
Using Script Files and Redirection
The remoteboot database used in Windows NT is contained within two files: SYSTEM.MDB and RPLSVC.MDB, found in the \\ systemroot \RPL directory. Access to the remoteboot database is enabled only through the RPLCMD.EXE command line utility and Remoteboot Manager.
Creating or editing boot blocks and configurations for new NICs can be made easier by using script files and redirecting them into the RPLCMD.EXE command line utility. Using the supplied examples, you can create your own scripts by modifying and copying them. The FETH.RPL script provided on the MBA Utility CD or MBA subdirectory on the EtherCD serves as an example for creating configurations for various DOS versions.
The following is a sample commented section for adding a boot block. Modify this sample as needed. Remove comments and remove any spaces between lines.
Comments
b boot
block
a add
dosfeth add
new BBLOCK name i.e. DOSFETH
002f00 1st six
digits of new NIC address
bblock\netbeui\feth\dosbb.cnf directory
name of NIC-specific
configuration
files
abc fastethernet comment
for the NIC
0 window
size of zero
A sample section for adding a configuration is as follows:
Comments
c configuration
a add
dos622ip new
configuration name i.e.
DOS622_ABC
FETH
dosfeth BBLOCK
name as above i.e.
DOS_ABC
FETH
dos
dos622
fits\dos622.fit
fits\dos622p.fit
dos6.22 abc fastethernet comment
for this configuration
The .BAT file (RPLUP.BAT, also on the MBA Utility CD or MBA subdirectory on the
EtherCD) requires the script file to reside in the same directory as that of
the .BAT file:
@echo off
if "%2"=="" goto error
if "%1"=="" goto error
:start
rplcmd %1 < %2
goto end
:error
echo rplup <computername> <scriptfile>
echo example: rplup \\nt_server feth.rpl
:end
When things do not work, check these situations to resolve the most likely problems:
Unknown Client NIC ID
If an "unknown client NIC ID" line appears within the NT Server Remoteboot Manger console while attempting a PC boot, it indicates the PC's prefix (VendorName) is not defined. Use the following example to define the prefix. The VendorName field is a unique six-digit value assigned to the NIC vendor; this value is the most significant six digits of the NIC's Ethernet address.
Even though it appears a valid VendorName exists for your NIC, it may be that you have a newer NIC that had a different VendorName value. To correct this problem, create a new remoteboot configuration or add the NIC to an existing profile as outlined in the Windows NT Server Installation Guide. Follow the example and add the new six-digit prefix to the VendorName parameter.
You must use the RPLCMD utility to add the new VendorName (the first six digits of the NIC's node ID) to the NIC's profile. The following example demonstrates how to add the new VendorName to an existing profile and assumes that VendorName is 002F00. Enter the correct VendorName for your NIC.
c:\winnt\rpl>
rplcmd
adapter boot config profile service vendor wksta [quit}: b
add del enum: a
bootname=dosh
vendorname=002f00
bbcfile=bblock\netbeui\feth\dosbb.cnf
bootcomment= abc fastethernet
windowsize=0
Searching for DLC RPL Server, retries=nnnnnn
![]() Does a proper connection to a file server
exist?
Does a proper connection to a file server
exist?
![]() Is at least one server running the Remoteboot
Service?
Is at least one server running the Remoteboot
Service?
![]() Is the NT Server RPL service rejecting PC
requests because the RPL service does not support the NIC you are using? See "Unknown Client NIC id" in this section.
Is the NT Server RPL service rejecting PC
requests because the RPL service does not support the NIC you are using? See "Unknown Client NIC id" in this section.
![]() Is there a Remoteboot Manager console for an
existing PC entry for the NIC? If one does not exist, refresh the screen (View
Refresh) to see if the NIC's RPL broadcast was received.
Is there a Remoteboot Manager console for an
existing PC entry for the NIC? If one does not exist, refresh the screen (View
Refresh) to see if the NIC's RPL broadcast was received.
![]() Is there a Remoteboot Service error in the
Event Viewer log?
Is there a Remoteboot Service error in the
Event Viewer log?
![]() Are there routers between the server and the
PC? Routers between the server and the PC will cause problems because the RPL
protocol is not routable
Are there routers between the server and the
PC? Routers between the server and the PC will cause problems because the RPL
protocol is not routable
NDIS Drivers Require More Memory to Load
The program below needs more memory XX K (NDIS driver name) The workstation failed to boot
drv bblock\ndis\feth.dos ~ ~ ~
drv bblock\ndis\feth.dos ~ 5 ~
Boot Block Fails to Load DOS
Non-system disk or disk error Replace and press any key when ready
\\%systemroot%\rpl\rplfiles\binfiles\dosxxx.
3Com provides easy access to technical support information through a variety of services. This appendix describes these services.
Information contained in this appendix is correct at time of publication. For the very latest, 3Com recommends that you access the 3Com Corporation World Wide Web site.
3Com offers worldwide product support 24 hours a day, 7 days a week, through the following online systems:
![]() World Wide Web site
World Wide Web site
![]() 3Com Knowledgebase Web Services
3Com Knowledgebase Web Services
![]() 3Com FTP site
3Com FTP site
![]() 3Com Bulletin Board Service (3ComBBS)
3Com Bulletin Board Service (3ComBBS)
![]() 3ComFactsSM automated fax service
3ComFactsSM automated fax service
Access the latest networking information on the 3Com Corporation World Wide Web site by entering the URL into your Internet browser:
This service provides access to online support information such as technical documentation and software library, as well as support options ranging from technical education to maintenance and professional services.
Access 3Com Knowledgebase-a self-service database of technical information to help you diagnose and solve installation, configuration, and upgrade problems with 3Com products by entering the URL into your internet browser:
https://knowledgebase.3com.com/
Download drivers, patches, software, and MIBs across the Internet from the 3Com public FTP site. This service is available 24 hours a day, 7 days a week.
To connect to the 3Com FTP site, enter the following information into your FTP client:
![]() Hostname: ftp.3com.com
(or )
Hostname: ftp.3com.com
(or )
![]() Username: anonymous
Username: anonymous
![]() Password: <your Internet e-mail address>
Password: <your Internet e-mail address>
Note: A user name and password are not needed with Web browser software such as Netscape Navigator and Internet Explorer.
The 3Com BBS contains patches, software, and drivers for 3Com products. This service is available through analog modem or digital modem (ISDN) 24 hours a day, 7 days a week.
Access by Analog Modem
To reach the service by modem, set your modem to 8 data
bits, no parity, and 1 stop bit. Call the telephone number nearest you:
|
Country |
Data Rate |
Telephone Number |
|
Australia |
up to 14400 bps |
61 2 9955 2073 |
|
Argentina |
|
541 313 7535 |
|
Brazil (general) |
up to 14400 bps |
+ 55 11 523 9790 |
|
Brazil (modem) |
|
+ 55 11 523 8780 |
|
Chile |
|
562 639 3601 |
|
Colombia |
|
571 629 4485 |
|
France |
up to 14400 bps |
33 1 6986 6954 |
|
Germany |
up to 28800 bps |
4989 62732 188 |
|
Hong Kong |
up to 14400 bps |
852 2537 5601 |
|
Italy |
up to 14400 bps |
39 2 27300680 |
|
Japan |
up to 14400 bps |
81 3 5977 7477 |
|
Mexico |
up to 28800 bps |
525 520 3662 |
|
P.R. of China |
up to 14400 bps |
86 10 684 92351 |
|
Taiwan, R.O.C. |
up to 14400 bps |
886 2 377 5840 |
|
U.K. |
up to 28800 bps |
44 1442 438278 |
|
USA |
up to 28800 bps |
1 847 262 6000 |
|
Venezuela |
|
582 267 6629 |
Access by Digital Modem
ISDN users can dial in to the 3Com BBS using a digital modem for fast access up to 64Kbps. To access the 3Com BBS using ISDN, use the following number:
1 408 654 2703
The 3ComFacts automated fax service provides technical articles, diagrams, and troubleshooting instructions on 3Com products 24 hours a day, 7 days a week.
Call 3ComFacts using your touch-tone telephone:
1 408 727 7021
If additional assistance is required, contact your network supplier. Many suppliers are authorized 3Com service partners who are qualified to provide a variety of services, including network planning, installation, hardware maintenance, application training, and support services.
When you contact your network supplier for assistance, have the following information ready:
![]() Product model name, part number, and serial
number
Product model name, part number, and serial
number
![]() A list of system hardware and software,
including revision levels
A list of system hardware and software,
including revision levels
![]() Diagnostic error messages
Diagnostic error messages
![]() Details about recent configuration changes, if
applicable
Details about recent configuration changes, if
applicable
If you are unable to contact your network supplier, see the following section on how to contact 3Com.
If you are unable to obtain assistance from the 3Com online technical resources or from your network supplier, 3Com offers technical telephone support services. To find out more about your support options, please call the 3Com technical telephone support phone number at the location nearest you.
When you contact 3Com for assistance, have the following information ready:
![]() Product model name, part number, and serial
number
Product model name, part number, and serial
number
![]() A list of system hardware and software,
including revision levels
A list of system hardware and software,
including revision levels
![]() Diagnostic error messages
Diagnostic error messages
![]() Details about recent configuration changes, if
applicable
Details about recent configuration changes, if
applicable
Following is a list of worldwide technical telephone support
numbers:
|
Country |
Telephone Number |
|
Asia Pacific Rim |
|
|
Australia |
1 800 678 515 |
|
P.R. of China |
10800 61 00137 or |
|
Hong Kong |
800 933 486 |
|
India |
+ 61 2 9937 5085 |
|
Indonesia |
001 800 61 009 |
|
Country |
Telephone Number |
|
|
|
|
Japan |
0031 61 6439 |
|
Malaysia |
1800 801 777 |
|
New Zealand |
0800 446 398 |
|
Pakistan |
+ 61 2 9937 5085 |
|
Philippines |
1235 61 266 2602 |
|
Singapore |
800 6161 463 |
|
S. Korea from anywhere in From Seoul: |
(0)2 3455 6455 |
|
Taiwan, R.O.C. |
0080 611 261 |
|
Thailand |
001 800 611 2000 |
|
Europe, South Africa, and Middle East From anywhere in Europe, call: |
+ 31 (0)30 6029900 phone |
|
From the following European countries, you may use the toll-free numbers: |
|
|
Austria |
0800 297468 |
|
Belgium |
0800 71429 |
|
Denmark |
800 17309 |
|
Finland |
0800 113153 |
|
France |
0800 917959 |
|
Germany |
0130 821502 |
|
Country |
Telephone Number |
|
Hungary |
00 800 12813 |
|
Ireland |
1 800 553117 |
|
Israel |
1800 9453794 |
|
|
1678 79489 |
|
|
0800 0227788 |
|
|
800 11376 |
|
|
00 800 3111206 |
|
|
0800 831416 |
|
|
0800 995014 |
|
|
900 983125 |
|
|
020 795482 |
|
|
0800 55 3072 |
|
|
0800 966197 |
|
|
|
|
All Latin America (except |
+ 800 666 5065 |
|
All Latin America (except |
+ 800 778 5573 |
|
|
+ 55 11 523 2725 phone |
|
Brazil Volume support |
+ 55 11 523 5153 |
|
Brazil Volume support |
0800 13 3266 |
|
From the following Latin American countries, you may use the following numbers: |
|
|
|
0800 54288 |
|
|
1 800 872 2881 |
|
Country |
Telephone Number |
|
Belize |
811 |
|
Bolivia |
0 800 1112 |
|
Brazil |
0800 13 3266 |
|
|
800 800 311 |
|
|
800 800 288 |
|
|
000 311 |
|
|
980 11 0010 |
|
|
0800 0 114114 |
|
Rep. Dominicana |
1 800 872 2881 |
|
|
999 119 |
|
|
800 1785 |
|
Guatemala |
99 99 190 |
|
|
183 |
|
|
800 0 123 |
|
|
0 800 872 2881 |
|
|
872 |
|
|
174 |
|
|
109 |
|
Panama |
281 0109 |
|
Paraguay |
0800 11 800 |
|
Peru |
0 800 50000 |
|
Uruguay |
000 410 |
|
Venezuela |
800 11 120 |
|
|
|
|
North America |
1 800 TSO 3Com |
Before you send a product directly to 3Com for repair, you must first obtain a Return Materials Authorization (RMA) number. Products sent to 3Com without RMA numbers will be returned to the sender unopened, at the sender's expense.
To obtain an RMA number, call or fax:
|
Country/Region |
Telephone Number |
Fax Number |
|
Asia, |
+ 65 543 6342 |
+ 65 543 6348 |
|
Europe, |
+ 31 30 6029900 |
+ 31 30 6029999 |
From the following Asian countries, you may call the following toll-free
numbers:
|
Country |
Telephone Number |
Fax Number |
|
|
00 11 800 5432 5400 |
|
|
|
00 800 5432 5400 |
|
|
|
001 800 5432 5400 |
|
|
|
543 6500 |
|
|
|
00 800 5432 5400 |
|
|
|
002 800 5432 5400 |
|
|
|
001 800 5432 5400 |
|
|
Taiwan |
00 80 65 1346 |
|
|
Philippines |
1800 1651 0210 |
|
|
China |
10 800 650 0025 |
|
RMA help desk e-mail address in
|
CABU/Enterprise Products |
E-mail Address |
|
South Asia and Korea | |
|
China | |
|
Japan | |
|
| |
|
Carrier |
From the following European countries, you may use the toll-free
numbers; select option 2 and then option 2.
|
Country |
Telephone Number |
|
|
|
06 607468 |
|
|
|
0800 71429 |
|
|
|
800 17309 |
|
|
|
0800 113153 |
|
|
|
0800 917959 |
|
|
|
0800 1821502 |
|
|
|
00800 12813 |
|
|
|
1 800 553117 |
|
|
|
1 800 9453794 |
|
|
|
1678 79489 |
|
|
|
0800 0227788 |
|
|
|
800 11376 |
|
|
|
0800 3111206 |
|
|
|
05 05313416 |
|
|
|
0800 995014 |
|
|
|
900 983125 |
|
|
|
020 795482 |
|
|
|
0800 55 3072 |
|
|
|
0800 966197 |
|
|
Country/Region |
Telephone Number |
Fax Number |
|
|
1 408 326 2927 |
1 408 764 6883 |
|
USA and Canada |
1 800 638 3266 or |
1 408 764 7120 |
Tech Support and RMA help desk e-mail address in
|
|
E-mail Address |
|
Communications Team e-mail address | |
|
Logistics Team e-mail address |
Managed PC Boot Agent (MBA)
HARDWARE: 3Com warrants this hardware product to be free from defects in workmanship and materials, under normal use and service, for the following length of time from the date of purchase from 3Com or its authorized reseller: Lifetime
3Com's sole obligation under this express warranty shall be, at 3Com's option and expense, to repair the defective product or part, deliver to Customer an equivalent product or part to replace the defective item, or if neither of the two foregoing options is reasonably available, 3Com may, in its sole discretion, refund to Customer the purchase price paid for the defective product. All products that are replaced will become the property of 3Com. Replacement products may be new or reconditioned. 3Com warrants any replaced or repaired product or part for ninety (90) days from shipment, or the remainder of the initial warranty period, whichever is longer.
software 3Com warrants that each software program licensed from it will perform in substantial conformance to its program specifications, for a period of ninety (90) days from the date of purchase from 3Com or its authorized reseller. 3Com warrants the media containing software against failure during the warranty period. No updates are provided. 3Com's sole obligation under this express warranty shall be, at 3Com's option and expense, to refund the purchase price paid by Customer for any defective software product, or to replace any defective media with software which substantially conforms to applicable 3Com published specifications. Customer assumes responsibility for the selection of the appropriate applications program and associated reference materials. 3Com makes no warranty or representation that its software products will meet Customer's requirements or work in combination with any hardware or applications software products provided by third parties, that the operation of the software products will be uninterrupted or error free, or that all defects in the software products will be corrected. For any third party products listed in the 3Com software product documentation or specifications as being compatible, 3Com will make reasonable efforts to provide compatibility, except where the non-compatibility is caused by a "bug" or defect in the third party's product or from use of the software product not in accordance with 3Com's published specifications or user manual.
YEAR 2000 WARRANTY: In addition to the Hardware Warranty and Software Warranty identified above, 3Com warrants that each product sold or licensed to Customer on and after January 1, 1998 that is date sensitive will continue performing properly with regard to such date data on and after January 1, 2000, provided that all other products used by Customer in connection or combination with the 3Com product, including hardware, software, and firmware, accurately exchange date data with the 3Com product, with the exception of those products identified at 3Com's Web site, http://www. com.com/products/yr2000.html, as not meeting this standard. If it appears that any product that is stated to meet this standard does not perform properly with regard to such date data on and after January 1, 2000, and Customer notifies 3Com before the later of April 1, 2000, or ninety (90) days after purchase of the product from 3Com or its authorized reseller, 3Com shall, at its option and expense, provide a software update which would effect the proper performance of such product, repair such product, deliver to Customer an equivalent product to replace such product, or if none of the foregoing is feasible, refund to Customer the purchase price paid for such product.
Any software update or replaced or repaired product will carry a Year 2000 Warranty for ninety (90) days or until April 1, 2000, whichever is later.
OBTAINING Warranty
Service: Customer must contact the 3Com
Dead- or Defective-on-Arrival In the event a product completely fails to function or exhibits a defect in materials or workmanship within the first forty-eight (48) hours of installation but no later than thirty (30) days after the date of purchase, and this is verified by 3Com, it will be considered dead- or defective-on-arrival (DOA) and a replacement shall be provided by advance replacement. The replacement product will normally be shipped not later than three (3) business days after 3Com's verification of the DOA product, but may be delayed due to export or import procedures. When an advance replacement is provided and Customer fails to return the original product to 3Com within fifteen (15) days after shipment of the replacement, 3Com will charge Customer for the replacement product, at list price.
3Com shall not be responsible for any software, firmware, information, or memory data of Customer contained in, stored on, or integrated with any products returned to 3Com for repair, whether under warranty or not.
ADDITIONAL SERVICES:
Telephone Support, with coverage for basic troubleshooting only, will be provided for the lifetime of the product, on a commercially reasonable efforts basis. Telephone support from 3Com is available from 3Com only if Customer purchased this product directly from 3Com, or if Customer's reseller is unable to provide telephone support. Please refer to the Technical Support appendix in the user guide for telephone numbers.
3Com's Web and Bulletin Board Service are available at no charge, and provide software and firmware upgrades, a bug list, and technical information about 3Com products.
Warranties Exclusive If a
3Com product does not operate as warranted above, Customer's sole remedy FOR
BREACh OF THAT WARRANTY shall be repair, replacement, or refund of the purchase
price paid, at 3Com's option. TO THE FULL
EXTENT ALLOWED BY LAW, THE FOREGOING WARRANTIES AND REMEDIES ARE EXCLUSIVE AND
ARE IN LIEU OF ALL OTHER WARRANTIES, terms, or conditions, EXPRESS OR IMPLIED,
EITHER IN FACT OR BY OPERATION OF LAW, STATUTORY OR OTHERWISE, INCLUDING
WARRANTIES, terms, or conditions OF MERCHANTABILITY, FITNESS FOR A PARTICULAR
PURPOSE, satisfactory quality, CORRESPONDENCE WITH DESCRIPTION, AND
NON-INFRINGEMENT, ALL OF WHICH ARE EXPRESSLY DISCLAIMED. 3COM NEITHER ASSUMES NOR AUTHORIZES ANY OTHER
PERSON TO ASSUME FOR IT ANY OTHER LIABILITY IN CONNECTION WITH THE
3COM SHALL NOT BE LIABLE UNDER THIS WARRANTY IF ITS TESTING AND EXAMINATION DISCLOSE THAT THE ALLEGED DEFECT OR MALFUNCTION IN THE PRODUCT DOES NOT EXIST OR WAS CAUSED BY CUSTOMER'S OR ANY THIRD PERSON'S MISUSE, NEGLECT, IMPROPER INSTALLATION OR TESTING, UNAUTHORIZED ATTEMPTS TO OPEN, REPAIR OR MODIFY THE PRODUCT, OR ANY OTHER CAUSE BEYOND THE RANGE OF THE INTENDED USE, OR BY ACCIDENT, FIRE, LIGHTNING, OTHER HAZARDS, OR ACTS OF GOD.
Limitation of Liability. TO THE FULL EXTENT ALLOWED BY LAW, 3COM ALSO EXCLUDES for itself and its suppliers ANY LIABILITY, WHETHER BASED IN CONTRACT OR TORT (INCLUDING NEGLIGENCE), FOR INCIDENTAL, CONSEQUENTIAL, INDIRECT, SPECIAL, OR PUNITIVE DAMAGES OF ANY KIND, OR FOR LOSS OF REVENUE or profits, LOSS OF BUSINESS, loss of information or data, OR OTHER FINANCIAL LOSS ARISING OUT OF OR IN CONNECTION WITH THE SALE, INSTALLATION, MAINTENANCE, USE, PERFORMANCE, FAILURE, OR INTERRUPTION OF ITS PRODUCTS, even if 3com or its authorized reseller has been advised of the possibility of such damages, AND LIMITS ITS LIABILITY TO REPAIR, REPLACEMENT, OR REFUND OF THE PURCHASE PRICE paid, AT 3cOM'S OPTION. THIS DISCLAIMER OF LIABILITY FOR DAMAGES WILL NOT BE AFFECTED IF ANY REMEDY PROVIDED HEREIN SHALL FAIL OF ITS ESSENTIAL PURPOSE.
DISCLAIMER: Some countries, states, or provinces do not allow the exclusion or limitation of implied warranties or the limitation of incidental or consequential damages for certain products supplied to consumers or the limitation of liability for personal injury, so the above limitations and exclusions may be limited in their application to you. When the implied warranties are not allowed to be excluded in their entirety, they will be limited to the duration of the applicable written warranty. This warranty gives you specific legal rights which may vary depending on local law.
GOVERNING LAW: This Limited Warranty shall be governed by
the laws of the State of
3Com Corporation
5400
(408) 326-5000
4/15/99
This section briefly describes some of the terms used when working with preboot technology. Information in this section was supplied through the following sources:
![]() PXE Specification 2.0 December 1998 by Intel
Corporation with special contribution from SystemSoft
PXE Specification 2.0 December 1998 by Intel
Corporation with special contribution from SystemSoft
![]() WfM 1.0, 1.1, 2.0 Summary and Review 1997,
1998 for 3Com Corporation / Lanworks, Intel, Microsoft, ACER, Adaptec, AMI, Bay
Networks, Compaq, Computer Associates, Dell, FUJITSU / ICL, HP, IBM / Tivoli,
Inference, Magic Solutions, Mylex, NEC, Novell, Phoenix Technologies, Royal
Blue, SCO, SNI, Standard Microsystems, SUN, SYMBIOS, SystemSoft, Texas
Instruments, Toshiba, Vantive.
WfM 1.0, 1.1, 2.0 Summary and Review 1997,
1998 for 3Com Corporation / Lanworks, Intel, Microsoft, ACER, Adaptec, AMI, Bay
Networks, Compaq, Computer Associates, Dell, FUJITSU / ICL, HP, IBM / Tivoli,
Inference, Magic Solutions, Mylex, NEC, Novell, Phoenix Technologies, Royal
Blue, SCO, SNI, Standard Microsystems, SUN, SYMBIOS, SystemSoft, Texas
Instruments, Toshiba, Vantive.
ACPI
API
APM
Asset management
BAID
Base Memory
BINL
BIOS
BOOTP
BUSD Bus/Device
Client
Common Information Model (CIM)
DDIM
Desktop Management Interface (DMI)
Independent of any specific desktop operating system, network operating system, network protocol, management protocol, processor, or hardware platform.
Easy for vendors to implement.
Easily mapped to higher-level protocols.
Desktop Management Task Force (DMTF)
DHCP
DMI compliance
Extensible Firmware Interface (EFI)
Extended Memory
GUID
IETF
IID
Instrumentation
Interoperability
Inventory management
IPL
LOM (LAN on Motherboard)
Manageability
Managed Client
Management Application
Management Information Base (MIB)
Management Information Format (MIF)
Management Object Format (MOF)
MTFTP
NBP
Network management
NIC
NSB
Option ROM
OS
PCI PM
POST
Power management
ProxyDHCP
Preboot Execution Environment (PXE)
Remote Procedure Call (RPC)
Remote wakeup (RWU)
RFC
ROM
RPL
Server management
Shadow
Simple Network Management Protocol (SNMP)
System
System Management
System Management (SM) BIOS
TFTP
Total Cost of Ownership (TCO)
UDP
UNDI
Upper Memory
UUID
Web-Based
Wired for Management (WfM)
Base code, 12, 14
BBS-BIOS, setting the boot order on PCs with, 13
Boot block for Remoteboot Service, 86
Boot Image Editor
description, 4
installation, 9
BOOTCONF.SYS
and MSD, 75
editing, 72
syntax, 73
BOOTEDIT, 72
BOOTP service for TCP/IP, 50
BOOTPTAB or DHCP fields, 47
BWLOADHI, 4
CHKID, 78
DHCP service for TCP/IP, 50
DIP Socket, ROM installation, 7
EFI, 30
EMM386
and DOS, 45
and Windows, 69
ERRORLEVEL, and CHKID, 79
Extensible Firmware Interface, 30
Frame types, 65
FREEMEM, 57
IA-32, IA-64, 30
IMAGEGEN, 4
IMGGEN, 4
Information screen, 34
ISA, 5
MAPGEN, 4
MBA base code, 12, 22, 33
MBA on Disk, 5, 30
MBA options, 14
MBA ROM, Programming with MBAFLASH, 11
MBA UNDI, 12, 22
MBACFG, 25
MBAFLASH, 11
MULTI_ED, 4
NCP, 65
NetWare, 65
Online technical services, 91
PBOOT, 40, 41
PCI, 5
PLCC Socket, ROM installation, 8
Pre-OS
creating NetWare boot images, 42
creating TCP/IP images, 41
Profile, and Remoteboot Service, 86
PXE, 61
Returning products for repair, 97
ROMSCAN, 35
ROMTYPE, 79
RPL, 85
RPLCMD, 89
RPLCMD.EXE, 88
RPLODI:, 69
Support
from 3Com, 93
from your network supplier, 93
online, automated fax service, 92
online, bulletin board service, 92
online, FTP site, 91
online, World Wide Web site, 91
returning products for repair, 97
TCP/IP, 47
TFTP, 50
UNDI, 12
UNDIS3C, 53
Universal NDIS Driver, 53
UNRPLFIX, 4
Updating with MBA ROM, 28
Verbose mode, 34
Wired for Management, 62
|