VNC consists of two types of component. A server, which generates a display, and a viewer, which actually draws the display on your screen. There are two important features of VNC:
So, to get started with VNC you need to run a server, and then connect to it with a viewer. Get the packages for the platforms you use from the download page, if you haven't already, and install them. The current VNC software requires a TCP/IP connection between the server and the viewer, though there is no reason why the software couldn't be modified to use, for example, RS232 or Firewire. We have internal versions that use other network transport layers. But for now you'll need to know the name or the IP address of the server machine.
Most people will be running either a Unix server or a Windows server, though similar principles will apply to other platforms.
Running a Unix serverA VNC server appears, to the Unix applications which appear on it, to be a standard X display just like the one 313i824d you sit in front of; but it doesn't have a physical screen attached. The applications don't know this. They just carry on running whether or not a viewer is connected, in the same way as they would regardless of whether you were actually looking at your physical screen. You can start a new VNC server by typing: vncserver on a Unix machine. (If you're sitting at a PC you may need to telnet to the Unix machine to get a command shell into which you can type this.) The vncserver program is a Perl script which you may need to edit to set up the directories appropriate for your local installation. If you haven't run a VNC server before you will be prompted for a password, which you will need to use when connecting to this server. All your servers will use the same password, and you can change it at a later date using vncpasswd With a normal X system, the main X display of a workstation called 'snoopy' is usually snoopy:0. You can also run as many VNC servers on a Unix machine as you like, and they will appear as snoopy:1, snoopy:2 etc, as if they were just additional displays. You can cause applications to use them by setting the DISPLAY environment variable to the VNC server you want, or by starting the application with the -display option. For example: xterm -display snoopy:2 & Normally vncserver will choose the first available display number and tell you what it is, but you can specify a display number if you always wish to use the same one: vncserver :2 Nothing will appear immediately as a result of starting a server. To see anything you need to connect a viewer to the server. See below. The server will generate a log in your ~/.vnc directory. If you have problems at this stage, see the full documentation and the FAQ . Killing a Unix serverYou can kill a Unix VNC server using, for example: vncserver -kill :2 |
Running a Windows server
Install the Windows server, WinVNC, by running the Setup program included in the distribution. This will create a VNC group in your Start Menu. Install the default registry settings using the option in the VNC group. Run the WinVNC server. If this is the first time you've used WinVNC on this machine you'll be prompted to set a password, which you'll need when you connect to the machine from a remote location. Normally you'll want to leave the other options on their default settings. (Note that the default display number is 0 on a PC. You'll need to specify this to the viewer when you connect.) Click OK and the server should be running. It will install a small icon on the system tray, and by right-clicking on this you can control most aspects of the server. (Full instructions for installing and running the WinVNC server can be found under the main documentation.) You can now go to another machine and connect a viewer to the server. (see below) |
When you run the viewer, you need to specify the name of the server and the number of the desktop. If, for example, you have started a server as display 2 on a machine called 'snoopy', you can start a viewer for it by typing:
vncviewer snoopy:2
With the Windows viewer, you can run it from the command line, but you will more typically run it from the VNC group on the Start Menu. In this case, you will be prompted for the host name and display number:

Enter it and click OK, and you will be prompted for your password, after which you should see the remote display. (If you are connecting to a Windows or Mac server, the display number will be 0, unless you have explicitly changed it).
If the machine running the server does not have a proper DNS entry, you probably won't be able to use the name and will have to replace snoopy:2 with something like . You can get round this on most platforms by creating a 'hosts' file which maps names onto IP addresses. Consult your local guru for help with this.
The VNC servers also contain a small web server. If you connect to this with a web browser, you can download the Java version of the viewer, and use this to view the server. You can then see your desktop from any Java-capable browser! (unless you are using a proxy to connect to the web). The server listens for HTTP connections on port 5800+display number. So to view display 2 on machine 'snoopy', you would point your web browser at:
https://snoopy:5802/
The applet will prompt you for your password, and should then display the desktop.
Note: A detailed paper about VNC can be found as:
Tristan Richardson, Quentin Stafford-Fraser, Kenneth R. Wood & Andy Hopper, "Virtual Network Computing", IEEE Internet Computing, Vol.2 No.1, Jan/Feb 1998 pp33-38.
You can download it in Acrobat format here (760k).
The following documentation assumes a basic familiarity with the terms and components used in VNC. See 'What is VNC?' and 'Getting Started' for introductory information, and the Frequently Asked Questions for common queries.
For a quick overview, you can download versions of the VNC Video.
See also 'What's
new in the VNC packages?'.
|
Technical documentation - Table of Contents |
|
VNC servers
VNC viewers
|
The VNC protocol is a simple protocol for remote access to graphical user interfaces. It is based on the concept of a remote framebuffer or RFB. In the past we have tended to refer to the VNC protocol as the RFB protocol, so you may have seen this term in other publications. The protocol simply allows a server to update the framebuffer displayed on a viewer. Because it works at the framebuffer level it is potentially applicable to all operating systems, windowing systems and applications. This includes X/Unix, Windows 3.1/95/NT and Macintosh, but might also include PDAs, and indeed any device with some form of communications link. The protocol will operate over any reliable transport such as TCP/IP.

This is truly a "thin-client" protocol: it has been designed to make very few requirements of the viewer. In this way, clients can run on the widest range of hardware, and the task of implementing a client is made as simple as possible.
The display side of the protocol is based around a single graphics primitive: "put a rectangle of pixel data at a given x,y position". This might seem an inefficient way of drawing arbitrary user interface components. But because we have a variety of different encoding schemes for the pixel data, we can select the appropriate scheme for each rectangle we send, and make the most of network bandwidth, client drawing speed and server processing speed.
The lowest common denominator is the so-called raw encoding, where the rectangle is simply pixel data sent in left-to-right scanline order. All clients and servers must support this encoding. However, the encodings actually used on any given VNC connection can be negotiated according to the abilities of the server, the client, and the connection between the two.
The copy rectangle encoding, for example, is very simple and efficient and can be used when the client already has the same pixel data elsewhere in its framebuffer. The server simply sends an X,Y coordinate giving the position from which the client can copy the rectangle of pixel data. This means that operations such as dragging or scrolling a window, which involve substantial changes to the screen, may only require a few bytes. Most clients will support this encoding, since it is generally simple to implement and saves bandwidth.
A typical workstation desktop has large areas of solid colour and of text. Some of our most effective encodings take advantage of this by efficiently describing rectangles consisting of one majority (background) colour and 'sub-rectangles' of different colours. There are numerous other possible schemes. We might use a JPEG encoding for still images or MPEG for efficient transmission of moving images. An encoding which uses some kind of caching of pixel data would be good for rendering text, where the same character is drawn in the same font multiple times. Subsequent occurrences of the same character would be encoded simply by reference to the first occurrence.
A sequence of these rectangles makes a framebuffer update (or simply update). An update represents a change from one valid framebuffer state to another, so in some ways is similar to a frame of video, but it is usually only a small area of the framebuffer that will be affected by a given update. Each rectangle may be encoded using a different scheme. The server can therefore choose the best encoding for the particular screen content being transmitted and the network bandwidth available.
The update protocol is demand-driven by the client. That is, an update is only sent by the server in response to an explicit request from the client. This gives the protocol an adaptive quality. The slower the client and the network are, the lower the rate of updates becomes. Each update incorporates all the changes to the 'screen' since the last client request. With a slow client and/or network, transient states of the framebuffer are ignored, resulting in reduced network traffic and less drawing for the client. This also improves the apparent response speed.
The input side of the protocol is based on a standard workstation model of a keyboard and multi-button pointing device. Input events are sent to the server by the client whenever the user presses a key or pointer button, or whenever the pointing device is moved. These input events can also be synthesised from other non-standard I/O devices. On our Videotile, for example, a pen-based handwriting recognition engine generates keyboard events.
When the connection between a client and a server is first established, the server begins by requesting authentication from the client using a challenge-response scheme, which typically results in the user being prompted for a password at the client end. The server and client then exchange messages to negotiate desktop size, pixel format, and the encoding schemes to be used. The client then requests an update for the entire screen, and the session begins. Because of the stateless nature of the client, either side can close the connection at any time without adverse consequences.
Writing an VNC viewer is a simple task, as it should be for any thin-client system. It requires only a reliable transport (usually TCP/IP), and a way of displaying pixels (either directly writing to the framebuffer, or going through a windowing system).
We have clients for all the networked display devices we have available at our lab. This includes the Videotile (the original RFB client), an X-based client (which runs on Solaris, Linux and Digital Unix workstations), a Win32 client which runs on Windows NT and 95, a Macintosh client, and a Java client which runs on any Java-capable browser (including Sun's JavaStation). Members of our lab use these clients on a daily basis to access their personal computing environments.
Writing an VNC server is slightly harder than writing a client for a number of reasons. The protocol is designed to make the client as simple as possible, so it is usually up to the server to perform any necessary translations. For example, the server must provide pixel data in the format the client wants. We have servers for our two main platforms, X (i.e. Unix) and Windows NT/95.
A Unix machine can run a number of Xvnc servers for different users, each of which represents a distinct VNC desktop. Each VNC desktop is like a virtual X display, with a root window on which several X applications can be displayed.
The Windows server (WinVNC) is a little more difficult to create, because there are fewer places to insert hooks into the system to monitor display updates, and a less clearly-defined model of multiuser operation. Our current server simply mirrors the real display to a remote client, which means that the server is not 'multiuser'. It does, however, provide the primary user of a PC with remote access to their desktop.
We have also created simple servers which produce displays
other than desktops, using a simple toolkit. A "VNC CD player", for
example, generates a CD player user interface using the protocol directly
without any reference to a windows system or framebuffer. Such servers 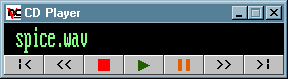 can run on very simple hardware, and can be accessed from any of the
standard viewers.
can run on very simple hardware, and can be accessed from any of the
standard viewers.
 WinVNC
is a VNC server that will allow you to view your Windows desktop from any VNC
viewer. Because Windows in its present, standard incarnation, only supports a
single graphical user being logged in at any one time, WinVNC makes the
existing desktop of the PC available remotely, rather than creating a separate
desktop as happens with the Unix server. It is only fair to emphasise this: VNC
does not make an NT machine into a multi-user server in the same
way that Citrix-based software, for example, does. A single NT machine can
therefore be accessed by multiple users, but if they all connect at the same
time they will all see the same desktop!
WinVNC
is a VNC server that will allow you to view your Windows desktop from any VNC
viewer. Because Windows in its present, standard incarnation, only supports a
single graphical user being logged in at any one time, WinVNC makes the
existing desktop of the PC available remotely, rather than creating a separate
desktop as happens with the Unix server. It is only fair to emphasise this: VNC
does not make an NT machine into a multi-user server in the same
way that Citrix-based software, for example, does. A single NT machine can
therefore be accessed by multiple users, but if they all connect at the same
time they will all see the same desktop!
On the other hand, WinVNC will run on Windows 95, Windows98, Windows NT 4.0, Windows 2000 and on any future Win32-based systems, without the need to replace any system files or run any OS-specific versions of the program. It is a standard application that can be run from the Start... menu and closed down just as easily.
WinVNC can also be run as a service, which means that you can log in remotely, do some work, and log out again. We recommend that you run it in this mode. See below for more details.
And, of course, WinVNC is free. We hope that making the source code available will enable others to suggest improvements to any and all aspects of WinVNC.
If you haven't yet read the 'Getting Started' page, you might like to do that first to give you the general concepts.
WinVNC is simple to install and to use:
On starting, WinVNC will add a small, green version of the VNC icon to the system task bar. Clicking on this icon with the right mouse button will cause a menu to be displayed, with the following options on it:
Moving the mouse over the icon should cause the IP addresses of the local machine to be displayed, if they can be discovered at that time.
You can connect to the server from another machine using a VNC viewer, as described in the Getting Started page.
The following options are available from the Properties dialog.
Incoming Connections
Update Handling
Note that clicking in a window will generally cause it to be updated, so if you have certain applications which don't update very well, try this! The default update handling settings should be the right ones for most people, and in general you will slow things down by changing them, so don't do this unless you have applications which cause problems.
The user's settings are saved into the
user-specific section of the registry when WinVNC quits, meaning that they will
be used next time you run WinVNC.
WinVNC can now be made to run as a service process under both Windows NT and Windows 95/98, by following the instructions outlined below. This allows you to connect to a machine which has nobody logged in to it, for example. On NT, you can also send Ctrl-Alt-Del to the server when it's running as a service, allowing you to unlock a locked workstation, for example. Note that in 'service' mode, many features are changed on a per-machine rather than per-user basis. You can access the per-machine 'Defaults' from the 'Administrative Tools' section of the VNC Start Menu group. The following 'features' should also be pointed out:
Windows NT 'features':
Windows 95 'features':
General features for both Windows NT and Windows 95:
Here's how to get it running as a service, assuming you've already installed it. Under Windows NT you need to have administrator privileges on the local machine, so log on as administrator if your account doesn't have these.
Select "Install WinVNC service" from the WinVNC Administrative Tools section of the Start menu.
Or:
Open a Command Prompt and run WinVNC
with the -install option. eg:
D:\> C: C:\> cd "\Program
Files\ORL\VNC" C:\Program Files\ORL\VNC>
winvnc -install
Windows NT : The WinVNC service is installed and set up to run whenever the
machine is booted into Windows NT but IS NOT YET RUNNING! It will run
when the machine next reboots. If you want to start it immediately, you can use
the Services section of the Windows control panel, or "net start"
from the command prompt:
C:\> net start winvnc
The service should now be running, but won't know that you are logged in until
you log out and back in again. It won't yet appear on the taskbar. You can run
the WinVNC Service Helper from the start menu to tell it who you are!
NOTE : Windows 95 : If Win95 has been set to use different settings for each user then the settings used are those of the currently logged in user. If no user is logged in or Win95 is set to use the same settings for all users then the settings used are the Default user settings and are stored per-machine, rather than on a per-user basis as is done when running WinVNC normally. (Under Win95, pressing Cancel on the login dialog gives access to the Default user settings.)
NOTE : A message about failure to remove the service usually indicates that it was not installed in the first place!
The full command-line options available are as follows. You probably won't need anything other than those listed above unless you're a real VNC power-user!
-run
Causes WinVNC to run normally & ignore rest of command-line.
-install
Installs the WinVNC service and continues reading the command-line.
-remove
Removes the WinVNC service and continues reading the command-line.
-settings
Tells a running copy of WinVNC to show the User Properties box.
-defaultsettings
Tells a running copy of WinVNC to show the Default Properties box.
-connect host
Tells a running copy of WinVNC to initiate an outgoing connection to a listening viewer running on the specified machine. This is the equivalent of the 'Add New Client' menu option. You can put multiple -connect options on one command line to connect to multiple viewers at once.
-kill
Kills a running copy of WinVNC.
-about
Tells a running copy of WinVNC to show its About box.
If no options are given then WinVNC runs normally. Multiple
options may be given, so, for example, to upgrade a currently running WinVNC
service to a new version, you could use:
WinVNC_new -remove -install
which will stop & remove the old copy & install the new one as a
service, or
WinVNC_new -kill -run
which will stop the running copy & run the new version as an application.
Extra options have been added to WinVNC for use primarily by system administrators, to tailor the server's behaviour to meet their particular needs. The options are DWORD values which can be set in the system registry, and tools such as the Windows Policy Editor can be used to apply these settings across a large number of machines.
Versions 3.3.2 R5 and later use a more sophisticated organisation of these options to allow more flexibility. It also makes it rather complex, so we're thinking about alternative ways of doing this. WinVNC will currently look for settings in the following places:
Most options can only be specified in a subset of these places, as specified in each option's description below.
AuthRequired
By default, all WinVNC servers will not accept incoming connections unless the
server has had its password field set to a non-null value. This
restriction was placed to ensure that misconfigured servers would not open
security loopholes without the user realising. If a server is only to be
used on a secure LAN, however, it may be desirable to forego such checking and
allow machines to have a null password. Setting this registry value
to zero will disable null-password checking by WinVNC. Local
machine-specific setting.
AllowLoopback
By default, WinVNC servers disallow any vncviewer connections from the same
machine. For testing purposes, or, potentially, when using multiple
instances of WinVNC on Windows Terminal Server, this behaviour is
undesirable. Setting this registry entry to 1 will cause local-loopback
connections to be allowed. Setting it to zero will filter out such
connections. Local machine-specific setting.
AllowProperties
If this is set to zero, the user is not allowed to view the properties dialog
and hence cannot change any settings, including the password. Note that
this stops all global per-user settings. A valid password must therefore be in
force before using this setting, generally in the local default-user setting.
Local per-user setting.
AllowShutdown
If this is set to zero, the user is not allowed to close down WinVNC. Local
per-user setting.
AuthHosts
The AuthHosts setting is, unlike the other settings, a REG_SZ string. It is
used to specify a set of IP address templates which incoming connections must
match in order to be accepted. By default, the template is empty and
connections from all hosts are accepted. The template is of the form:
+[ip-address-template]
?[ip-address-template]
-[ip-address-template]
In the above, [ip-address-template] represents the leftmost bytes of the
desired stringified IP-address. For example, +158.97 would match both
158.97.12.10 and 158.97.14.2. Multiple match terms may be specified,
delimited by the ":" character. Terms appearing later in the template
take precedence over earlier ones. e.g. -:+158.97: would filter out all
incoming connections except those beginning with 158.97. Terms beginning with
the "?" character are treated by default as indicating hosts from
whom connections must be accepted at the server side via a dialog box. The
QuerySetting option determines the precise behaviour of the three AuthHosts
options. Local machine-specific setting.
QuerySetting
The QuerySetting allows individual users to tailor the degree of paranoia
expressed by the per-machine AuthHosts setting. It is a DWORD value ranging
from zero (maximum availability) to four (maximum security). The following
table indicates how the value affects the AuthHosts behaviour:
0 - +:Accept, ?:Accept, -:Query
1 - +:Accept, ?:Accept, -:Reject
2 - +:Accept, ?:Query, -:Reject [Default]
3 - +:Query, ?:Query, -:Reject
4 - +:Query, ?:Reject, -:Reject
By default, value 2 (Obey AuthHosts) will be assumed. Local & global
per-user setting.
QueryTimeout
The QueryTimeout setting indicates the number of seconds for which the Accept
Connection dialog (see AuthHosts and QuerySetting options) will be displayed
before rejecting the incoming connection automatically. Local & global
per-user setting.
AutoPortSelect
Causes WinVNC to select the first available display number automatically.
Corresponds to the 'Auto' checkbox in the Properties dialog. Local or Global
per-user setting
CORBAConnect
Only relevant in internal AT&T version. Local or Global per-user setting
DebugLevel
DebugMode
Run-time logging of all internal debug messages is now supported. Log data may
be output to a file or a console window (or the MSVC debugger if the program
was compiled with debugging active.) Two registry keys are used:
DebugMode
indicates which logging methods to use,
[1 = MSVC debugger]
2 = Output to log file Winvnc.log in the WinVNC directory
4 = Output to a console window, displayed on-screen
Any combination of the above values may be used. e.g. DebugMode=6 will
cause output to be sent both to the WinVNC.log file and to the a console window
on the desktop.
DebugLevel indicates how much debug information to present. Any positive integer is valid. Zero indicates that no debugging information should be produced and is the default. A value of around 10-12 will cause full debugging output to be produced. Local machine-specific setting.
ConnectPriority
By default, all WinVNC servers will disconnect any existing connections when an
incoming, non-shared connection is authenticated. This behaviour is
undesirable when the server machine is being used as a shared workstation by
several users or when remoting a single display to multiple clients for vewing,
as in a classroom situation.
ConnectPriority indicates what WinVNC should do when a non-shared connection is
received:
0 = Disconnect all existing connections.
1 = Don't disconnect any existing connections.
2 = Refuse the new connection.
This is a Local machine-specific setting.
IdleTimeout
This setting tells WinVNC how many seconds a connected VNC client may remain
idle for (no input events or update requests) before being disconnected. If
this setting is not specified or is set to zero then no timeout is enforced. Local
or Global per-user setting
InputsEnabled
Corresponds (inversely) to the 'Disable Remote keyboard and pointer' option in
the Properties dialog box. Local or Global per-user setting
LockSetting
WinVNC can be made to take actions when a viewer disconnectsby setting this
value as follows:
0 - none
1 - lock workstation on disconnect (not currently implemented)
2 - logoff on disconnect
Local or Global per-user setting
LoopbackOnly
By default, WinVNC servers accept incoming connections on any network adapter
address, since this is the easiest way of coping with multihomed machines. In
some cases, it is preferable to listen only for connections originating from the
local machine and aimed at the "localhost" adapter - a particular
example is the use of VNC over SSH to provide secure VNC. Setting this
registry entry to 1 will cause WinVNC to only accept local connections - this
overrides the AllowLoopback and AuthHosts settings. Setting this entry to
zero causes WinVNC to accept connections on any adapter and is the default
setting.Local machine-specific setting.
Password
Local or Global per-user setting
PollUnderCursor,
PollForeground, PollFullScreen, OnlyPollConsole, OnlyPollOnEvent
These correspond to the options in the Properties dialog box. Local or
Global per-user settings
PortNumber
specifies the port number to be used for VNC. You will need to disable
AutoPortSelect to use this.
Local or Global per-user setting
RemoveWallpaper
Indicates whether or not WinVNC should remove the user's background wallpaper
when an incoming connection is made. It is necessary to reconnect in order for
this setting to take effect. Local or Global per-user setting
SocketConnect
This corresponds to the 'Accept Socket Connections' option in the properties
dialog box and is a Local or Global per-user setting.
WinVNC uses a special library, VNCHooks, to hook into the other running applications and retrieve notifications of areas of the screen being changed. The VNCHooks library uses the messages sent to visible Windows to decide which areas need considering for update. Not all applications use the same method of updating the screen, so you can tweak the method used by WinVNC for particular applications by editing the registry. All the entries listed can be found under
HKEY_CURRENT_USER\Software\ORL\VNCHooks\Application_Prefs
WinVNC runs fine on NT3.51 but the absence of
a system tray means that the Properties dialog cannot be accessed. In
addition, Ctrl-Alt-Del from clients cannot be correctly interpreted under NT
3.51, limiting WinVNC's usefulness when run as a service on this
platform. It also runs on NT5 beta. If you have a choice we recommend
NT4.0 with the latest service packs installed.
If you have difficulties which are not covered
by this document, try reading the FAQ.
If that doesn't help then try the mailing
list.
If you try to contact the developers directly, please remember that VNC has
hundreds of thousands of users, and we cannot, in general, respond to
individual queries. We will read your message, but don't expect an answer!
If you install the Windows server, the viewer is also installed and is available from the VNC section of the start menu. But you can start it in other ways, and you can use the viewer without installing the server.
You can run the windows vncviewer from the command line or from a shortcut and it will prompt you for a display:
vncviewer
You can specify a display on the command line:
vncviewer snoopy:2
And you can run it with -h to get a list of other important options. The full list is below. These can all take either or as the switch character. Most of the options can also be set from the 'Options...' dialog box which is available from the initial connection prompt before connecting, and some from the system menu by clicking the VNC logo in the top-left corner of the window after connection, and selecting 'Connection options...'.
The system menu also allows you to see some information about the connection, start new connections, and send a Ctrl-Alt-Del to a remote machine. This will only have an effect if the remote server is able to interpret it, currently only true for WinVNC running as a service under NT 4.
Keystrokes such as Ctrl-Esc and Alt-Tab may be interpreted at the local (viewer) machine. If you want to send them to the remote machine, you can use the options on the viewer menu to send individual Ctrl-down, Ctrl-up, Alt-down and Alt-up keystrokes. For example, to type Ctrl-Esc on the remote machine, send Ctrl-down using the menu, press Esc, and then send Ctrl-up (or just tap the Ctrl key) to release the Ctrl key at the remote end.
-shared
When you make a connection to a VNC server, all other existing connections are normally closed. This is for security reasons, and because we normally think of VNC as a tool for mobility: your desktop follows you from place to place. This option asks the server to leave any existing connections open, allowing you to share the desktop with someone already using it. Some servers have options to change the default behaviour and to override this request.
-8bit
The viewer will normally accept whatever pixel format the server offers and do the translation locally. This forces it to request 8-bit true-colour (BGR233) from the server, which will reduce network traffic. Useful over modems.
-config file
You can save all the details of an open connection to a file using a command from the menu. You can then restart that connection at a later date by specifying the name of the file using this switch.
-register
This tells the Windows shell that .vnc files are associated with the vncviewer. You should then be able to double-click on them to start the session. Sometimes Windows seems to need restarting before this take effect.
-scale n m
Specify a scaling factor for the local display. The values n and m should be integers. The '/' and the m can be omitted if m=1.
-emulate3
Users with a two-button mouse can emulate a middle button by pressing both buttons at once if this option is enabled on the command line or in the dialog box. Note: On recent versions of the viewer this is the default, so there's now a -noemulate3 option to turn it off if wanted.
-noemulate3
Opposite of -emulate3
-swapmouse
This option was more
commonly used before the 3-button emulation was available. Normally the PC
buttons left-middle-right are mapped on to X buttons 1,2,3. This switch causes
them to be mapped onto buttons 1,3,2, which may be more useful for two-button
users who only have left-right, because they will then get buttons 1 & 2
instead of 1 & 3.
If combined with 3-button emulation, this also causes the middle button to
emulate button 3 instead of button 2. This may be useful if you use button 2
more.
-emulate3timeout
When using 3-button emulation, both mouse buttons must be pressed within a certain period for them to be registered as a single middle-click instead of separate left and right clicks. This option allows that time period to be specified in msec. The default is 100.
-emulate3fuzz
When using 3-button emulation, both mouse buttons must be pressed within a certain distance of each other for them to be registered as a single middle-click. This option allows that distance to be specified in pixels. The default is 4.
-fullscreen
This causes connections to start in full-screen mode by default. See below for more details.
-listen
![]() In the internal
version of VNC used at AT&T Labs Cambridge, the server can initiate
connections to the clients under CORBA control. This switch puts vncviewer into
listening mode where it can accept these connections, but it also has a useful
side-effect which may be of interest to those outside AT&T using the public
version. A listening vncviewer does not pop up a connection dialog, but
instead installs itself in the system tray. From there you can easily
start up new connections and can set default options to be used for them during
this instance of the program. RECENT NEWS! The latest versions of
WinVNC can initiate the connection to a viewer using the 'Add New Client' menu
option. For this to work, the viewer must be in listening mode.
In the internal
version of VNC used at AT&T Labs Cambridge, the server can initiate
connections to the clients under CORBA control. This switch puts vncviewer into
listening mode where it can accept these connections, but it also has a useful
side-effect which may be of interest to those outside AT&T using the public
version. A listening vncviewer does not pop up a connection dialog, but
instead installs itself in the system tray. From there you can easily
start up new connections and can set default options to be used for them during
this instance of the program. RECENT NEWS! The latest versions of
WinVNC can initiate the connection to a viewer using the 'Add New Client' menu
option. For this to work, the viewer must be in listening mode.
-disableclipboard
Clipboard changes caused by cutting or copying at either the viewer or server end are normally transmitted to the other end. This option disables clipboard transfers.
-belldeiconify
VNC allows for the transmission of a 'bell' character, causing a beep at the viewer if it has sound facilities. You can set the sound to be used for the bell under the VNCviewer section of 'Sounds' in the Control Panel. Often a beep will happen because you are being notified of something such as email arriving or compilation finishing. This switch causes a minimized vncviewer to be un-minimized when a bell character is received.
-nocursor, -dotcursor, -normalcursor
Most VNC servers send their cursor as part of the screen image that is displayed in the viewer. Having a local cursor in addition to this can be distracting. The default is for the viewer to use a small dot to show the position of the local cursor, and this is our recommended mode of use. You can use the -nocursor option to turn off this local cursor completely, or -normalcursor to leave it at the default Windows 'arrow'. Some things to note here:
When you press a mouse button, it is the local mouse position that is used to send the event. On a slow network, the remote cursor may lag behind the local one a bit. You don't need to wait for it to catch up before you click, but if you have switched off the local cursor display, it can be harder to know exactly where you're clicking!
The X-based server has an option which tells it not to show a cursor. This can be useful if combined with -normalcursor at the viewer, particularly on slow networks. However, the cursor will then never change shape - it will always be the arrow.
We like the default dot the best!
-keyboard kbdname
Windows uses an internal and not very helpful name for the keyboard layout currently selected for an application. You can see the one being used by vncviewer if you select 'Connection Info' from the system menu of the viewer window. If you change the keyboard settings and then make a note of this, you can specify it on the command line to cause vncviewer to attempt to load this in the future. Note that vncviewer does not currently support 'dead keys', and that the differences between language and keyboard are confusing and the way they are handled is different in Windows 95 and NT. But this may help a bit.
-logfile filename
VNCviewer (R6 and later) has a logging mechanism which can save some debugging information to a file or display it on a console. This option specifies the name of a file to which a log will be written.
-loglevel n
This option controls the amount of logging information sent to the log file. The default is zero, and higher values (up to about 12) will provide more detail.
-console
In addition to, or instead of, logging to a file, this option will cause the debugging information to be sent to a console window.
-viewonly
In View-only mode, no mouse or keyboard events will be sent back to the server. This is useful for teaching sessions or other situations where you want to observe but don't want to interfere.
-restricted
In restricted mode, most of the items are removed from the menu, so that the user cannot, for example, send a Ctrl-Alt-Del to the remote end.
Vncviewer can now be switched into a fullscreen mode. This is particularly useful when connecting to a remote screen which is the same size as your local one. If the remote screen is bigger, you won't get any scrollbars, but you can scroll by bumping the mouse against the edge of the screen.
To leave fullscreen mode you must disable it from the menu,
but the menu is no longer visible! So you have to bring the taskbar to the
front by typing Ctrl-Esc Esc, and then right-click on the vncviewer icon.
A dialog box will appear when you select fullscreen mode to remind you of this;
if, after a while you get annoyed with the dialog box, you can disable it by
creating a DWORD registry value named
HKEY_CURRENT_USER\Software\ORL\ VNCviewer\Settings\SkipFullScreenPrompt
and setting it to 1. A simpler method will be in a future version!
You can cause new connections to start in fullscreen mode using the -fullscreen command-line option.
|
