![]()
Zoomifyer for FlashT
Version 1.75
User's Guide
Copyright © 2001-2002 Zoomify, Inc.
Table of Contents
Zoomify unleashes unlimited resolution
How Zoomify's technology works
Zoomifyer delivers one-step image prep
Chapter II. Zoomifyer for Flash Quick Start
Install the Zoomify Viewer (optional)
Chapter III. Elements of Zoomifyer for Flash
Zoomifyer for Flash v1.75 application
Chapter IV. Using Zoomifyer for Flash
Installing Zoomifyer for Flash
Converting your images to stream
The ByteHandlers: selecting the CGI app or the servlet
The Zoomify CGI-BIN application: configuring your server
The Zoomify Servlet: configuring your server
1. Using the Zoomify dynamic SWF
2. Using the Zoomify Flash Component
Integrating Zoomify_Component.fla into Flash MX
Customizing Zoomify_Component.fla
Compiling ByteHandler source code for your server
Troubleshooting image encoding
Troubleshooting the Flash viewer
Troubleshooting the ByteHandlers
Complementary Zoomify products - available at www.zoomify.com
Zoomify makes high-resolution images useful on the Web. The Zoomifyer family of products quickly converts images of any size or quality to stream for fast initial display and on-demand viewing of fine details!
Zoomify enables publishing of gigabyte photos that can be viewed without any large download, or in many cases, no download at all. Visitors to your Web site can interactively zoom-in and explore huge images - of ultra-high quality - in real-time.
Zoomify's solutions are geared toward the needs of your Web site.
Zoomifyer for Flash enables your site visitors to interactively pan and zoom to explore images in detail with only Flash Player 6 or later needed. Or use ActionScript to dynamically drive the display to any view at any resolution.
Zoomifyer Pro includes support for ultra high-quality 3D objects and panoramas and supports unlimited viewing options including QuickTime, ActiveX, plug-in, and even Java. No special server software is needed when publishing using Zoomify's QuickTime, ActiveX, and plug-in viewing alternatives - nothing to set up or maintain.
Zoomifyer
And Zoomify's solutions never involve any license fees, 'broadcast keys', or arcane contracts. In short, there are no strings on your images whatsoever. Simply convert and host on any Web server - anytime, anywhere.
How does the Zoomifyer work? Zoomifyer for Flash encoder intelligently converts any image for incremental access. Flash Player 6 is then able to display any view of the image - close or far, left or right, up or down - without delivering any unneeded, undisplayed image data.
The Zoomifyer begins by copying an image several times at different resolution levels - from the original source resolution down to a thumbnail. Zoomifyer cuts each of these levels into many small tiles. All the tiles from all the levels are then combined into one new file - along with an index of the exact location in the file. This file is pyramidal - that is, like a pyramid, stacked from a thumbnail down to the highest resolution, level upon level.
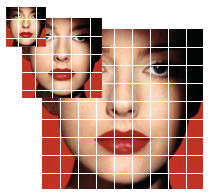
Figure 1: Pyramidal Tiled Multi-Resolution Image
When the new file is viewed, the Zoomifyer for Flash Viewer uses the index to request the lowest resolution tiles from the Web server and displays the thumbnail. Each pan and zoom causes a request for only a small additional number of tiles - those for the part of the image panned to, at the level of zoom desired. No tiles are ever delivered unless required for the current display, or for a display that is anticipated to immediately follow (intelligent pre-fetching).
These requests for image data are all made via standard HTTP 1.1 Internet protocol. The only difference is that the Web server is providing parts of image files rather than entire image files.
Zoomify's image streaming approach is complementary to
compression because compression reduces the size of data delivered while
Zoomify ensures that no unnecessary data is delivered. In fact, Zoomify leverages the complementary
benefits of compression by applying JPEG compression to the image tiles within
a converted file (lossless conversion is also available in Zoomifyer
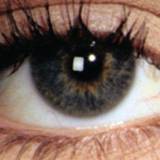
Compression alone is inadequate for publishing high-quality images. A 32 megabyte image licensed from a stock photo house - even if compressed 100-fold with wavelet technology to approximately 320k - is impractical for Web viewing. The time required to download a file of this size - or one much larger - makes it unreasonable to attempt to publish a 100-megabyte file without image streaming. Zoomify supports viewing of images gigabytes in size, which are difficult to view without Zoomify even if the file is on your local machine.
|
|
|
|
|
Example Image |
Enlarged Low-Res Image |
Zoomify Image |
Figure 2: Image Streaming Illustrations
Zoomifyer for Flash enables creative professionals to convert images to stream directly on the desktop with the Zoomifyer for Flash encoder. Zoomifyer for Flash presents a single, end-of-workflow step to prepare content for publishing on the Web. Simply double-click the Zoomifyer for Flash icon or drag an image onto it, and the Zoomifyer does the rest. To convert multiple images at once (batch conversion) simply drag multiple images onto the icon.
This Guide describes the features of Zoomifyer for Flash. Users new to imaging, the Web, Zoomify, or Flash MX will most likely prefer to follow the chapters in the order presented. The section entitled "Zoomifyer for Flash Quick Start" can be read now or referred to once you've become more familiar with the Zoomifyer and its capabilities.
For additional help Zoomify's outstanding Support Team is standing by. Simply email [email protected] - every effort is made to respond promptly. Please be sure to first review relevant portions of this Guide prior to contacting us. Standard business hours are 8 a.m. to 5 p.m. Pacific Time. Don't forget to check https://www.zoomify.com regularly for the latest Zoomify news, viewer updates, and more. For additional help, please be sure to visit our support pages at https://www.zoomify.com/support/.
If reporting a problem with the product, please provide the following information to the best of your ability:
Description: Area of product affected. Application,
browser, and operating system behavior.
Errors: Exact wording of any error message displayed.
Steps to reproduce: Exact order of actions leading up to the problem
including every menu and button choice.
Reproducibility: Is the problem 100% repeatable or intermittent?
Configuration: Platform and model, operating system and version,
browser and version, and Zoomifyer product and version.
We are committed to your successful use of Zoomifyer for Flash. Thank you for your business.
The Zoomify Team
If you're already familiar with Zoomify, have used Zoomifyer Pro or Zoomifyer Enterprise in the past, or just want to jump right in, this section is for you! This step-by-step outline will explain how to install Zoomifyer for Flash, create a Zoomify image, and set up the simple server-side helper application - all within the course of a few minutes.
a. If you wish, you can install the Zoomify Viewer for your OS so you can view Zoomify images outside of Flash Player 6. Zoomify viewers are located in the "For Viewing \ Zoomify Optional Viewers" folder.
b. Windows: you may install either the ActiveX (for use with Internet Explorer 4+) or the Netscape-style plug-in (for use with Netscape 4.5+ & Mozilla). To install the ActiveX, simply open the HTML page called "Install ActiveX.htm". To install the Netscape plug-in, double-click the file called "Zoomify Plug-in v3.03.exe".
c. Macintosh: run either the installer for the OS X plug-in or the OS 9 plug-in (or both if you plan on creating Zoomifyer for Flash content on both operating systems).
a. Find an image file you'd like to convert to the Zoomify format and drag it onto the Zoomifyer for Flash icon (the droplet executable is entitled "Zoomifyer for Flash v1.75"). You should see the image convert in a popup window. This first image can be used to test your server configuration.
b. For best results we recommend that you use a bitmap (.bmp), TIFF (.tif or .tiff), or losslessly compressed image (PNG). Zoomifyer for Flash applies JPEG compression. In order to obtain the best possible quality you'll want to begin with a source image that has not been previously compressed with a 'lossy' image format.
You can view your new Zoomify image one of two ways. First, if you've installed the optional Zoomify Viewer you may just double-click the PFF - it should appear in your browser. This confirms that you've successfully created a zoomable image file.
You may also run the "Test Server" application and then double-click the "Test Viewer.htm" file to select a Zoomify image to view (it's easiest to have the Zoomify image in the same folder as the "Test Server" application, the "Test Viewer.htm", and the "Test Viewer.swf").
Once you've successfully created and viewed a Zoomify image, you're ready to copy the image, SWF, and ByteHandler to your server. Please refer to the "Using Zoomifyer for Flash" chapter.
Read this first for information on how to rapidly create and deploy Zoomify content. It will also contain any late-breaking news and information.
Used to simulate network streaming of the converted image. Works in conjunction with the HTML and SWF files entitled "Test Viewer". Simply double-click to start the server and then double-click the "Test Viewer" HTML file.
Used to launch the "Test Viewer" Flash file so you can test your newly converted Zoomify images. Works in conjunction with the application file "Test Server" and the SWF file "Test Viewer".
Used to simulate network streaming of the converted image. Works in conjunction with the application file "Test Server" and the HTML file "Test Viewer". Double-click the HTML file called "Test Viewer" and then type in the path and name of the PFF file you'd like to view (type over the file "test.pff"). If you have Flash MX installed, you may double-click the SWF or the HTML.
This is the Zoomifyer for Flash encoder that you will use to create Zoomify images. Zoomifyer for Flash is implemented as a simple 'droplet' - an extremely simple tool upon which a source image is dropped to initiate conversion (encoding). Alternatively, double-clicking the droplet will present a standard "file open" dialog. Zoomifyer for Flash is so simple is actually requires no interface other than this (optional) open dialog and the progress display presented once conversion begins. This is possible because all publishing choices (view dimensions, initial display coordinates and zoom, etc.) are set in HTML (when using the Zoomify Dynamic SWF) or in component parameter settings (when using the Zoomify Flash Component.)
The Documentation folder contains Microsoft Word and Adobe Acrobat files which are identical in contents - these provide information regarding working with Zoomifyer for Flash and the other elements of the Zoomifyer for Flash solution.
The Zoomify ByteHandler is a tiny helper application that resides on your Web server and fulfills byte requests from the Zoomify Flash Component. It performs none of the sophisticated logic involved in determining the part of the image being viewed or the part of the image data file that is therefore necessary to stream. The Zoomify Flash Component performs all this logic in a completely distributed and therefore highly scalable manner. The Zoomify ByteHandler is currently available as a CGI-BIN application and as a Java servlet.
a. Zoomify CGI v1.75 folder
The CGI folder contains the CGI application "ZoomifyerCGIv175". Generally speaking, the CGI application is easier to set up than the servlet, although it is not recommended for production environments as it launches a separate process for each tile request.
b. Zoomify Servlet v1.75 folder
This folder contains the Zoomify Servlet. As it is written in Java, it will run on most operating systems without modification. It requires a servlet container. Both Macromedia's JRun 4 and the Apache Software Foundation's Tomcat have been tested. However, the Zoomify Servlet is designed work with any Java-compliant servlet container. The servlet is recommended for production Web sites.
c. Source Code folder
The Source Code folder contains the code for both the Zoomify CGI application and the Zoomify Servlet. If you discover that the CGI application or the servlet are not compatible with your server, you can compile the source code to create your own CGI application or servlet.
The Zoomify Flash Component is designed to rapidly stream relevant views of very large high-quality images over the Web. It is therefore not designed to view local files, such as files that have just been converted using Zoomifyer for Flash, but rather those that have already been placed on a Web server. It is therefore convenient to use the Zoomify Test Server & Test Viewer or the optional Zoomify viewers to view images locally during the creation process. Zoomify's alternative viewing solutions include ActiveX, plug-in, QuickTime component, and Java. For simplicity, the Zoomifyer for Flash product includes the Zoomify plug-in and ActiveX (for Windows). The additional viewing solutions (and the most current versions of all viewing solutions) are available for download from the Zoomify Web site at https://www.zoomify.com/downloads/.
a. Zoomify Dynamic SWF folder
The Zoomify Dynamic SWF offers a simple means to use a single SWF to point to any Zoomify Image merely by editing HTML parameters. Also useful for integration with scripting languages such as ASP, JSP, ColdFusion, etc.
zoomifyDynamic.htm
When you'd like to pass in the image path from HTML to your SWF, you'll edit the <object> and <embed> statements included in this HTML file.
zoomifyDynamic.swf
This is the SWF file that will accept an image path and display the corresponding image. It can be used with either the CGI-BIN application or the Zoomify Servlet.
Source Code folder
Contains the "zoomifyDynamic"
b. Zoomify Flash Component folder
Contains the file "Zoomify_Component.fla" - the basic source for the Zoomify Flash Viewer. This file requires Flash MX. Information on using, editing, and building upon this file is available in the "Using Zoomifyer for Flash" and "Advanced Features" chapters.
c. Zoomify Optional Viewers folder for Windows
Download Latest Version.htm
This file redirects you to https://www.zoomify.com/downloads/ where you can download the latest Zoomify Viewer. You may wish to occasionally visit this URL to ensure you have the latest Zoomify Viewer installed.
Install ActiveX.htm
Double-clicking this HTML file will install the Zoomify ActiveX Viewer for use with Internet Explorer 4+.
zoomify303.cab
This is the file used by "Install ActiveX.htm" to install Zoomify's ActiveX.
Zoomify Plug-in v3.03.exe
If you prefer to use Netscape 4.5+ or Mozilla, you should run this executable. You will then be able to view Zoomify images in Netscape / Mozilla browsers.
d. Zoomify Optional Viewers folder for Macintosh
Download Latest Version.htm
This file redirects you to https://www.zoomify.com/downloads/ where you can download the latest Zoomify Viewer. You may wish to occasionally visit this URL to ensure you have the latest Zoomify Viewer installed.
Zoomify Plug-in v3.03
This is the installer for the Mac OS 9 Zoomify Viewer. Run it to enable viewing of Zoomify content in your Web browser.
Zoomify Plug-in v3.03 OSX folder
This folder contains the installer for the Mac OS X Zoomify Viewer. Run it to enable viewing of Zoomify content in your Web browser.
If you received a CD with your purchase of Zoomifyer for Flash, you will have 2 folders, one with sample source images and one with sample PFFs.
If you downloaded Zoomifyer for Flash you may download the sample
content by double-clicking the HTML file.
This content can be used to test your encoder and your Flash viewer and ByteHandler.
The Zoomifyer for Flash encoder is quite easy to use - it's drag-and-drop simple!
After purchasing Zoomifyer for Flash, you'll download a ZIP or SIT file to your computer. On the Mac your browser will likely extract the SIT file automatically. If not, you can obtain a free version of a program called "StuffIt Expander" from https://www.aladdinsys.com. On windows you'll need a program called "WinZip". A free trial is available at https://www.winzip.com. Once you've decompressed the files from your ZIP or SIT you'll have a folder entitled "Zoomifyer for Flash v1.75 Mac" or "Zoomifyer for Flash v1.75 Win".
Zoomifyer for Flash enables you to create Zoomify images (PFFs) with the Zoomifyer for Flash encoder - simply create a shortcut to the "Zoomifyer for Flash v1.75" application on your desktop - that's it! To get started, drag an image onto the Zoomifyer for Flash target icon and the Zoomifyer will begin to convert your image - you'll see the conversion happen.
Zoomifyer for Flash supports BMP, TIFF, and JPEG files natively. We recommend that you use a non-compressed image format such as BMP or TIFF when converting to the Zoomify image format. You may also save and convert JPEG and other 'lossy' compressed formats that offer very high compression ratios. It is important to note that the conversion process itself will apply JPEG compression to the final zoomable content. Beginning with a file that has already been compressed in a lossy manner will result in double JPEG compression. This may lead to a noticeable loss of image quality. As a general rule of thumb, Zoomify the best quality source image you have to achieve the best quality zoom.
If you have QuickTime 5 or higher installed on your machine, Zoomifyer for Flash can convert any file format supported in QuickTime, such as PICT, PNG, etc. QuickTime is available for free from https://www.apple.com. Please note that you do not need the "Pro" version of QuickTime to use the image libraries with Zoomifyer for Flash. Also, conversion with formats that rely on QuickTime format libraries will take more time than with native formats.
To convert an image, simply drag it onto the Zoomifyer for Flash target icon - the conversion window will pop up and you can watch the conversion process as it happens. You may also double-click the Zoomifyer for Flash encoder and select an image from a dialog box. Once the conversion completes, you will have a file with a name identical to your original image (except for the PFF extension).
Because the new Zoomify image will be created in the same directory as the original image, ensure that you have write privileges to the directory in question. If you wish to convert an image from a read-only directory or a CD-ROM, first copy the image to a folder with write permissions enabled. If you have previously converted a Zoomify image with the same name in the same directory and wish to keep it, please rename the existing Zoomify image or move it to another directory. Zoomifyer for Flash will overwrite PFFs with the same name.
The time it takes to convert an image depends chiefly on the size of the image and if it is a format native to Zoomifyer for Flash. Other factors include your system specifications, your operating system, and the number of other applications or processes running on the machine.
You can also batch convert images by simply selecting multiple image files and dragging them onto the Zoomifyer for Flash icon. Zoomifyer for Flash will convert them sequentially. Please ensure that you have enough disk space for both the original images and the newly created Zoomify images. If you plan to convert a large number of images that are not native to Zoomifyer for Flash via the batch process, you might consider first running a batch process in your favorite image-editing application and saving out your original images as BMPs and TIFFs.
The CGI application is ideal for testing purposes, development environments, and moderate usage on production Web servers. The CGI application launches a process every time a tile is requested. Depending on the number of visitors your Web site receives, this may cause more processor usage and fewer requests per second than is desirable.
The Zoomify Servlet was developed with the high-volume Web server in mind. Unlike the CGI application, it stays resident in memory and is therefore generally more efficient. We recommend that you implement the servlet for most production environments.
We recommend that you use the Zoomify's CGI-BIN application on your local Web server (your development machine) unless you already have JRun 4 or Tomcat installed.
We've provided a version that will run in Windows and Mac OS X server environments, and also the source code so that you may compile for UNIX, Linux, and so forth.
Just drop the application called "ZoomifyCGIv175" into your CGI-BIN. If your development machine is running Mac OS X, your directory may be: /Library/WebServer/CGI-Executables/. If you are running Windows, the directory may be \inetpub\cgi-bin\. If you changed the default Web site root or CGI-BIN installation directory during the setup of your Web server, you should locate the directory you created. If you do not have a CGI-BIN in this non-default directory, you may simply create one. Remember, your CGI-BIN should have "Execute" permissions only. If your CGI-BIN is already set up and running, that's it!
For more information on setting up your CGI-BIN, please refer to the documentation that came with your Web server software.
When using the CGI-BIN application, you can copy your Zoomify images anywhere within the root of your Web server.
The Zoomify Servlet is designed to run within a servlet container such as JRun 4 (available from Macromedia - https://www.macromedia.com/jrun/) or Tomcat, a free servlet container (found at https://jakarta.apache.org/tomcat/ Of course, numerous popular servlet containers exist on the market today. In fact, Macromedia's own ColdFusion MX product allows easy access to Zoomify Servlet functionality directly from any ColdFusion page. You can find a list of servlet containers here: https://www.servlets.com/engines/.
We recommend you use the servlet for your production Web site as it is more efficient than the CGI application. If you haven't already installed JRun 4 or Tomcat, install one of them according to the instructions included with the product. We recommend that you integrate the servlet container you've chosen with your Web server, not as a standalone server that requires a separate port designation. Once you've successfully installed either program, locate the appropriate servlet directory (\JRun4\servers\<server>\SERVER-INF\classes\ for JRun 4, \webapps\root\WEB-INF\classes\ for Tomcat) and drag the entire contents of the Zoomifyer for Flash "Zoomify Servlet v1.75" folder into the pre-existing classes folder. The contents of the servlet container \classes\ folder should at least contain the file "web.xml" and a folder called "zoomifyservlet" which contains the servlet files. If you don't see the appropriate folders (such as \WEB-INF\ or \classes\) you may create them.
Stop and start your servlet container service or server. Consult the documentation included with JRun 4, Tomcat, or other servlet container if you have questions about how to do this.
Drag your new Zoomify image file (the PFF file) into your Web root. You may create a folder called "zoomifyImages" or something similar and place the PFF in that folder.
There are two very simple ways to publish a Zoomify
image. The first involves editing HTML
in your editor of choice, the second, editing settings in the
Zoomifyer for Flash includes a simple SWF file and an
associated HTML file. Parameters in the latter can be easily edited to direct
the SWF to display any Zoomify image. This approach is preferable for customers
who prefer editing HTML to editing
To change which ByteHandler and image this HTML and SWF refer to, you'll need to edit the HTML file. Open it with your favorite text editor. You'll see a standard Flash <object> and <embed> statement.
First, change the "zoomifyImagePath" variable from
/test.pff
to the right path for your image on your server. A few notes about how to make this change:
Second, change the "zoomifyByteHandlerPath" variable from
https://www.zoomify.com/servlet/zoomifyservlet.ZoomifyServlet
to the domain (and port if you've set up your servlet container as a standalone) and directory appropriate to your setup. A few notes will about how to make this change:
Note that numerous additional parameters can also be easily set. These include:
zoomifyImagePath
zoomifyByteHandlerPath
zoomifyWidth
zoomifyHeight
ZoomifyToolbar (0 = invisible, 1 = visible)
Initial View
zoomifyX
zoomifyY
zoomifyZoom
More information about passing parameters into components is available on the Macromedia Web site. Please visit:
https://www.macromedia.com/support/flash/ts/documents/flashvars.htm.
Rather than using Zoomify's dynamic implementation located in the "Zoomify Dynamic SWF" folder, you may wish to edit the Zoomify Flash Component parameters and create a FLA file (and for publication, a SWF) that directly references a specific Zoomify image.
To do so, simply double-click the file "Zoomify_Component.fla" in the "Zoomify Flash Component" folder to launch it into Flash MX. Once it has been launched, you'll see the Zoomify_Component.fla on the Flash MX stage.
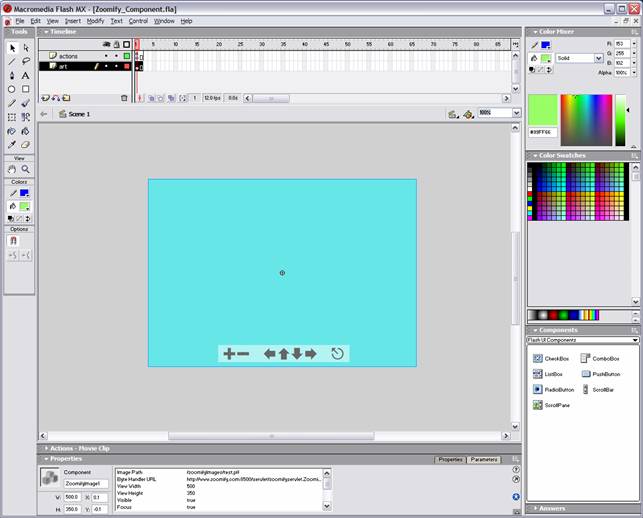
Figure 3: Flash MX Default View with Zoomify_Component.fla
The editable parameters will appear in the "Properties" panel. In the default Flash MX view, shown above, the "Properties" panel will appear at the bottom of the screen. If you do not see the list of parameters, simply click on the large blue area surrounding the Zoomify toolbar, and then click on the "Parameters" tab within the "Properties" panel. Once you've done this, you'll see a list of editable parameters within a frame in the "Properties" panel. It will appear like the following:

Figure 4: Flash MX Component Properties Panel Close-up
The same concepts from editing the dynamic HTML / SWF combination apply, although the variable names are different.
. Image Path: the path to your Zoomify image from the root of your server.
. Byte Handler URL: the absolute path to either the CGI application or the Zoomify Servlet.
. View Width & View Height: sets the size of the area the component will draw.
. Visible: sets a specific instance of the Zoomify Flash Component visible or not.
. Focus: assigns focus to a specific instance of the Zoomify Flash Component for the purposes of receiving keystrokes.
. Initial X & Initial Y: sets the part of the image displayed when the SWF is first launched.
. Initial Zoom %: determines how far in the image is zoomed when the SWF is first launched. A "-1" means that the image will appear at the default resolution and the entire image will fit within the display area.
. Min Zoom %: determines how far out the user can zoom in an image. At the default setting of 1%, the user is able to zoom out until the image is quite small within the display area. This is equivalent to 1% zoom in popular image editing tools such as Adobe Photoshop.
. Max Zoom %: determines how far in the user can zoom into the image. At the default setting of 100% the user can zoom in until each image pixel corresponds to a single screen pixel. This is equivalent to 100% zoom in popular image editing tools such as Adobe Photoshop.
. Show Toolbar: determines if the toolbar is visible or not. A setting of "true" will make the toolbar visible, and a setting of "false" will make it invisible.
Once you have set the parameters, you can publish the SWF and HTML as you would normally publish any other Flash MX movie.
Flash MX comes with a component architecture that allows you to easily add third-party components to your components directory for easy access. If you choose to integrate the "Zoomify_Component.fla" into your copy of Flash MX, it will be available whenever you launch Flash MX.
To integrate Zoomify's component, simply copy the "Zoomify_Component.fla" into the "components" folder. You may have to change your folder settings to allow the viewing of hidden files and folders. First, close any running instances of Flash MX. Then copy the file "Zoomify_Component.fla" into the following directory based on your operating system:
. Windows 98 or ME: C:\Windows\Application Data\Macromedia\Flash MX\Configuration\Components
. Windows 2000 or XP: C:\Documents and Settings\user\Application Data\Macromedia\Flash MX\Configuration\Components
. Windows NT: Windows directory\profiles\user\Application Data\Macromedia\Flash MX\Configuration\Components
. Mac OS X: Hard Drive/Users/Library/Application Support/Macromedia/FlashMX/Configuration/Components
. Mac OS 9: Hard Drive/System folder/Application Support/Macromedia/Flash MX/Configuration/Components
. Mac OS 9, multiple users: Hard Drive/Users/user/Documents/Macromedia/FlashMX/Configuration/Components
Once you've restarted Flash MX, you should be able to locate the component in Window > Components. Simply select the "Zoomify_Component.fla" from the pop-up menu bar below the title bar in the Components panel, and then drag the component into an existing Flash MX movie. Edit the parameters for the Zoomify Flash Component as you normally would to point to your preferred ByteHandler and your Zoomify image.
The quickest way to get started serving Zoomify images on your Web site is to use the dynamic SWF as discussed above. This will allow you to pass in the URLs to Zoomify images and integrate with your server-side scripting language (ASP, JSP, PHP, etc.) Alternately, you can directly set simple parameters in the Zoomify Flash Component - also discussed above.
We recognize, however, that Flash designers and developers may wish to make changes to the "zoomifyDynamic.fla" and "Zoomify_Component.fla" to suit their particular requirements. In addition, developers may wish to modify the Zoomify ByteHandler (servlet or CGI). We therefore include helpful information and complete source code for each of these elements of the Zoomifyer for Flash solution.
The Zoomify dynamic SWF supports passing parameters into the (integrated) Zoomify Flash Component through use of a series of functions in Frame 1 of the container movie. These functions receive the passed parameters and set internal variables. These functions can easily be used in any movie in which one or more instances of the Zoomify Flash Component are present. The following are the functions:
if(zoomifyToolbar != undefined)
if(zoomifyX
!= undefined)
if(zoomifyY != undefined)
if(zoomifyZoom != undefined)
if(zoomifyMinZoom != undefined)
if(zoomifyMaxZoom != undefined)
if(zoomifyImagePath
!= undefined)
if(zoomifyByteHandlerPath
!= undefined)
stop();
Notes regarding function modifications:
As a general rule, Zoomify sets the component properties directly - and sets URL-related properties last. API calls should not be made until the image has initialized. The Init callback is used to indicate when calls to the image can be made safely. Prior to this, the properties should be used directly.
It is important to note that while "_viewWidth" and "_viewHeight" are provided as component parameters and can also be set by passing values in from the HTML, they should not be dynamically set after the component has initialized. In the current implementation dynamically setting these values after the component initializes could cause unpredictable results.
More information about passing parameters into components is available on the Macromedia Web site at:
https://www.macromedia.com/support/flash/ts/documents/flashvars.htm.
In order to ease the introduction of Flash designers and developers to the Zoomify Flash Component source code, the functions within the Zoomify_Component.fla are clearly grouped as "Public Methods" and "Private Methods". Modifications to the Public Method functions should be undertaken with caution. Modifications to the Private Method functions are recommended only for advanced ActionScript programmers.
The following are the Public Methods and Private Methods:
i. "Focus" - called whenever focus of this instance is set to true. This can happen through either a setFocus call or by the user clicking on the instance.
ii. "View" - called whenever the view changes. The view is reported as x, y, and zoom. Please see setView for a description of these parameters.
iii. "Rect" - called whenever the view changes. In this case, the view is reported back as a bounding box in platform independent coordinates. This is useful for drawing a navigation window that shows where the user is currently looking.
iv. "Init" - called when the image is done initializing. An image is initialized once it has downloaded its headers. It is at this point that all other API calls can be safely made.
i. initKeyHandler: Creates a keyListener and handles key events. Key events will be ignored if focus is set to false.
ii. mousePan: mouse events handled in this function are triggered in the invisible button included in the component. On mouse down, an interval is begun that checks the mouse position and syncs the background and old tier positions (see syncTierMotion below). Additionally, focus is set to true. On mouse up, all movies are adjusted so that their gPanPosition variables reflect their current position. gPanPosition is used by the drawing loop to determine where to draw tiles.
iii. syncTierMotion: mouse events are handled by the mousePan function (see above). They are triggered in the invisible button included in the component. On mouse down, an interval is begun that checks the mouse position and syncs the background and old tier positions. Additionally, focus is set to true. On mouse up, all movies are adjusted so that their gPanPosition variables reflect their current position.
iv. gPanPosition: used by the drawing loop to determine where to draw tiles.
v. zoomIn: called by the zoomInBtn and when the zoom in key is pressed. The scale of the current, background, and old tiers are reset with verification to ensure that the maxZoom setting is not exceeded.
vi. zoomOut: called by the zoomOutBtn and when the zoom out key is pressed. The scale of the current, background, and old tiers are reset with verification to ensure that the minZoom setting is not exceeded.
vii. panLeft: called when the panLeftBtn is clicked or the pan left key is pressed. The image position is incremented by an amount scaled to allow for the current amount of zoom.
viii. panUp: called when the panUpBtn is clicked or the pan up key is pressed. The image position is incremented by an amount scaled to allow for the current amount of zoom.
ix. panDown: called when the panDownBtn is clicked or the pan down key is pressed. The image position is incremented by an amount scaled to allow for the current amount of zoom.
x. panRight: called when the panRightBtn is clicked or the pan right key is pressed. The image position is incremented by an amount scaled to allow for the current amount of zoom.
xi. panStop: called whenever any of the pan buttons are released. Note that any pan of a view simply pans a tier 'container' movie clip. The tiles that are contained therein are positioned at the completion of the pan motion and the tier container is then reset to a centered position (to ensure that future zooms are relative to the center point. This approach ensures that minimal processing (tile positioning) occurs during panning. This provides a much smoother pan experience. The order of processing is as follows: First, the amount of motion is calculated. Next, this motion measurement is scaled based on the current amount of zoom. Next, the gPanPosition variable is updated. This variable is used by the drawing functions to reposition the tiles. Lastly, the x and y coordinates of the current, background, and old tiers are reset and the tiers are re-entered.
i. Constructor: calls init, sets callbacks to empty, initializes the key handler and sets up tier (containers) movie clips to match the component parameters.
ii. setViewDimensions: sets the scale of all parts of the component based on the height and width specified in the component parameters and the height and width specified in the component instance properties (far left of the Properties Panel). The viewWidth and viewHeight parameters (passed into gViewWidth and gViewHeight) determine the span of image displayed within the component. The component instance properties determine the span of the component on the stage.
iii. destroy: disposes of all memory used by the component. This must be called whenever the URL is changed. Can also be called to free up memory in applications where it is clear that the viewing of an image is complete.
i. setTier: determines whether current tier of resolution must change based on amount of zoom and setTierThreshold variable. Includes functionality to change tier if determined to be appropriate. Precedes test with verification that choice of image to be displayed has not changed (if so, tier test is unnecessary).
ii. fillView: checks the current, background, and old tiers to determine if drawing is required. If so, calls fillViewWithParams is called as necessary to draw each tier. Additionally, any tiles not to be drawn (out of view) are unloaded.
iii. fillViewWithParams: Determines which tiles are within the current view. Draws the tiles.
i. getTileURL: called by fillViewWithParams to determine the URL for a specified tile. If the offsets for the tile not been previously retrieved and there is not currently a pending offset request, the offset must be requested. Offsets are grouped into chunks of 256. Where an offset is required, the appropriate chunk is identified and requested. Where a pending request exists, 'missing' is returned. Upon request receipt, an additional call to draw occurs. This process repeats until no offsets are missing and no tiles are unrequested. This approach, in effect, implements a sequential offset request system. (Note that each tile has two offsets - its begin and end - and we must check for each separately as they may fall into separate chunks.)
If you are implementing the CGI-BIN method, and are not running a Windows server (such as Windows NT 4 or Windows 2000) or a Mac OS X server, you may have to compile the file "ZoomifyCGIv175.c" for your particular platform. As the Mac OS X version is UNIX-compliant, it will likely work in many UNIX environments. Please consult your operating system documentation for information on compiling the "ZoomifyCGIv175.c" file. Instructions on compiling the CGI app are also included in the header of the "ZoomifyCGIv175.c" file (which can be viewed in any standard text editor).
If you are implementing the Java servlet method, you should not need to compile the Java files - the compiled version should run as-is on most platforms. If you do need to compile the code you will likely need a Java development environment.
Subject to Zoomify's copyright restrictions, you may make modifications to Zoomify's ByteHandler source code. Depending on your operating system, you may need a development environment capable of compiling C++ code.
If you receive an error message or the Zoomifyer unexpectedly quits, you may wish to check the following:
a. Does the directory you're attempting to write the Zoomify image to (the target directory) have enough disk space? Generally the Zoomifyer requires a substantial amount of swap space when encoding an image. This swap space is freed up after successful conversions.
b. Is the target directory writeable (i.e., not a CD or a directory / disk with limited write permissions). If so, select a target directory that is writeable before proceeding.
c. Are you trying to convert a non-native format to the Zoomify format and do not have QuickTime 5 or higher installed? The Zoomifyer supports TIFF, BMP, and JPEG natively - otherwise it relies on the QuickTime image libraries. If these are not present, conversion will not occur.
If conversion is slower than you expected:
a. Are you running the Zoomifyer on a non-server OS such as OS 9 or Windows 95/98/ME? We strongly recommend that you run the Zoomifyer on OS X or Windows 2000/XP.
b. Are you trying to convert an image that is not native to the Zoomifyer? The Zoomifyer supportsTIFF, BMP, and JPEG images natively. Other formats rely on QuickTime's image libraries. Although the Zoomifyer is able to employ the QuickTime libraries, making use of them is generally much slower than native formats.
c. Are you trying to convert using the Photoshop Plug-in? Zoomifyer Pro comes with a Photoshop Plug-in that is designed to allow for the creation of hotspots. It is not recommended that you convert large images with the Photoshop Plug-in as requesting image data from Photoshop is much slower than requesting it directly from the hard disk.
d. Is your target directory a network drive? As the Zoomifyer encoding process is disk-intensive, we recommend that you convert to a local drive.
e. Is your source image on a network drive? We recommend that you copy all images you'd like to encode to a local drive.
f. Do you have enough memory?
If you still experience problems encoding, please send an email to [email protected] with details about your environment, including OS, amount of free disk space, available RAM, Zoomifyer product and version number, the source image format and size, and any other information you believe to be relevant. If we determine that the issue is related to the image itself and not the environment, we may request the image for testing purposes.
If you are unable to display your Zoomify content in Flash, first verify that Flash Player 6 is installed. You can also view Zoomify's Flash content at https://www.zoomify.com/flash/. If you are able to see Zoomify's content and not your own, the issue likely resides with your ByteHandler. Please see the section below entitled "Troubleshooting the ByteHandlers".
If you are delivering Zoomify content via Flash or Java and are unable to view images, you should ensure that your ByteHandler is set up properly, the PFF is in its expected location, and that the ByteHandler can access the PFF file.
The easiest way to check to see if your ByteHandler is running and configured properly is to go directly to it via your Web browser. For the CGI application on a Windows server, you would go to:
https://www.<web_server_name>.com/<directories>/ZoomifyCGIv175.exe
The ByteHandler should return an error message stating that certain parameters are missing. The error message It should look like the following:
reply_data=Error=No params!&Error=No params!
If you receive a "404" error message, the ByteHandler is either not present in the location entered into the browser, or it is not properly configured.
For the servlet, you would go to:
.../<directories>/servlet/zoomifyservlet.ZoomifyServlet
The servlet error message will be quite similar:
Error=1&reply_data=You must specify a file path
Again, if you receive a "404" error message, the ByteHandler is not present at that location or is not properly configured.
If the ByteHandler returns the error message stating that params are missing or that there is no file path specified, then it is running. You should ensure that your HTML and SWFs have the correct path to the ByteHandler. If the paths are correct, proceed to Step 2.
If the ByteHandler does not return an error message, then
you should review the section regarding ByteHandlers in the Chapter entitled
"Using Zoomifyer
For CGI: verify that you have set your CGI-BIN (or other directory if you placed it elsewhere) to have execute permission (but not write permission).
For servlets: make sure that you have restarted the servlet container service after you've added the Zoomify servlet. Refer to the documentation specific to your servlet container for information on how to do this.
For servlets: verify that you've placed the servlet and the "web.xml" file in the place designated for servlets. This will vary depending on the servlet container you've chosen.
If you've verified that the ByteHandler is running, you should make sure that the path to your PFF file is correct. You may simply type in the path to the PFF via your browser:
https://www.<web server name>.com/<directories>/myPFF.pff
The PFF should start to download into your browser. When it has completed downloading the initial header information, you should see the PFF in your browser (provided you have installed a Zoomify Viewer such as the ActiveX or the Plug-in). If you get a "404" error (file not found) then your PFF is not at the location specified. PFF files are similar to any other file you store on your server, such as a HTML page, a JPEG, etc. - if you cannot see them directly then they likely do not exist at the place specified.
If you see the PFF image (or the graphical question mark displayed by the Zoomify Viewer ), the PFF is in the expected location. If the ByteHandler is responding and the PFF is in the correct location, proceed to Step 3.
Step 3: Ensure that the ByteHandler can see the PFF file
Although you may be able to directly access both the ByteHandler and the PFF, you should ensure that the ByteHandler can access the PFF. To do this, simply enter the path to the ByteHandler with parameters that will request image data:
https://www.<web_server_name>.com/<directories>/servlet/zoomifyservlet.ZoomifyServlet?file=/<directories>/<my_pff_name.pff>&begin=0&end=1060&requestType=1
As an example, you might type:
https://www.zoomify.com/servlet/zoomifyservlet.ZoomifyServlet?file=/test.pff&begin=0&end=1060&requestType=1
You should see a detailed message regarding the PFF file you have referenced. It will look something like:
Error=0&newSize=124&reply_data=<PFFHEADER WIDTH="2700" HEIGHT="4050" NUMTILES="241" NUMIMAGES="1" HEADERSIZE="16161" VERSION="106" ZA="0" TILESIZE="256" />
A message such as this means that the ByteHandler was able to locate the PFF image and extract data from it. Otherwise, you will get an error message like this:
Error=1&reply_data=Unknown servlet error - check your path name
In this case, you either typed in the path to the PFF incorrectly or the ByteHandler cannot see the PFF. You should move the PFF to a location that the ByteHandler can access.
Ensure that you have correctly set the paths to your ByteHandler and your PFF file. If you are using the dynamic HTML/SWF, you should enter this information into the HTML file. More information on these paths is available in this chapter in the section entitled "Troubleshooting the Viewers: Flash".
Drag-and-drop image conversion, with additional support for:
No special server software is required - nothing to set up or maintain ensures the lowest possible TCO! Includes the standalone Zoomifyer Pro Droplet and a plug-in for Adobe Photoshop.
For more information, please visit https://www.zoomify.com/pro/.
Zoomifyer
Zoomifyer
a. higher-education image gallery solutions
b. telepathology and medical research
c. industrial quality assurance
d. semiconductor inspection
e. materials science and metallurgy
f. pharmaceutical chemistry & biotechnology
Features include:
a. server-side image conversion support for batch processing and automation
b. online annotation including non-destructive icon and text capabilities
c. conversion support for multiple source images
d. optional lossless encoding
e. optional image decoding to editable BMP format
f. decoding support for images stored in the LizardTech MrSid format or the MGI FlashPix format.
g. 1 year maintenance contract (phone and email support, issue tracking, and updates)
For more information, please visit: https://www.zoomify.com/enterprise/.
ActionScript: Macromedia's Flash-based scripting language, similar to JavaScript.
Compression: Sophisticated means to reduce file size while retaining file information by substituting representations or approximations of the file data for the actual data.
Flash MX: The latest version of Macromedia's tool for creating rich Internet content and applications.
JRun 4: The latest version of Macromedia's Java application server.
Lossy: Compression that permanently removes image data to reduce file size. Lossless compression, by comparison, keeps all original image data intact.
Metadata: Additional information embedded in an image format (such as a TIFF). May include copyright, author, data, and equipment information.
Multi-resolution: Data file containing many levels of quality.
PFF: Zoomify's streaming image format.
Pixel: The smallest unit of screen display. A point of color.
Pre-fetching: Intelligent retrieval of data from a Web server in anticipation immediately subsequent use.
Pyramidal image: A data file format containing multiple levels of resolution.
Resolution: The amount of image data available for display. One measure of image quality. Screen equivalent of printer 'dpi' (dots per inch).
Servlet: A small Java-based server-side application. Requires a servlet container.
Servlet container: A Java-based application that calls upon servlets to perform specific server-side tasks.
SWF: Macromedia's published Flash format.
Tile: 64x64 pixel piece of image at a given resolution.
Tomcat: The Apache Software Foundation's servlet container application.
Wavelet: Highly effective image compression approach enabling maximum reduction in file size while preserving image quality.
Apple Macintosh: PowerMac
Intel: Pentium II or better
Apple Macintosh OS: Version 9.1 or higher, including OS X
Microsoft Windows: 98, ME, NT 4, 2000, XP
QuickTime: Version 5.0 or higher recommended for extended image libraries
Zoomify, Inc. www.zoomify.com
Eversoft, Inc.
(Zoomify
Macromedia, Inc. www.macromedia.com
Apache Software Foundation www.apache.org
Microsoft, Inc. www.microsoft.com
Apple, Inc. www.apple.com
Adobe, Inc. www.adobe.com
Sun Microsystems www.sun.com
Zoomifyer for Flash www.zoomify.com/flash/
Zoomifyer Pro www.zoomify.com/pro/
Zoomifyer
Macromedia Flash MX www.macromedia.com/flash/
Macromedia JRun 4 www.macromedia.com/jrun/
Macromedia ColdFusion MX www.macromedia.com/coldfusion/
Macromedia Flash Communication Server www.macromedia.com/flashcom/
Apache Tomcat jakarta.apache.org/tomcat/
Sun Microsystems' Java resources java.sun.com
Aladdin Systems' StuffIt Expander www.stuffit.com
WinZip Computing Inc.'s WinZip www.winzip.com
Flash MX Developer Info www.macromedia.com/desdev/mx/flash
JRun 4 / Java Developer Info https://www.macromedia.com/desdev/java/
Why might you want to install a Zoomify Viewer when Flash Player 6 is what we're aiming for? Simple - viewing in Flash Player 6 requires a small helper file (we call these ByteHandlers) - something the other Zoomify Viewers do not require (except for the Java viewer, which is similar to the Flash viewer in this regard). Installing a Zoomify Viewer will ensure that you can view newly converted Zoomify content. You may also use the included Test Server application, "Test Viewer.htm" & "Test Viewer.swf" to simulate a server environment. More information on this is included below.
And your modifications to the Zoomify Flash Component
Zoomify offers native support for BMPs (Windows bitmap files), TIFFs, and JPEGs. If you have QuickTime 5+ installed, you can convert any image format that QuickTime supports. Please be aware that native conversion tends to be faster, and you might wish to convert your images to the bitmap or TIFF format before Zoomifying them.
If the PFF file does not load into your browser, you may want to ensure that you've correctly installed the Zoomify Viewer. You may also download the Zoomify Viewer for your OS and browser at https://www.zoomify.com/downloads/.
Please note that the Test Server and Test Viewer are currently compatible with Windows and Mac OS X. We recommend use with Windows 2000 or XP or Mac OS X. Please install an optional Zoomify Viewer to view Zoomify images on Mac OS 9.
You can find a fairly comprehensive list of servlet containers at https://www.servlets.com/engines/.
With the dynamic HTML / SWF files we have provided, you will never have to open
or edit the
Flash MX is not required to publish Zoomify images in Flash Player 6, but it is required if you'd like to modify the Zoomify Flash Viewer or import the component into your pre-existing Flash movies.
Windows has browser-dependent viewers - the ActiveX and the Plug-in will work
in
If you would like to install the Zoomify Netscape-style Plug-in to newer Netscape or Mozilla builds, you may have to first double-click "Zoomify Plug-in v3.03.exe" and install to Netscape 4.5+ or Netscape 6. Then, locate the "plugins" folder and copy the "NPPFF.dll" file into the "plugins" folder of the newer Netscape or Mozilla browser.
Macintosh viewers are based on the user's operating system (i.e., OS 9 or OS X). Once installed, the Plug-in will work with either Internet Explorer or Netscape. Note that Windows has browser-dependent viewers.
If you received a CD when you purchased Zoomifyer for Flash, you will not have to decompress the files.
Native format support means that the file format encoder is built into the Zoomifyer for Flash tool and is therefore directly utilized during the conversion process.
The most important specifications are the processor speed, RAM, hard disk speed and space available.
Generally speaking, converting an image to the Zoomify format will take less time on machines running Windows 2000 or XP than under Windows 98 or ME. Similarly, conversions will generally take less time under Mac OS X than under
Mac OS 9.
On both Mac OS X and Windows the location of you CGI-BIN may vary depending on how your Web site was set up. Please consult your Web server documentation for more information.
You should ensure that "Execute" and "Write" permissions are not set simultaneously in any directory in your Web site (except for special applications) as that may enable malicious code to be copied to your server and executed.
To test your newly configured servlet container, please refer to the sample applications that come with either JRun 4 or Tomcat.
This will ensure that visitors to your Web site who are behind firewalls will have access to your Zoomify content.
Note regarding Zoomifyer for Flash files: Zoomify can provide only limited support with regard to modifications of Zoomify source code, including the files "Zoomify_Component.fla", "zoomifyDynamic.fla", "ZoomifyCGIv175.c", and "ZoomifyServlet.java". Unmodified source code may be redistributed for non-commercial purposes so long as Zoomify's copyright and license notices are retained. Modified source code and the works based thereon may be distributed for non-commercial purposes so long as it is clearly labeled as modified and Zoomify's copyright and license notices are retained. Modified source code and the works based thereon that are to be distributed for commercial purposes, must retain Zoomify's copyright and license notices, and must clearly include modifications and works within the scope of which the Zoomify source code is not the primary source of value. For SWF or other files for which source code is not provided, disassembly and creation of derivative works for redistribution is prohibited as stated in the Zoomify License Agreement. This stricture applies to files including but not limited to the Zoomify Annotation System provided with Zoomifyer Enterprise.
Overview of drawing approach: At any time and for any view, three 'tiers' of image data are present in the Zoomify Flash Component display. The 'current tier' is visible, pannable, and zoomable. The other tiers are synced with its motion. The 'old tier' is the most recent current tier. It is used as a visual placeholder while the current tier is refreshed. This occurs primarily when one zooms in. The 'background tier' is a low-resolution display held behind the current tier. It is a visual placeholder like the old tier, but is used primarily when zooming out. It is downloaded once and saved for use throughout a viewing session. Note that the current tier and background tiers may be one and the same if the view is zoomed out sufficiently. The drawing process begins with a call to setTier, which determines the appropriate resolution tier to display. This is followed by a call to fillView, which determines the tiles required, identifies and/or requests the offsets for those tiles, and finally requests and draws the tiles. Note that each time fillView is called, all tiles are set invisible. As each tile is drawn its visibility flag is set true. After all tiles are drawn, those still set invisible are unloaded.
For optimal results working with source images in an uncompressed (BMP, TIFF) or 'losslessly' compressed (PNG) source images is recommended rather than working with images in a 'lossy' format such as the popular JPEG format. The Zoomifyer itself will apply JPEG compression to the tiles created during conversion. When working from lossy compressed source images this would effectively represent a second lossy compression and would introduce the possibility of visible artifacts if caution is not excercised.
Zoomify respects intellectual property rights and any image provided to Zoomify will not be used for any other purpose than testing unless otherwise indicated by the copyright holder.
|