Import Tips for Discreet 3ds maxT users:
Prepared exclusively for Marlin Studios. © 2002
You should use the 3DS set of models for use with Discreet 3ds max.
One issue with importing any model into 3ds max is that quite often the models might need to be scaled up after being imported. They typically import very small in scale. This is a known issue with MAX since v.1 and you probably want to scale up the objects after they are imported (this is actually not a problem with 3ds max as much as it is issues with the more 10510y2417k generic file formats such as 3DS and OBJ.
It is especially important to have your units set accurately in 3ds max version 5 and higher. This is primarily if you are going to be using Global Illumination or Radiosity renderings in your work. If you are not, it is still advantageous to use accurate units, even if they are generic units. Scenes in 3ds max that are very very small or very very large often behave a bit odd sometimes due to these extreme values. This is especially true of lights, shadows and cameras.
It might also be a good idea to perform certain scale resetting operations on these models. The models, upon import, will have all of the parts selected. This is a good thing when dealing with the next steps.
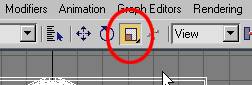
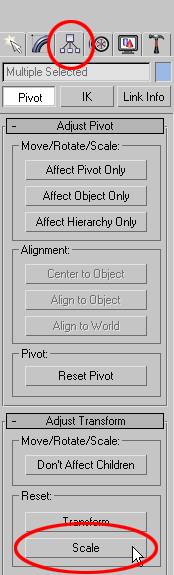
1. With the entire model (all parts) selected, Right
click on the Scale icon to access the Scale Transform Type-In Dialog.
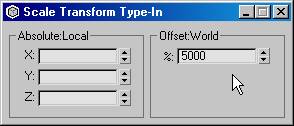
2. In the Offset World field, enter the amount you want to scale the model up. Using this one field will give you uniform scaling on all three axis at the same time. A good starting point if you are unsure is 5000% (yup, that says five thousand percent. I told you they might be a bit too small when you import them!).
At this point, you will probably want to perform a Zoom Extents > Selected from the viewport commands. This will fit the entire (now larger) selected model(s) into the viewports. You should now notice that your user grid is much easier to view. Your cameras and lights should also behave a bit better at this scale, especially if you plan to use Radiosity.
Sizing the Model:
If you are building scene that is going to, indeed, use scale of some kind, you will probably want to verify at least one of your buildings is scaled to the size you want. Try comparing your model to a cube created natively in 3ds max that is roughly the unit dimension you are shooting for. You can do this by creating a cube that represents the size of the target-bounding box of your building. This target cube does not get scaled and represents a bounding box to scale the building up to.
For example, if you want a 200 unit-tall building that is 50 units across both directions or, in the case that you are using real world units such as inches, feet, meters or miles, you can set up the target size cube to the units you need.
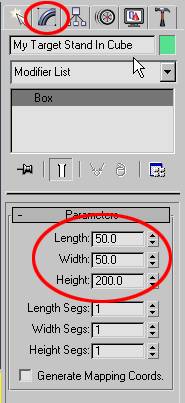
Create a cube primitive at the world origin (0,0,0) that is the target size for
your building. Use the Modify Command
Panel to alter the units to exact measurements.
Rename this object something like "My Target Stand In Cube"
Select all the objects in your building. Do not have the target cube selected.
Scale the building parts up or down as needed. It might be best to do a uniform scale at first; to get a quick approximation of the size.
You may need to keep hitting the Zoom Extents > Selected button to continuously refit the viewport around your model as you scale it. Continue to zoom and scale the model until it is the size and position of the Target Stand In Cube.
You may delete the cube at this time, or optionally use it for rough animations while the high-resolution building model is hidden or getting textured by another artist.
Deleting the Helpers:
If you used the 3DS models from the collection, you probably will notice lots of helper objects inside 3ds max. If you do not want these (non-rendering) objects to clutter your viewport, you can optionally group them and hide the single group, or you can just delete them.
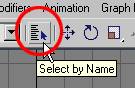
Open the Select By Name Dialog from the top of the user interface.
In the List Types, click the None button.
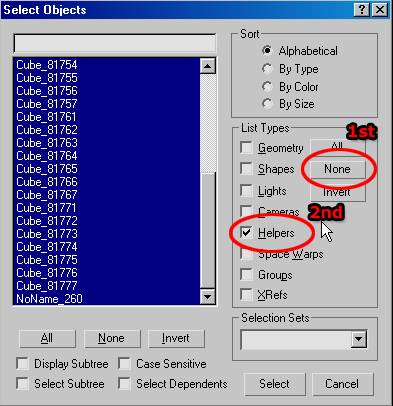
Next, In the List Types, turn on the Helpers.
Select all the helpers by hitting the ALL button under the list (not the ALL button in the List Types section).
Exit the Select Objects Dialog by clicking the Select button at the bottom.
At this point, all the helpers (and only the helpers) from the imported 3DS model are selected. You can now group them for hiding or simply hit the Delete key on the keyboard.
You should then be left with the polygonal model only.
Resetting the New Scale to 100%
After you have scaled up the models and removed the helpers, it is a good idea to also reset their scale so that the new size represents 100% of the model's scale (as opposed to something like 5000%!). Also, this should probably best be done initially and prior to adding UV coordinates or other mapping parameters.
 |
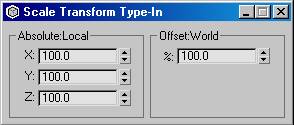
You should notice that the Absolute Local scale is now 100% in all three dimensions.
You models are now ready for texturing using the UVW Map modifier.
|
