Brought to you by

YOU KNOW YOU WANT IT
Table of Contents
Formatting the SanDisk USB Device
Connecting the USB Device to Your PC
You proceed at your own risk. This process can completely ruin your Xbox and will void your warranty if this happens. If done properly, it is complete reversible. Also, I have performed this mod to numerous Xboxes without trouble, even new ones. While some say that newer Xboxes are not compatible, I have not encountered this problem, even on Xboxes that are reportedly not compatible.
I strongly suggest that you read these instructions in their entirety before proceeding. I have simplified them as much as I am capable of. Good luck.
Required
1 Xbox controller w/ adapter
1 USB extension cable (I suggest at least 3 feet long; by extension cable I mean that the
cable has one female end and one male end; in other words one end can connect into a PC and one end can connect into an addit 23223n136x ional USB cable or a USB device can be connected to it)
1 SanDisk cruzer micro (256 MB)
007: Agent Under Fire (it has to be the original game without the Xbox Live logo)
Xbox with an Xbox Live Dashboard
PC with USB ports
Optional
1 soldering iron
1 roll of electric tape
Ensure you have an Xbox Live Dashboard. If on the main menu there is an Xbox Live menu option, then you are ready to go. If not, insert any game with the Live logo and the Xbox will set one up for you.
Please note that pre-made cables are sold at various websites for around $15.
The first step in the mod process is creating a cable that will allow you to connect the SanDisk USB device to your Xbox. To do this you will need to get the Xbox controller and the USB cable.
First, cut the Xbox controller cord between the controller and the adapter that connects the controller's cord to the Xbox. I suggest that you cut at least 1 foot above the adapter connector so that you have enough room in the event that you make a mistake. Now, cut the USB cable. I suggest you cut in roughly in the center of the cable.
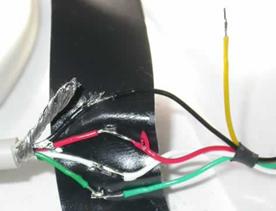
Once you have cut both cables, you are ready to strip the cords to expose the internal wires. On the Xbox cord, you will need to strip the end that connects into the Xbox. On the USB cable, you will need to strip the end that has a female connector. If you are unsure which end is the female end, it is the end that allows for a USB device to be connected to it.
With the cables stripped, strip the internal wires carefully. You need not strip the yellow wire on the Xbox cord as this wire is not used by the USB cable. Once the wires are stripped, connect the corresponding wires together as shown in the picture below.
OPTIONAL
You can solder each wire together, tape each individually and then tape together as a whole with the electric tape if you prefer. However, if you are careful and do not plan to use the cable again, this is not necessary.
The Xbox uses a filing system that is different from the filing system used in Windows. Typically, you must format a USB device before it can be used with Windows. The same is true with the Xbox. In Windows, formatting the USB device is as easy as connecting it and selecting format option from the pop-up window. It is even easier with the Xbox.
To format the USB device for the Xbox, insert it into the female USB connector of the Xbox/USB cable that you just made. Connect the other need of the cable into the Xbox. It does not matter if the Xbox is on or off when you connect the cable, but the Xbox must be on before you can proceed.
Wait a few moments, and then open the Memory section of the Xbox menu. If you correctly made the connections with the cable a message will appear stating that the memory unit was not operating correctly and that it was erased. The USB device will now appear on the Memory menu as an Xbox memory unit.
If not, ensure that all wires are securely connected and not touching other connections. If this does not work, ensure that the USB device you are using is the one that is listed in the Additional Equipment Needed section. If there still is a problem, then one or both of the cables are damaged.
If the USB device is listed as an Xbox memory unit, then you have successfully formatted the USB device. Disconnect the USB device from the cable.
Open the Action Reply auto installer and follow the wizard until the program is installed. Install the program into the default folder. If the program opens after installation, close it.
Since the USB device is now formatted for the Xbox, transferring the needed files onto it is no longer straight forward. To do this, you will need to change some files used by Action Reply and update the USB drivers. But before you do this, you will need to determine the ID of the USB device.
In order to determine the ID of the USB device, connect it to your PC. Ignore any pop-up windows. DO NOT FORMAT THE USB DEVICE.
Open usbview.exe. The program will open a window that shows you all USB devices connected to your PC. Find the SanDisk USB device on this list. If you are unsure, select each one until you find the device that shows the name SanDisk Corporation to the right of the idVendor number. Below is a picture of my device. Please note that yours will not be labeled Action Reply on the left side of the window. I have already edited Action Reply and updated the drivers so now Windows associates the device with Action Reply.

Write down the idVendor number and the idProduct number of the device. In the picture above, my idVendor number is 0781 and my idProduct number is 5151. You need only the 4 digit number.
Open C:\Program Files\Datel\Action Replay XBOX\Drivers. Now open up xbreader.ini. Scroll down the page to the devices section. Edit the first line, AND ONLY THE FIRST LINE, replacing the original VID (idVendor) and PID (idProduct) numbers with the ones that you copied from usbview. The picture below shows what the file looks like after edited with my own VID and PID numbers.

To further clarify, I replaced the original numbers in the first line under [_Devices] with my 4 digit VID and PID number. YOU ONLY NEED TO CHANGE THE 4 DIGIT NUMBERS, NOTHING ELSE. Save the file and close it.
Now you must configure the USB driver to work with Action Reply. Open the Device Manager. In XP this is done by right clicking on My Computer and then selecting Properties. Once the Properties menu is open, select the Hardware tab. Now click on the Device Manager button. For other Windows versions, conduct a quick Google search to find out how to open the Device Manager or its equivalent.
Once you have opened the Device Manager, open the Universal Serial Bus tab. This will show you a list of all your USB devices that are connected. Select the SanDisk Device. It should be labeled the same as it was in usbview. Click on the Driver tab and then click on the Update Driver button.
An install wizard will open. Select the advanced option, install from a list. Click next. Use the Browse button to select C:\Program Files\Datel\Action Replay XBOX\Drivers\ xbreader.ini. Click next. Windows will now install the driver for the USB device.
Now that the USB device is compatible with Action Reply you can use Action Reply to transfer the needed files onto the USB Device. Open Action Reply. Open My Computer and navigate to the folder that you downloaded the mod kit to.
Drag WaffleTools_007_1224.zip from the folder into the center column in Action Reply. Action Reply should show a folder labeled Agent Under Fire. If you expand this folder, Bond: AUF should appear. Ensure the USB device is connected to your PC. Drag the Bond: AUF file to the left column. The left column will now have the same folder and file in it as the middle column does. The Linux installer is now copied onto your Xbox ready USB device.
Disconnect the USB device from your PC and plug it into the Xbox/USB cable. Open the Memory section of the menu. Open your Xbox hard drive memory. Delete any previous 007 Agent Under Fire gamesaves as these can interfere with the install process. If you prefer, you can back these up to the USB device rather than delete them and copy them back over after you have installed Linux.
Exit out to the main Memory menu. Select the USB memory unit. Select the 007 gamesave file. Copy this file to your Xbox hard drive. Unplug the USB device.
Insert 007 and load the game. After the intro movies, go to load and select the Linux installer file. You must select the installer file that is saved onto your Xbox hard drive. This is why I say to remove the USB device once you have copied the installer to the hard drive. Your Xbox will freeze for a moment and the screen will go dark. After several more screens Linux will be installed.
You now have an Xbox that will play burnt games, allow you to copy games and much, much more.
Well boys and girls I am going to leave you on your own. Search the Internet for answers to other questions that you have. I STRONGLY SUGGEST THAT YOU BACKUP THE ENTIRE CONTENTS OF YOUR XBOX HARD DRIVE TO YOUR PC THROUGH FTP. Search the Internet to learn how to do this. Enjoy.
I have to say thanks to those smarter than myself than created the special software and the procedures needed to complete this process. I did not create this process or any of the software used in the process. I simply created this instruction page and gathered the needed software. If I knew who did, I would give you your props, but oh well.
Please post
comments, suggestions or corrections to the original torrent page on
|
