What you will do: See the new
features of Learn to use
the standard Office 2000 tools Find out how
to send documents from the program in which you create them Discover new
Web integration and HTML compatibility in Office 2000 Become
familiar with worldwide usage features of Office 2000 Understand
Office 2000's Y2K and accessibility features![]()

![]()
Office 2000
 Office
2000 Professional Overview
Office
2000 Professional Overview
Welcome to Microsoft Office 2000 Professional! Microsoft Office 2000 Professional features a new integrated workspace, which means that the features and functionality work the same in all the programs. For example, the new Microsoft Office E-mail and the Office Assistant are available in all the Office programs. The Office-wide (or shared) features make Office 2000 easier to learn and easier to use. These new features also increase productivity in and out of the classroom by letting you transfer information between programs, an 11111e411l d with others who may not have the same programs or software versions that you have.
In this chapter you will learn about some of the shared features in the Office 2000 Professional suite. These features include:
Personal productivity features, including new easier-to-use wizards.
Standardized Office tools such as toolbars, ScreenTips, and the improved Office Assistant.
Microsoft Office E-mail feature for sending documents quickly and easily through e-mail.
Improved searchable Clip Gallery.
Web integration and HTML compatibility with Internet Explorer 5.0.
Multi-language and editing tools that allow you and your students to use more than one language in a single document.
Year 2000 compatibility.
Personal productivity and user assistance
![]() The
Office 2000 suite includes features integrated into all of the programs. This
makes the programs easier to learn and use. Office 2000 also conforms to your
habits and preferences to increase your personal productivity.
The
Office 2000 suite includes features integrated into all of the programs. This
makes the programs easier to learn and use. Office 2000 also conforms to your
habits and preferences to increase your personal productivity.
Microsoft Office Profile Wizard. A utility that captures preferences and settings made to Office programs, which can then be copied to other machines. Office 2000 takes special care to accommodate Windows Terminal Server with the Roaming User Profiles.
Intelligent Install. Determines the optimal installation based on existing Office settings and available machine resources. A Custom Installation Wizard also allows system administrator or technology coordinators to create custom installations on an individual, departmental, or institutional level.
Self-repairing applications. Checks all essential files and registry entries at startup and then, if missing or corrupted, reinstalls them in the background, requiring less maintenance for technology specialists.
Backward compatibility. Office 97 can open files built in Office 2000.
Customizable Alerts. Allows network administrators or technology coordinators to supplement built-in alert dialogs with school or university-specific information by inserting links to existing intranet information or assistance sites.
Updated File Open/Save dialog box. The most commonly used dialog boxes in Office, File Open and File Save, now have a Places bar which contains icons for places you often store files such as the My Documents folder and the Desktop.
Collect and Paste. With the extended Microsoft Office Clipboard, you can gather up to 12 items from different sources and paste them into any Office document either individually or all at once.
Virus Protection and Security. The new Microsoft Office Antivirus utility allows third-party virus protection vendors to directly scan Office documents before they are loaded. With Office 2000, authors can digitally sign their documents, certifying that they are virus free. Such signed documents open in Office without the virus warning. If the documents are changed at all, Office recognizes this and alerts you.
Quick file switching. Each open Office document is represented by its own icon on the Windows taskbar, making switching among a group of open documents much easier.
URLs in Command Bars, including the Outlook Bar. One or more icons in the Command Bar can be links to Web pages so you can create links to class or department Web pages, or pages you are using for research.
History folder. This folder, found in the File Open dialog box, contains links to recently opened files.
Standardized Office tools
![]() Several
Office tools have been standardized to increase your productivity. Once you
have learned to use these tools, you can use them the same way in each program
in the Office 2000 suite. These tools are:
Several
Office tools have been standardized to increase your productivity. Once you
have learned to use these tools, you can use them the same way in each program
in the Office 2000 suite. These tools are:
Toolbars
ScreenTips
Office Assistant
ClipArt Gallery
Drawing tools
In Office 2000, the most recently used commands will
appear first on your menus. Besides being a convenient productivity tool,
Personalized Menus also reduces keystrokes and mouse clicks for those with
mobility impairments.
Toolbars
![]()
![]()
The Menu bar contains a list of menus that will help you create, edit, and
format items, documents, and publications in Office 2000. As you click each
menu, additional options appear. Each option can show more choices, depending
on what you are doing. If a menu option looks faded (is grayed out), the option
is not currently available to you, but it will be available for other
activities. If you see a chevron ![]() at the bottom of the menu, hover over it for a
moment, and all of the options appear.
at the bottom of the menu, hover over it for a
moment, and all of the options appear.
The Standard
toolbar contains buttons that give you quick access to Office 2000's most
commonly used functions, such as opening, saving, and printing.
|
|
|
Link to the Web, create tables, insert spreadsheets, or add columns or WordArt. |
|
|
||||||||||
|
||||||||||||||
|
Print a document, preview printing, or check spelling. |
Undo or redo any action. |
Zoom, view markers, or select a magnification. |
More buttons. |
|||||||||||
The Web toolbar contains buttons that allow you to quickly open, search, and browse through any document, including Web pages.
|
|
Return to your start page or search on the Web. |
|
|||||
|
|
||||||
|
Stop a current jump or refresh a current page if you are working in a browser. |
Shows the location of the document in which you are currently working or currently displayed Web page. |
|
||||
Changing Toolbar settings
You can change many of the toolbar setting so that you can see more available buttons, view large icons, list font names in their font, or view additional toolbars.
To change the Toolbar settings
From any Office 2000 program, on the View menu, click Toolbars, and then click Customize.
Click the Options tab.
You can use larger icons to aide those with visual
impairments.
To view the Standard
and Formatting toolbars
in two rows so that all buttons are visible, clear the Standard and Formatting Toolbars share one row
checkbox.
![]()
To view large icons, select Large
icons.
To list font names in their fonts, select List
font names in their font.
Click the Toolbars tab.
To view additional toolbars, select the checkbox next to the name of the toolbar that you want to view.
Click Close.
You can reduce the physical steps necessary to use a
feature for those with mobility impairments.
To add or remove buttons from a toolbar
![]()
|
|
Click on the down arrow at the end of the toolbar.
Click Add or Remove Buttons. A list of available buttons opens.
Select those that you want to display on the toolbar. Clear those that you do not want to display on the toolbar.
Click outside the button list to close it.
ScreenTips
When you position your pointer to hover over any button on a toolbar, a small box appears with the name of that button. The box is called a ScreenTip. If you do not see ScreenTips, you can change the settings to show them.

To change the ScreenTip settings
From any program in Office 2000, on the View menu, click Toolbars.
Click Customize.
Click the Options tab.
You can use keyboard shortcut keys instead of the mouse.
Click Show
ScreenTips on Toolbars.
![]()
Click Show Shortcut keys in ScreenTips.
Click Close.
Office Assistant
You can turn off the graphical Assistant and still use
Help through the keyboard. The new HTML Help is easier to navigate with
fewer keystrokes or clicks.
With Office 2000's extensive Help system, you can quickly find
answers to questions as you work. The Office Assistant can answer questions,
give you helpful tips, and display alerts to help you work better. You can ask
the Office Assistant questions in your own words, and answers are given in
simple language understood by educators and students alike. If you like, you
can select a different Assistant that better matches your personality. Or, you
can turn off the Office Assistant and ask questions using the online Help.
![]()
To ask the Office Assistant a question
From any program in Office 2000, click Office Assistant ![]() .
.
Click in the text box and then type How do I save my document?
Click Search. Several topics appear.
Click Save a document. The Help system opens to this topic. You can continue looking for other topics or close the Office Assistant.
To close the Office Assistant, click the X in the upper-right corner of the Office Assistant box.
To select a different Office Assistant
Although an animated Office Assistant is installed with Office 2000, you can select another Office Assistant instead. To change Office Assistants, you must have the Office 2000 CD-ROM in your computer CD drive.
From any program in Office 2000, click Office Assistant.
Click Options.
Click the Gallery tab.
To view the different Office Assistants, click Next or Back.
Click OK
to accept the Office Assistant shown.
- Or -
Click Cancel to keep
the current Office Assistant.
Clip Gallery
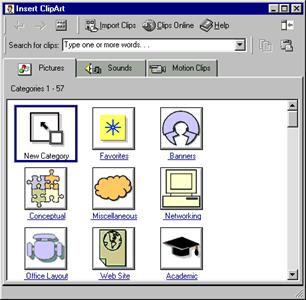
In the Office 2000 suite, you can add multimedia to your document, presentation, Web page, or publication using the Clip Gallery tool. You can use the Clip Gallery to preview a wide variety of pictures, photographs, sounds, and video clips that you can insert in your documents.
To insert a clip
If the Drawing toolbar is not visible, on the View menu, click Toolbars and then click Drawing.
Click Insert
Clip Art ![]() on the Drawing
toolbar. The Clip Gallery appears with the Pictures
tab visible.
on the Drawing
toolbar. The Clip Gallery appears with the Pictures
tab visible.
 Select
a category by clicking a picture.
Select
a category by clicking a picture.
- Or -
Type a keyword in the Search
for clips box.
The Search and Find similar features reduce keystrokes for
those with mobility or cognitive impairments.
Click the graphic you want to insert or preview. A toolbar
opens next to the picture.
![]()
To insert the picture click the Insert clip icon
![]() .
.
To see a preview of the clip click the Preview
clip icon ![]() .
.
To add the clips to your favorites folder in the
Clip Gallery click the Add clip to favorites or other category icon ![]() .
.
If a graphic looks similar to what you want, but
isn't quite right, click the Find clips that look similar icon ![]() .
.
To get Help using the Clip Gallery
The Clip Gallery includes its own Help system, where you'll find such information as how to organize your clips in categories, how to assign keywords to clips for easy searching, and how to work with the Clip Gallery by using shortcut keys.
On the Clip Gallery, click Office Assistant ![]() .
.
Ask a question or search for a topic just as you would with the Office Assistant in the program in which you are working.
To add a clip to the Clip Gallery
If you often use your own pictures, sounds, or motion clips in your documents, you can store and locate them quickly by adding them to the Clip Gallery. You can add pictures in any format supported by graphics filters in Word 2000. You can also add your own sound and motion clips.
Click Insert
Clip Art ![]() on the Drawing toolbar and then
click the tab for the type of clip you want to add.
on the Drawing toolbar and then
click the tab for the type of clip you want to add.
Select the category or create a new category in which to store the clip and then click Import Clips.
Locate the folder that contains the clip you want to add and then select the clip.
Under the Clip import option, select the option you want.
For Help on an option, click the question mark ![]() on the toolbar and then click the option.
on the toolbar and then click the option.
Click Import.
In the Clip Properties dialog box, type a description of the clip and select the options you want.
Delivering documents
![]() All
Office 2000 programs have a standard feature that makes it easy to send your
Office files directly from that program. For example, you could create a
schedule of assignment due dates in Word 2000 or Excel 2000. Then, with
Microsoft Office E-mail, you can open a new e-mail message and send
it to your students or colleagues. Note that before you use this feature for
the first time, your e-mail must already be configured properly. Check
with your technology coordinator or system administrator if you have questions.
All
Office 2000 programs have a standard feature that makes it easy to send your
Office files directly from that program. For example, you could create a
schedule of assignment due dates in Word 2000 or Excel 2000. Then, with
Microsoft Office E-mail, you can open a new e-mail message and send
it to your students or colleagues. Note that before you use this feature for
the first time, your e-mail must already be configured properly. Check
with your technology coordinator or system administrator if you have questions.
When you use Microsoft Office E-mail, you have four options for how to send the document you created:
Mail Recipient. The document you create is sent as the text of the e-mail message.
Mail Recipient (as Attachment). The document you create is sent as an attachment to the e-mail message.
Routing Recipient. The document is sent as an attachment to an e-mail message that can be routed to several people. Recipients can review the document and send it to the next routing recipient. The document returns to you after the last person has reviewed the document.
Exchange Folder. Select this option to post the document to an Exchange folder where your students or colleagues can look.
To send to a mail recipient
After you have saved your document and wish to send it to someone with an e-mail address, on the File menu, click Send To and then click Mail Recipient.
Depending on the program you are using, you may have a choice of sending part or all of your document. For example, if you have a worksheet in an Excel 2000 workbook, a dialog box asks if you want to send only the current sheet or the entire workbook. Make a selection and click OK.
In the boxes that appear, type the e-mail address of the recipient in the To box.
If you prefer, change the contents of the Subject box to something other than the name of the file.
Click Send
this Copy.
The document is sent to the e-mail address you typed and the document
becomes the body of the e-mail message.
To send to a mail recipient (as attachment)
After you have saved your document and wish to send it as an attachment to e-mail, on the File menu, click Send To and then click Mail Recipient (As Attachment).
In the mail message dialog box that appears, add the recipients e-mail address in the To box.
Type a subject in the Subject box.
Click in the box below the Subject box and type a greeting and instructions on what the recipients should do with the attached file (optional).
Click Send. The document is sent to the e-mail address you typed, and the document is viewable as an attachment to the message.
To send to routing recipients
After you have saved your document and wish to route the document, on the File menu, click Send To and then click Routing Recipient. The Routing Slip appears.
In the To box, add the e-mail addresses of the individuals to whom you would like to route the message.
Type a subject in the Subject box.
In the Message text box, add a message indicating why the document is being routed.
Click OK to send the document.
To post to an Exchange folder
After you have saved your document and wish to post the document to an Exchange folder, on the File menu, click Send To and then click Exchange Folder. The Routing Slip appears. The Send To Exchange Folder dialog box appears.
In the Send To Exchange Folder dialog box, view the available folders by pressing the plus sign (+).
Select a folder and click OK.
Remote user assistance and synchronization
If you are using Microsoft Office 2000 and Microsoft Internet Explorer 5.0, you can continue to work on files even when you are no longer connected to the Web server. You select folders and files in Web Folders to be replicated on a local computer, such as your laptop. You can then continue to edit those files after you disconnect from the Web server. When you reconnect to the Web server, you synchronize the files on your portable computer with the files on the Web server; this ensures that the files are kept up to date.
This feature can be especially helpful to you as an educator if, for example, you wanted to grade homework files from home on your laptop computer. You would connect to your server, copy the files you need to your computer, and then disconnect from the Internet (and your Web server). After completing your work on the files, you would reconnect to the Web server, and synchronize the files.
For more information about synchronizing files, ask the Office Assistant from any of the programs in the Office 2000 suite.
![]() Worldwide
usage
Worldwide
usage
Office 2000 has been improved to embrace a global community. It can be easily adapted to local or regional needs with the following new features. These are especially useful for foreign language teachers as they work with students writing in languages other than English.
Global Interface. A technology coordinator or system administrator can change the language without affecting the operation of the program. You can type in multiple languages throughout a document without having to change the interface language.
Language AutoDetect. By automatically detecting the language you type in, Word 2000 can intelligently use the correct spelling, grammar checking, AutoCorrect, Thesaurus, and other proofing tools. Language settings have been redesigned to be more accessible.
Multilingual Editing and AutoCorrect. Word 2000 and PowerPoint 2000 can take advantage of features such as AutoSummarize and AutoCorrect in multiple languages.
Euro Currency Support. Excel 2000 supports the new Euro currency (both the symbol and the three-letter ISO code).
![]() The year
2000
The year
2000
Microsoft provides new features in Office 2000 to help ensure that you are ready for the new millennium. It provides a new set of tools, features, and safeguards for the new millennium, including support for administering a four-digit year cutoff.
For more suggestions to help
organizations prepare for the new millennium, as well as for answers to
frequently asked questions, visit the Microsoft Year 2000
https://www.microsoft.com/year2000.
![]() Integration
with the Web
Integration
with the Web
In Office 2000 you can save your documents as Web pages so that anyone with a Web browser can read your documents. Office 2000 has also added an interactive feature to some components of the programs to allow real-time document collaboration with other educators and students around the world. Using Office programs, any document can be saved in HTML format. Documents in progress can be previewed as HTML in the default Web browser at any time. A Save as Web Page command makes saving to a Web server as easy as saving a file. When you save a document, Office 2000 checks all links and repairs any that don't work. Office 2000 includes these features to make Web integration seamless:
Themes created and coordinated between Office 2000 programs and FrontPage 2000 make it easy to create consistent-looking Web pages.
HTML files created in Office 2000 are easily edited using Office programs. Clicking Edit in the browser launches the Office 2000 program that created the HTML file, simplifying document editing.
Office 2000 offers an improved hyperlink function to make it easier to create, edit, follow, and remove hyperlinks in documents.
Office 2000 saves files using the appropriate international text encoding so that users of any language can view the correct characters.
Web-based collaboration
The Office 2000 programs support HTML as a native file format, so all Office 2000 documents are automatically Web-ready. Saving an Office 2000 document to a Web server is as easy as saving a file. With this feature you can use the Web to interact with other educators and students with:
Online Meetings. Office 2000 programs include a Conference command that invokes NetMeeting conferencing software and enables sharing the current document with one or more people using real-time Chat, Whiteboard tools, Audio conferencing , or Video Conferencing. Outlook 2000 offers the option of setting up an Online meeting and then automatically shares the current document with other people. This allows several people to work collaboratively on one document.
Presentation Broadcasts. The PowerPoint 2000 presentation graphics program now makes it possible to broadcast a slide presentation with live narration over the Web. These presentations can use either audio only, or audio and video. Because the presentation is sent in HTML format, the audience needs only a browser to view it. An Events page can offer pre-presentation information or allow students to tune in to a presentation in progress. Outlook 2000 can be used to schedule presentation broadcasts and the broadcasts can also be archived on a Web server, making viewing presentations on demand easier.
Web Discussions. If you have Office Server Extensions, you can initiate conversations about documents as comments posted within those documents. This allows educators and students to collaborate in-context in research papers, presentations, and Excel workbooks.
Web Subscriptions and Notifications. You can subscribe to a document or Web page and indicate when you would like to be notified of changes to that document. Subscribe to online professional journals and newsletters, or your favorite subject area Web sites and receive notification when the sites are updated.
HTML File Management. When you use Windows Explorer to manage files, storing files on a Web server is as easy as on a file server.
Microsoft Office Web Components
Not only does Office 2000 make it easy for you to save a spreadsheet or database document to the Web, but visitors to the site can interact with the saved documents and extract the information they need. For example, if you create a spreadsheet to analyze data your science class is collecting over a period of time, students can enter new values and recalculate the results in a copy of the spreadsheet you have saved to the Web. Likewise, if you create Excel 2000 PivotTable dynamic views or Access 2000 forms, reports, or queries, you may want students to be able to sort, filter, pivot, or enter new values themselves. Saving interactive spreadsheets or databases to the Web is a great way to distribute class materials.
How does this interaction translate to the Web? Web browsers can't sort, filter, or recalculate totals on Web pages. However, with Microsoft Office Web Components, you can manipulate data in ways you have not been able to do before.
The Microsoft Office Web Components work behind the scenes to enable saving spreadsheets, charts, and databases to the Web. They take full advantage of the interactivity provided by Microsoft Internet Explorer. The Microsoft Office Web Components include a spreadsheet, a PivotTable dynamic view, a data source, and a chart.
Spreadsheet. The spreadsheet component provides a recalculation engine, a full-function library, and a simple spreadsheet in Web pages. You create Web pages with spreadsheet components by saving Excel 2000 workbooks as Web pages and by selecting the option to save the page interactively.
PivotTable. The PivotTable dynamic views component enables you to analyze information by sorting, grouping, filtering, outlining, and pivoting. When you save an Excel 2000 PivotTable or QueryTable dynamic view as an interactive Web page, the page contains a PivotTable component.
Data Source. The data source component is the reporting engine behind Data Access Pages and the PivotTable component. It manages communication with back-end database servers and determines which database records can be displayed on the page.
Chart. The chart component graphically displays information from the spreadsheet, from the PivotTable dynamic views, or from the data source component. When you save an Excel 2000 workbook containing a chart as an interactive Web page, the page contains a chart component.
|


