WindowFX includes a number of basic animations used when minimizing & restoring windows. While these are enough for some people, we have decided to allow 3rd parties to extend this using scripts.
This document explains the scripting format used by WindowFX.
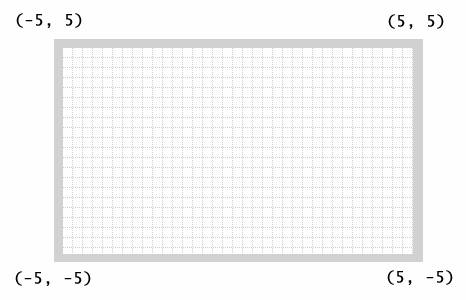
WindowFX world coordinates
In the 3D world, the top left coordinate is -5, 5 and the bottom right is 5, -5
How to create a transition file to tell WindowFX about your transition
WindowFX needs to know about your transition so you need to create a .TRA file in the scripts directory.
We have to tell WindowFX how many rectangles make up our transition, its name, the scripting files to use and the initial texture coordinates of those rectangles.
[Effect]
RectCount = 1
MinName = Test Script minimize
RestoreName = Test Script restore
The above defines the script names & tells us that it uses 2 rectangles (start counting from 0).
Then each rectangles texture coordinates are defined (rect0..rectN). Texture coordinates range from 0 to 1000 in both directions.
; Bottom left rectangle
[RECT0]
; bottom left corner
TextureX1 = 0
TextureY1 = 1000
; top left corner
TextureX2 = 0
TextureY2 = 500
; bottom right corner
TextureX3 = 500
TextureY3 = 1000
; top right corner
TextureX4 = 500
TextureY4 = 500
; Script file to run.
; Each rectangle can run its own script, or you can do all the
; work in one script
script = q2d_1_rect.ttt
; A script is also run to position the transition window on
; screen
[World]
Script = world.ttt
What is the format of a script?
Scripts are text files but they do have a specific 'format'.
The basic format of a statement is as follows :
<OPCODE>
<PARAM1>
<PARAM2>
<PARAM3>
Each part is on a new line so the parser can read the scripts quickly and efficiently.
A totally blank line anywhere in the script is perfectly acceptable. So the following would work fine :
<OPCODE>
<PARAM1>
<PARAM2>
<PARAM3>
You are also allowed to add comments to your scripts. A comment is a line which starts with a semi colon ';'. Anything else on that line is ignored when parsing the scripts. Adding a ; to any other part of the line will NOT make what follows a comment.
Scripting looks very complicated and it is not for me
While your initial reaction may be to think scripting is too complicated and not for you, you should not get too concerned. Scripting may look complicated at first glance, but it is actually quite easy to use once you have read this document and looked at the sample scripts provided.
The best way to learn is probably to try modifying the existing scripts provided in this document. Then, once you are happy, you can start building your own scripts.
What can a script do?
A script is build from a series of low level instructions or operations. When combined these can allow you to make much more complicated scripts.
Lets cover the 9 basic operations
END
This instruction takes no parameters and simply stops the script running.
The most likely use is with an IF instruction where a condition is true and the programmer wants the script to stop.
Example Use :
END
JUMPTOTOP
This instruction takes no parameters and jumps to the top of the script and starts executing from there again.
Using this instruction allows you to implement a 'for' or 'while' loop when used in conjunction with an IF instruction.
WARNING : You must not make scripts that loop forever or they will lock the application up.
Example Use ;
JUMPTOTOP
IF
This is the 2nd instruction that can alter program flow. It takes a 3 parameters as follows :
<VALUE ONE> - This is the first value to compare
<VALUE TWO> - This is the value to compare against
<OPCODE> - This is the comparison operation to use.
For programmers it would look like this
IF ( <VALUE ONE> <OPCODE> <VALUE TWO> )
VALUE ONE can be one of the following :
All acceptable variables & constants
VALUE TWO can be one of the following :
All acceptable variables & constants
OPCODE can be one of the following :
= - The IF statement is TRUE if the two values are EQUAL
< - The IF statement is TRUE if the VALUE ONE is LESS THAN
VALUE TWO
> - The IF statement is TRUE if the VALUE ONE is GREATER
THAN VALUE TWO
<= - The IF statement is TRUE if the VALUE ONE is LESS THAN OR EQUAL to VALUE TWO
>= - The IF statement is TRUE if the VALUE ONE is GREATER
THAN OR EQUAL to VALUE TWO
!= - The IF statement is TRUE if the two values are NOT EQUAL
If the statement is TRUE then the line following the IF instruction is executed. If the the statement is FALSE then the next instruction is skipped.
Example Use :
IF
T1
T4
=
END
This instruction will end the script IF the values held in T1 and T4 are equal.
MATHS
This instruction takes 3 parameters and can be used to perform certain basic mathematical operations. The parameters are as follows :
<VALUE TO MODIFY> - The value to store the final result in
<OPCODE> - The opcode for the operation to use
<VALUE> - The 2nd value to use in the operation
<VALUE TO MODIFY> can be one of the following :
All acceptable variables & constants
<VALUE> can be one of the following :
All acceptable variables & constants
<OPCODE> can be one of the following :
ASSIGN - Copy the value in <VALUE> and put it in <VALUE TO MODIFY>
ADD - Add the value in <VALUE> to the value in <VALUE TO MODIFY> and store the result in <VALUE TO MODIFY>
SUBTRACT - Subtract the value in <VALUE> from the value in <VALUE TO MODIFY> and store the result in <VALUE TO MODIFY>
MULTIPY - Multiply the value in <VALUE> by the value in <VALUE TO MODIFY> and store the result in <VALUE TO MODIFY>
DIVIDE - Divide the value in <VALUE TO MODIFY> by the value in <VALUE> and store the result in <VALUE TO MODIFY>
SIN
COS
TAN
Example Use :
MATHS
T1
ASSIGN
42
The above would make T1 equal to 42
MATHS
T4
ADD
T2
The above would do the sum T4 = T4 + T2
GET
This instruction takes 2 parameters and obtains a special WindowFX engine value which it stores in the local variable specified. The parameters are as follows :
<ITEM> - The value to obtain from the WindowFX engine.
<PLACE TO STORE> - The variable to store the value in.
<ITEM> can be one of the following :
All acceptable variables & constants
<PLACE TO STORE> can be one of the following :
All acceptable variables & constants
Example Use :
GET
CURRENTVERTEX
TEMP1
The above will obtain the current vertex index value of the current button and store the value in TEMP1.
SET
This instruction takes 2 parameters and sets a special WindowFX engine value from the local variable specified. The parameters are as follows :
<VALUE> - The variable to get the value from.
<ITEM> - The value to set in the WindowFX engine.
<VALUE> can be one of the following :
All acceptable variables & constants
<ITEM> can be one of the following :
All acceptable variables & constants
Example Use :
SET
2
CURRENTVERTEX
The above would set the current vertex index value to 2
This instruction takes no parameters and is used to indicate the end of a block of code.
GOTO
This instruction takes one parameter which is the name of a label which is defined somewhere in the source file.
A label is a line which starts with an @ and then has a name.
The first parameter MUST include this @ sign
Example:
@MYLABEL
.
.
.
GOTO
@MYLABEL
This code will jump to the instruction after the @MYLABEL line.
The instructions documented above are very basic and WindowFX also includes some higher level instructions to make your life easier. These instructions are documented below :
AUTOREPOSITION
This instruction takes no parameters and is usually called in the world script.
It will position the window based on the percentage done to simulate the window moving towards the taskbar
SLIDERECT
This instruction takes 4 parameters and is used to slide the specified rectangle by the amount specified by the X, Y and Z parameters.
<RECTANGLE> - The variable to get the value from.
<X> - The amount to shift in the X coordinate
<Y> - The amount to shift in the Y coordinate
<Z> - The amount to shift in the Z coordinate
All of these parameters can take the usual WindowFX variables. If you want
to make a generic script, then you can use CURRENTRECT for the rectangle value.
Negative values can be used for X, Y and Z.
SETVERTEX
Setting up the X, Y and Z coordinates for each rectangle can be time consuming using the SET instruction, so the Setvertex instruction was designed to make it more logical & efficient.
The instruction takes 5 parameters as follows :-
<RECTANGLE> - The rectangle to set the vertex coordinates for. (0 - 500)
<VERTEX> - The vertex on the rectangle to setup (0 - 3)
<X> - The X value
<Y> - The Y value
<Z> - The Z value
It is recommended you look at the coordinate space notes to understand how these values all work.
ROTATEXY
This instruction will take the current rectangle and rotate it in the X, Y plane. It takes 2 parameters.
<ANGLE> - The angle by which to rotate the rectangle
<INDEX > - How to rotate the rectangle
0 = rotate around coordinate (0,0)
1 = rotate around the middle of the rectangle
2 = rotate around vertex 0
3 = rotate around vertex 1
4 = rotate around vertex 2
5 = rotate around vertex 3
ROTATEYZ
This instruction will take the current rectangle and rotate it in the Y, Z plane. It takes 2 parameters.
<ANGLE> - The angle by which to rotate the rectangle
<INDEX > - How to rotate the rectangle
0 = rotate around coordinate (0,0)
1 = rotate around the middle of the rectangle
2 = rotate around vertex 0
3 = rotate around vertex 1
4 = rotate around vertex 2
5 = rotate around vertex 3
ROTATEXZ
This instruction will take the current rectangle and rotate it in the X, Z plane. It takes 2 parameters.
<ANGLE> - The angle by which to rotate the rectangle
<INDEX > - How to rotate the rectangle
0 = rotate around coordinate (0,0)
1 = rotate around the middle of the rectangle
2 = rotate around vertex 0
3 = rotate around vertex 1
4 = rotate around vertex 2
5 = rotate around vertex 3
COPY
This instruction copies the vertex & texture coordinates from one rectangle to
another. It takes 2 parameters.
<RECTANGLE TO COPY FROM> - The rectangle to copy the coordinates from.
<RECTANGLE TO COPY TO> - The rectangle to copy the
coodinates to
COPYCOORD
This instruction copies just the vertex coordinates from one rectangle to
another. It takes 2 parameters.
<RECTANGLE TO COPY FROM> - The rectangle to copy the coordinates from.
<RECTANGLE TO COPY TO> - The rectangle to copy the
coodinates to
SETUPGRID
This instruction will setup the first col*row rectangles with the correct vertex & texture coordinates. It takes 2 parameters.
<COL COUNT> - The number of cols to create
<ROW COUNT> - The number of rows to create
Example Use :
SETUPGRID
2
2
The above would create a 2x2 grid of rectangles. The rectangles are counted from the bottom left like this :
2 3
0 1
All variables are doubles and so can store floating point numbers.
Each of these can have - placed in front of them to return a negative version of the value.
VISIBLE ( 0 = hidden, 1 = visible)
TEXTURE.X ( X texture coordinate for the current vertex & current
rectangle)
TEXTURE.Y ( Y texture coordinate for the current vertex & current
rectangle)
VERTEX.X ( X coodinate for the current vertex & current rectangle)
VERTEX.Y ( Y coodinate for the current vertex & current rectangle)
VERTEX.Z ( Z coodinate for the current vertex & current rectangle)
TEMP1 ( Temp variable for the current rectangle)
TEMP2 ( Temp variable for the current rectangle)
TEMP3 ( Temp variable for the current rectangle)
TEMP4 ( Temp variable for the current rectangle)
TEMP5 ( Temp variable for the current rectangle)
TEMP6 ( Temp variable for the current rectangle)
TEMP7 ( Temp variable for the current rectangle)
TEMP8 ( Temp variable for the current rectangle)
CURRENTRECT ( The rectangle index to use when working on vertex &
texture coordinates. 0 based
Appending THIS. To the front of the above variables will
get the value for the current rectangle
So THIS->VISIBLE will return or set the visibility of the
current rectangle the script is running for regardless of the value of CURRENTRECT)
CURRENTVERTEX (The vertex index to use when working on vertex &
texture coordinates. 0-3)
GLOBAL1 ( Global temp variable )
GLOBAL2 ( Global temp variable )
GLOBAL3 ( Global temp variable )
GLOBAL4 ( Global temp variable )
GLOBAL5 ( Global temp variable )
GLOBAL6 ( Global temp variable )
GLOBAL7 ( Global temp variable )
GLOBAL8 ( Global temp variable )
The following are read only.
PERCENT ( The percent completed )
PERCENTLEFT ( The percent left to do)
PERCENT10 ( The percent completed / 10)
PERCENTLEFT10 ( The percent left to do / 10)
WINDOW.X ( X coordinate of window)
WINDOW.Y ( Y coordinate of window)
WINDOW.STARTX ( X coordinate of starting position)
WINDOW.STARTY ( Y coordinate of starting position)
WINDOW.STARTWIDTH ( Width of initial window)
WINDOW.STARTHEIGHT ( Height of initial window)
WINDOW.ENDX ( X coordinate of end position)
WINDOW.ENDY ( Y coodinate of end position)
WINDOW.ENDWIDTH ( Width of end window)
WINDOW.ENDHEIGHT ( Height of end window)
PI ( The value of PI)
2PI ( The value of 2*PI)
HALFPI ( The value of PI/2)
Final Notes
Stardock suggests you should use a .ttt extension for a WindowFX script file.
We also suggest you have a look at the demonstration scripts included with WindowFX (see the scripts directory).
|
