Windows
XP Tweaking - Page 1
Introduction
This is the first article I have written for TweakTown, with many
more to hopefully follow. Before we get into it, I'd like to thank all the
people who have been involved in the running of TweakTown over the time I've
been here - Mike Wright, Jon Albiez, Cameron Johson, Jason Rist, Chris Lee and
Mytch Harper. Oh yeah, I think that Cameron Wilmot guy had something to do with
TweakTown as well...
But hey, you guys and gals don't want to hear me
brown-nosing... you want to find out how to maximize your performance and
visual appearance of Windows XP. Or at least, I hope you do. If you don't, what
are you doing reading this article? Supporting me? Awww,
thanks...
On with the show!
Before we begin...
Before we start tweaking, I recommend you set up a few
things on your operating system. Make sure you have Administrator privileges on
the computer you are tweaking as some options may have been disabled for use by
standard users. Also, there's ClearType.
ClearType basically works to make text on your screen appear much clearer and
readable - a massive boon for laptop owners. It works wonders for desktop
owners as well - as you can observe from the below pictures...
![]()
ClearType Off
![]()
ClearType On
To turn ClearType on, just access your Display
properties in Control Panel, then click on the
'Appearances' tab. Then click the 'Effects...' button, and you will get a
dialog like the one below.
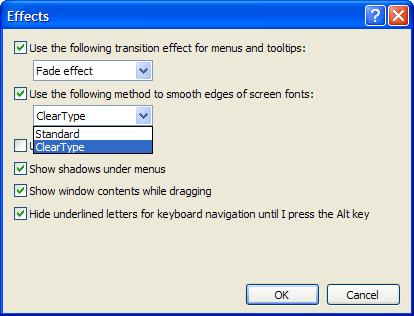
Tick 'Use the following method to smooth edges of screen
fonts...' and change the listbox to 'ClearType'. Then just click OK, Apply, and
close down your dialogs.
OK? let's get tweaking!
All right... First off, we're going to have a look at
some very basic tweaks. Some of these are just basically Windows
95/98/ME et cetera tweaks, but they still work fine in XP. I'd also better
mention that I tested all of these tweaks on Windows XP Professional Edition -
most 545y2412f of them should work in XP Home Edition, but make sure you read down a bit
- there are alternate methods for Home Edition users for some tweaks. I'd also
better say that to perform some of these tweaks, you should have knowledge
about how to edit the registry.
Tweak #1 - MsConfig
Most of you will be familiar with MsConfig, which is basically a built-in system
configuration utility for Windows. Open it up by simply going to Start ->
Run..., then type 'msconfig' in the box and press enter. Now, the tab we are
interested in here is the 'Startup' tab... simply
click on it and you should see a screen similar to the one below.
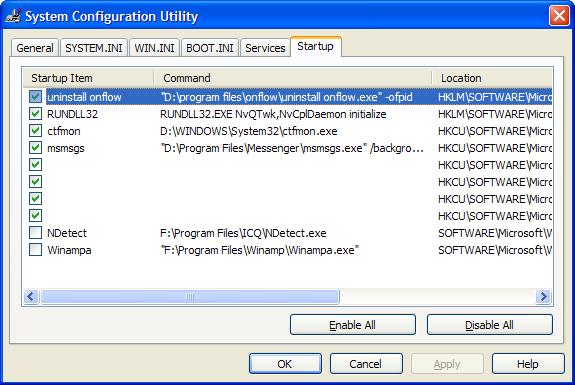
This box displays all of the programs that will be
started when Windows boots up. None of these programs are vital for Windows, so
don't feel worried about removing some of them in experimentation. You can see
from the screenshot that I have disabled both NDetect (ICQ's start-up program)
and WinAmpa (WinAmp, obviously). Now, if you've unchecked some boxes, Windows
should start up faster and will take less resources by not running these
programs in the background.
Tweak #2 - More Startup Tweakage
Now we're going to take the tweak above and go one step futher.
Go to Start -> Run again, then type 'services.msc'.
You should get:
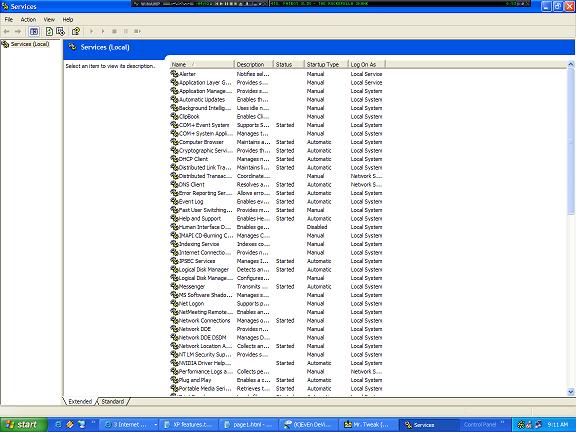
This is a more detailed list of processes that are
starting up with Windows. All those items with 'Automatic' listed next to their
names are booting with Windows. Click on the items to find out just what they
do. If you decide you don't need a certain service, you can simply right-click
on it and change it's properties from 'Automatic' to 'Manual'.
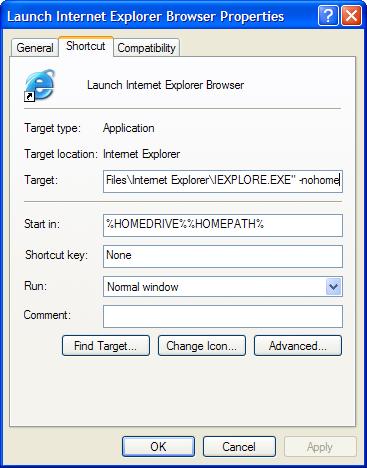
Tweak #3 - Speeding Up Internet Explorer
This is a handy little trick you can use with Internet
Explorer 6 (which ships with XP) to make it boot up extremely fast - instantly,
on my system :). This should be familiar to those of you who have created
shortcuts for Half-Life mods and the like. For those of you who aren't familiar,
simply right-click on a shortcut to Internet Explorer (such as the one in the
Quicklaunch bar) and add the parameter '-nohome' to the end of the command
line, like so:
Tweak #4 - Menu Delays
Another minor and easy tweak to remove any delay from menus sliding
out. For this you will need to use regedit (open regedit by going to Start
-> Run..., then typing 'regedit' and pressing enter). The key you need to
change is located in HKEY_CURRENT_USERControl
PanelDesktop. The actual key is called MenuShowDelay
- all you have to do is change the value to 0.
Remember, you will have to re-boot your computer for this tweak to take effect.
Tweak #5 - GPEDIT.MSC And Autoplay
A great tweaking file that comes with XP is gpedit.msc.
Go to Start -> Run... and then type in 'gpedit.msc' and press enter. This is
effectively the Policies Editor, and it comes in handy often. For example, if
you hate CD autoplay like I do and want to permanently disable it, you can use
this tool to do so. Just run gpedit.msc, then go to Computer Configuration -> Administrative Templates -> System. In here you can see the value 'Turn Off Autoplay'. Right-click on it and then
click 'Properties'.
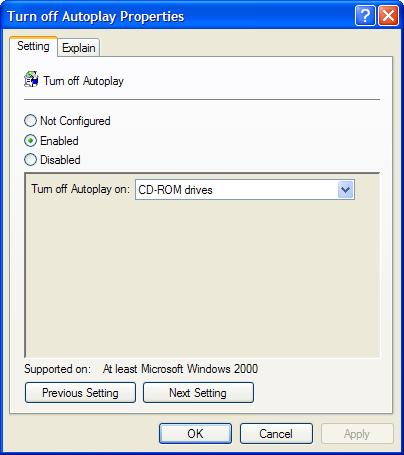
Now you can simply play around with the settings for
this and other values in these folders, customizing appearance and performance
issues.
Tweak #6 - Increasing Options In Add/Remove Menu
Not a fan of MSN Messenger? don't want
Windows Media Player on your system? Fair enough, but if you go to Add/Remove
Programs in the Control Panel, by default none of Windows XP's 'built in'
programs are visible. it's fairly easy to change,
though... just open the file X:\Windows\inf\sysoc.inf (where X: is the drive
letter where Windows XP is installed) in Notepad. You should see a section of
the file something like this:
[Components]
NtComponents=ntoc.dll,NtOcSetupProc,,4
WBEM=ocgen.dll,OcEntry,wbemoc.inf,hide,7
Display=desk.cpl,DisplayOcSetupProc,,7
Fax=fxsocm.dll,FaxOcmSetupProc,fxsocm.inf,,7
NetOC=netoc.dll,NetOcSetupProc,netoc.inf,,7
iis=iis.dll,OcEntry,iis.inf,,7
com=comsetup.dll,OcEntry,comnt5.inf,hide,7
dtc=msdtcstp.dll,OcEntry,dtcnt5.inf,hide,7
IndexSrv_System = setupqry.dll,IndexSrv,setupqry.inf,,7
TerminalServer=TsOc.dll, HydraOc, TsOc.inf,hide,2
msmq=msmqocm.dll,MsmqOcm,msmqocm.inf,,6
ims=imsinsnt.dll,OcEntry,ims.inf,,7
fp_extensions=fp40ext.dll,FrontPage4Extensions,fp40ext.inf,,7
AutoUpdate=ocgen.dll,OcEntry,au.inf,hide,7
msmsgs=msgrocm.dll,OcEntry,msmsgs.inf,hide
RootAutoUpdate=ocgen.dll,OcEntry,rootau.inf,,7
IEAccess=ocgen.dll,OcEntry,ieaccess.inf,,7 This is a list of
all components installed at the moment. I've taken the example of MSN Messenger
- the program entry called 'msmsgs', third-last line. You can see the word
'hide' highlighted - this is the string which tells Windows not to display the
component in the Add/Remove Programs list. Fix this up by simply deleting the
word 'hide' like so: msmsgs=msgrocm.dll,OcEntry,msmsgs.inf,hide To this:
msmsgs=msgrocm.dll,OcEntry,msmsgs.inf,,7
Now, after
restarting, you should be able to see MSN Messenger in the Add/Remove Programs
list. If you want to be able to quickly view and remove all components, simply
open the sysoc.inf file and do a global find and replace for the word
",hide" and replace it with a single comma ",".
Tweak #7 - Disabling Windows File Protection
WARNING:
Using this tweak means you will be able to delete vital Windows files.
here's a quick tweak to
be able to totally disable Windows File Protection, the system that prevent
users from deleting system and program files. Simply find the key SFCDisable in HKEY_LOCAL_MACHINESOFTWAREMicrosoftWindows NTCurrentVersionWinlogon and edit it to hold the value 0xFFFFFF9D.
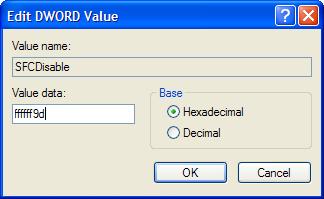
If you want to re-enable File Protection, just
re-set the value to 0.
Tweak #8 - Automatically Kill Programs At
Shutdown
don't you hate it when, while trying to shut down, you get message
boxes telling you that a program is still running? Making it so that Windows
automatically kills applications running is a snap. Simply navigate to the HKEY_CURRENT_USERControl PanelDesktop directory in the Registry, then alter the key
AutoEndTasks to the value
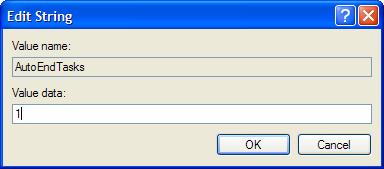
Note: the key 'AutoEndTasks' might not exist. If not, simply create it
with a value of 1. To disable the AutoEndTask feature, simply change the value
back to 0.
Tweak #9 - Memory Performance Tweaks
There are several memory tweaks that can be performed
with Windows XP - all of them are located in the
HKEY_LOCAL_MACHINESYSTEMCurrentControlSetControlSession
ManagerMemory Management
section of the registry.
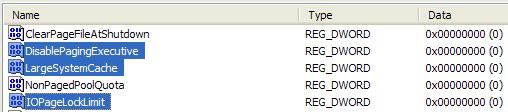
Disable Paging Executive
In normal usage, XP pages sections from RAM memory to
the hard drive. We can stop this happening and keep the data in RAM, resulting
in improved performance. Note that only users with a large amount of RAM
(256MB+) should use this setting. The setting we want to change to disable the
'Paging Executive', as it is called, is called DisablePagingExecutive.
Changing the value of this key from 0 to 1 will de-activate memory paging.
System Cache Boost
Changing the value of the key LargeSystemCache from 0
to 1 will tell Windows XP to allocate all
but 4MB of system memory to the file system cache, basically meaning that the
XP Kernel can run in memory, greatly improving it's speed. The 4MB of memory
left is used for disk caching, but if for any reason more is needed, XP
allocates more. Generally, this tweak improves performance by a fair bit but
can, in some intensive applications, degrade performance. As with the above
tweak, you should have at least 256MB of RAM before attempting to enable
LargeSystemCache.
Input/Output Performance
This tweak is only really valuable to anyone running a
server - it improves performace while a computer is performing large file
transfer operations. By default, the value does not appear in the registry, so
you will have to create a REG_DWORD value called IOPageLockLimit.
The data for this value is in bytes, and defaults to 512KB on machines that
have the value. Most people using this tweak have found maximum performance in
the 8 to 16 megabyte range, so you will have to play around with the value to
find the best performance. Remeber that the value is measured in bytes, so if you want, say, 12MB allocated, it's 12 *
1024 * 1024, or 12582912. As with all these memory tweaks, you should only use
this if you have 256MB or more of RAM.
Tweak #10 - Speeding Up Share Viewing

This is a great tweak. Before I found it, I was always
smashing my head against the table waiting to view shares on other computers.
Basically, when you connect to another computer with Windows XP, it checks for
any Scheduled tasks on that computer - a fairly useless task, but one that can
add up to 30 seconds of waiting on the other end - not good! Fortunately, it's
fairly easy to disable this process. First, navigate to HKEY_LOCAL_MACHINE/Software/Microsoft/Windows/Current
Version/Explorer/RemoteComputer/NameSpace in the Registry. Below that,
there should be a key called .
Just delete this, and after a restart, Windows will no longer check for
scheduled tasks - mucho performance improvement!
Tweak #11 - Prioritizing Individual Processes
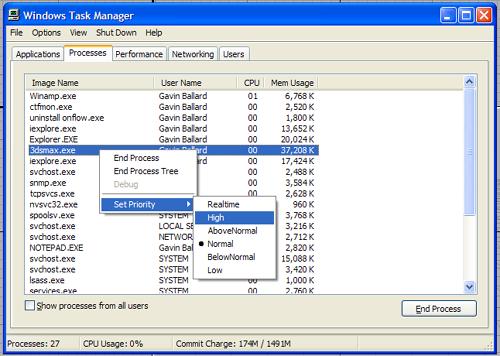
This is so simple it's not funny, but it leads into the
next tweak... anyway, if you press Control+Alt+Delete, then click on the
'Processes' tab, you should get a dialog like the one above. You can see a list
of all the processes running at the time. Now, if you are running a program
that you want to dedicate more processing time to - eg, 3D Studio Max, as in my
example, you can just right-click on the process, move your cursor down to 'Set
Priority >', then select how high you want that program prioritized. While
I'm checking my email, I might want a
Tweak #12 - Prioritizing IRQs
The last tweak for this guide - and a good one. The main
components of your computer have an IRQ number assigned to them. With this
tweak we can increase the priority given to any IRQ number, thereby improving
the performance of that component. The most common component this tweak is used
for is the System CMOS/real time clock, which improves performance across the
board. First of all, decide which component you want to give a performance
boost to. Next, you have to discover which IRQ that piece of hardware is using.
To do this, simply go to Control Panel, then open the System panel (You can
also press the shortcut of Windows+Break). Click the 'Hardware' tab, then on
the 'Device Manager' button.
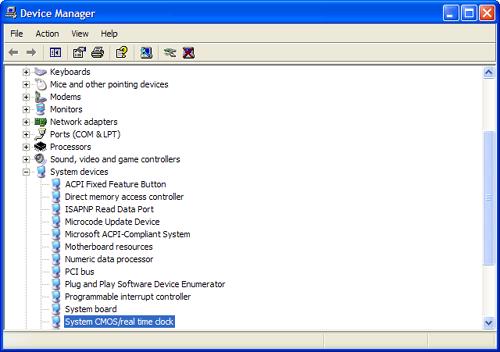
Now, right click on the component you want to discover
the IRQ for and click 'Properties', then click on the 'Resources' tab.
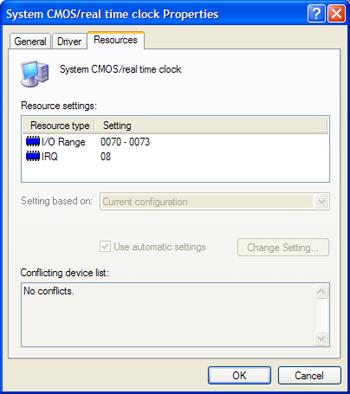
You can plainly see which IRQ this device is using (if
there is no IRQ number, select another device). Remember the number and close
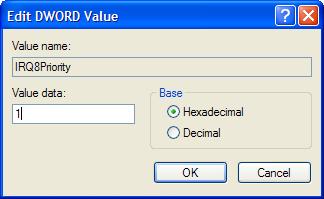
down all of the dialog boxes you have opened, then start up RegEdit. Navigate
to HKEY_LOCAL_MACHINESystemCurrentControlSetControlPriorityControl
in the registry. Now, we have to create a new DWORD value - called IRQ#Priority (where '#' is the IRQ number), then set
the data to 1. For example, the IRQ of my
System CMOS is 8, so I would create the key IRQ8Priority.
Now, after restarting, you should notice improved
performance in the component you tweaked. I would strongly recommend the CMOS,
as it improves performance around the board. Also note that you can have
multiple IRQ prioritized, but it is fairly inefficient and can cause
instability. To remove this tweak, simply delete the value you created.
End Of The Line
Well, that's the end of my first guide. I hope it's
helped you to maximise both your performance and appearance. (Windows's
appearance, that is - not your own, for that, you'll just have to wait for my
plastic surgery guide...)
Thanks again to all the TweakTown Staff, I hope I can
continue to make a contribution to TweakTown. If you have a suggestion or
comment about this article, please email me at [email protected] (not
sure if my TweakTown email is working yet), or just message me in the TweakTown Forums.
Happy Tweaking, Guys And Gals!
-Gavin "Osiris" Ballard
|
