ALTE DOCUMENTE
|
||||||
The Separations options control how the colors of your file print when outputting your work to separate pieces of film.
To choose the Separations options:
In the Print Setup dialog box, click the tab for Separations
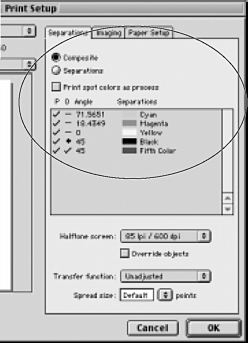
If you want all the colors to print together, click Compo 22422s1812w site.
To separate the colors to different plates, click Separations.
Click Print spot colors as process to override the settings for spot colors.
To prevent a color from printing, click its checkmark in the P column to delete the checkmark for that color.
To set the overprint options:
In the separations options, click the O column. The Overprint Ink dialog box appears
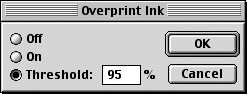
Choose one of the following:
o On sets all instances of that color to overprint.
o Threshold specifies what tint of that color or higher will overprint.
o Off turns off overprinting.
TIP
A checkmark in the O column of the indicates that the ink is set to overprint. A diamond indicates that the ink is set to overprint at a threshold level.
To set the screen angle:
Click the angle column for that color. The Screen Angle dialog box appears
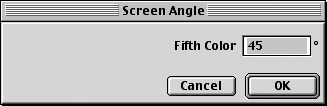
Enter the angle you want for that color and click OK.
Repeat for each color.
TIP
Consult with your print shop before you adjust the screen angles, screen frequency, or overprinting options.
If your artwork has any screened objects, you may want to set the halftone screen.
To set the halftone screen:
Select the printer's PPD.
Open the Separations options.
Use the Halftone screen pop-up menu in the Separations options to choose from the list of common screens for your output device
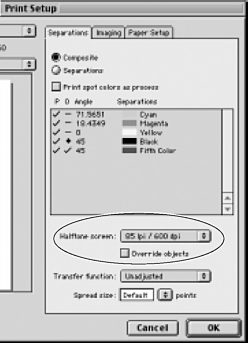
To override any halftone screens set for individual objects, click Override objects.
TIP
If you print to a laser printer and find banding in your blends, lower the screen frequency to around 35 lpi (lines per inch) or 40 lpi. While the screened artwork may look a little "dotty," this should reduce the banding.
In addition to setting the halftone screen for the entire illustration, you can set the half-tone screen for individual objects.
To set the halftone screen for individual objects:
Select the object whose halftone screen you want to set.
Choose Window > Panels > Halftone. The Halftone panel appears
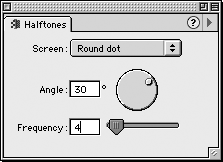
Choose the shape of the screen dot from the Screen pop-up menu.
Enter the angle of the screen in the Angle field or rotate the wheel to set the screen angle. If no value is set, the default angle of 45 degrees is used

Enter the frequency (lines per inch) of the screen in the Frequency field or use the slider to set the number. If no value is set, the default of the output device is used.
The Transfer function controls the dot gain for screened images.
To set the Transfer function:
With the Separations tab selected in the Print Setup dialog box, select one of the following from the Transfer function menu
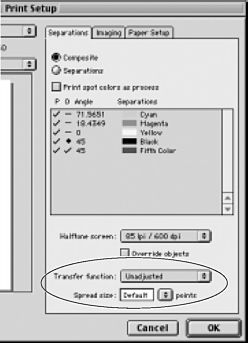
o Unadjusted is used if you are printing to a specially calibrated output device.
o Normalize is used if you are printing to an ordinary laser printer.
o Posterize is used if you want to speed the printing and do not mind sacrificing quality. This reduces the number of levels of screens.
In addition to the Trap Xtra (see page 174), FreeHand has a global trapping option called spread.
To choose the spread size:
In the Spread size field, enter the amount that you want basic fills and strokes to expand . This compensates for misregistrations in the printing. Before you enter any amount, talk to the print shop where the artwork will be printed.
|
