Slipstreamed Windows XP CD Using SP2
Whenever a new version of a service pack for XP is released I always run it through the slipstreaming procedure to see if everything works as expected. Service Pack 2 (SP2) is the latest release so it was time for another round of testing. For those of you that have a copy of SP2 and want to give it a try the procedure I used is presented below. I experienced absolutely no problems with the procedure based on an original Gold Edition XP Professional CD. The slipstreamed CD booted and installed perfectly to a freshly formatted hard drive.
The first step is to build a directory structure to hold the files that will be used in the CD creation process. It's a simple structure, requiring nothing more than a few folders. It doesn't matter what names you use for you 454j96e r folders or where you locate them on your hard drive, but most users find drive C the easiest. I created the folders shown below, located on Drive C, and used the XP- prefix for each one so they would all be located together for easy access. Create whatever folders you are comfortable with or use the ones below if you want to copy and paste commands later in the tutorial.
|
XP |
Before copying the XP CD make sure that the system is set to display all hidden and system files to ensure a complete copy of all files on the CD. The settings to control what files are visible are located in Windows Explorer > Tools > Folder Options > View tab. Make sure [Show hidden files and folders] radio button is selected and [Hide protected operating system files] is unchecked.
The Run dialogue box is accessed
from [Start] [Run]
The command to begin the extraction is:
C:\XP-SP2\WindowsXP-KB835935-SP2-ENU.exe -x
The prompt for where to store the extracted files shown above will open. I used the default C:\XP-SP2 but again, you can choose an alternate location if you wish.
Apply the extracted Service Pack to Windows XP files in the XP folder that were copied in the first step using the [Run] dialogue box.
The Run dialogue box is accessed
from [Start] [Run]
The command to apply the Service Pack is: C:\XP-SP2\i386\Update\Update.exe
-S:C:\XP
As shown below, Service Pack 2 is being integrated into the Windows installation folder.
Successful completion of the integration process.
Extract the Imaging File
In order to make a slipstreamed CD bootable it's necessary to add an image file during the burning process. You need to extract the file Microsoft Corporation.img and save it to a folder. For my testing I just created a XP-BootImage folder on the C:\ drive. There are a number of ways to perform the extraction but the easiest is to use ISO Buster.
With the Windows XP CD in your CD drive, open ISO Buster. Click on Bootable CD in the left pane then right click Microsoft Corporation.img in the right pane, finally clicking Extract Microsoft Corporation.img file.
Extract the file to the C:\XP-BootImage folder previously created or your equivalent.
With the preparation out of the way it's time to actually burn the CD. There are a number of different burning or CD creation programs that can be used to accomplish this task. I've included instructions here for Easy CD and DVD Creator 6 by Roxio and another set of instructions for Nero Burning ROM 6-SE. While the terminology and screens may vary depending on your CD burning program choice and version, the principles remain the same and can be easily adapted no matter what burning software is being used. Click on the burning instructions of choice below.
Load the NERO Burning ROM program.
In the left hand column select CD-ROM [Boot] from the available choices.
Make sure the [Boot] tab is selected.

In [Source of Boot Image Data] section select [Image File] and click the [Browse...] button.
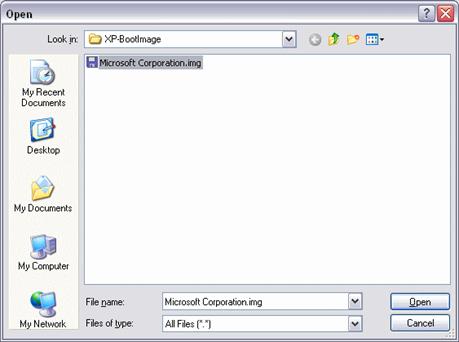
Navigate to the XP-BootImage folder and select the Microsoft Corporation.img file then click [Open] which will return you to the main [New Compilation] window.
Back in the New Compilation window, make sure there is a checkmark in the [Enable Expert Settings 9for advanced users only)] section.
Set [Kind of Emulation] to No Emulation
Set [Load Segment of Sectors (hex)] to 07C0
Set [Number of Loaded Sectors] to 4 (Failing to set Number of Loaded Sectors to 4 will make the CD unbootable)
Switch to the ISO tab in New Compilation window and make sure the settings appear as shown in screen capture below.

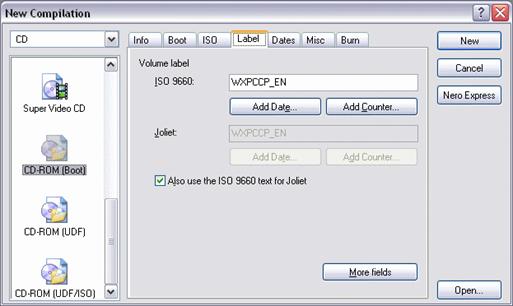
Switch to the Label tab in New Compilation window and make sure the settings appear as shown in screen capture below.
Set the [Volume Label] field depending on your Windows XP version.
o If you have Windows XP Professional enter WXPCCP_EN
o If you have Windows XP Home enter WXHCCP_EN
o If you have Windows XP Professional OEM enter WXPOEM_EN
Although it's not required, you can click the [More Fields...] button and customize the publisher file information. I use THE ELDER GEEK when making my personal slipstreamed CD's, but MICROSOFT CORPORATION would be an appropriate choice or use your own company name.
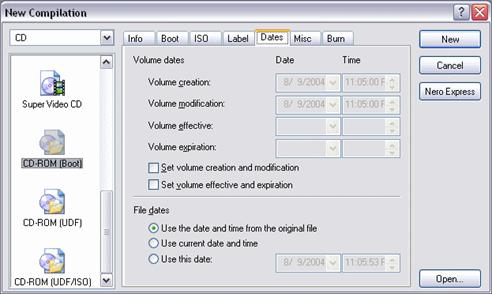
Switch to the Dates tab in New Compilation window and make sure the settings appear as shown in screen capture below.
Switch to the Misc tab in New Compilation window and make sure the settings appear as shown in screen capture below.

Switch to the Burn tab in New Compilation window and make sure the settings appear as shown in screen capture below. Of course, your [Write Speed] setting may vary depending on the installed system hardware. I suggest you leave the [Number of Copies] setting at 1 until you've burned the first CD and tested it for proper operation.

Once all the tabs in the New Compilation window shown above have been accessed and set appropriately, click the [New] button to open the main Nero application window.
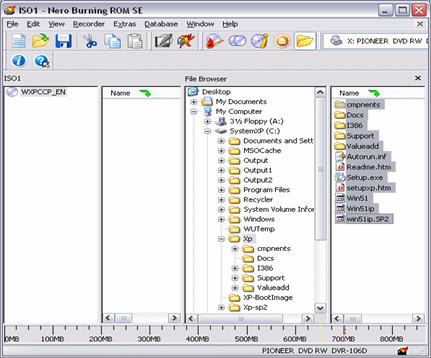
Set the [File Browser] section on the right side to display the XP folder that was created earlier or your equivalent folder. Click on the first file in the list, hold down the Shift key and click on the last file in the list to select all the files and folders in the C:\XP folder.
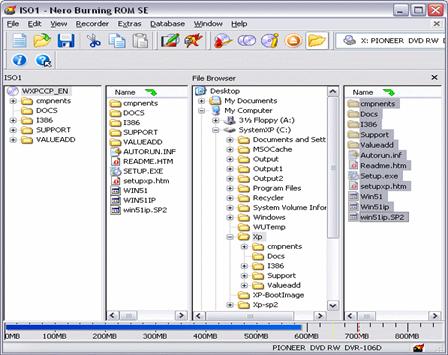
Left or right click the highlighted files and drag and drop them beneath the WXPCCP_EN heading in the ISO1 column on the far left.
If everything was done correctly you should see a window very similar to the one shown below. The first column shows that the CD will be titled WXPCCP_EN and contain the folders listed below the name. The second column shows that in addition to the folders there will also be seven other files added to the CD. The view is identical to what you'd see if you looked at the finished CD in Windows Explorer using details view.
Once everything has been completed and looks right the only thing left to do is click the Burn (it's the ninth icon from the left in the screen capture above) icon to start burning the current compilation.
Before you start the burning process close all other programs. Burning a CD can be very processor and memory intensive and there is no sense in taxing the system more than necessary. Even I can avoid FreeCell during a CD burning session and I'm a FreeCell addict.
If you use a screensaver, disable it before the burning process as an extra precaution. The same applies to your anti virus software if it starts scans or updates automatically.
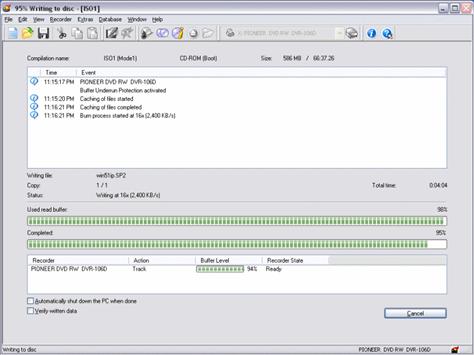
How long the burning process takes will vary widely depending on your system and the CD burner speed. It may not appear like anything is happening at times, but be patient and more than likely all will be fine.
If the burn does fail, especially because of a buffer problem, reduce the speed of the burn and try again.
Congratulations !
When the screen above appears you have successfully burned a Slipstreamed XP/SP2 CD ROM.
|
