ALTE DOCUMENTE
|
||||||||||
Programul este instalat automat. Pentru a instala programul în computerul dumneavoastra trebuie sa faceti urmatorii pasi.
Descarcati fisierul, apasati de doua ori pe el si instalarea va începe automat, afisând o fereastra de instalare.
Continuati instalarea apasând tot timpul Next. Programul va fi instalat în directorul Program Files în Windows®. Programul de instalare va pune o pictograma a noului program pe desktop.
Daca veti dori vreodata sa stergeti acest program din computerul dumneavoastra, functia de îndepartare a programului este disponibila în directorul Furnish din meniul Programs.
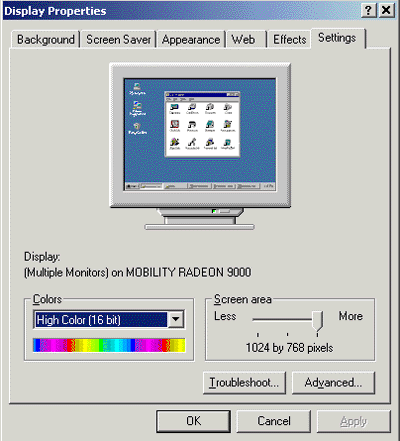
Setarea ecranului
Va recomandam ca atunci când lucrati cu programul Furnish sa schimbati rezolutia ecranului la 1024 x 768 - ca si culorile care trebuiesc sa fie de min. 16 biti. Daca trebuie sa schimbati rezolutia si culorile, urmati pasii :
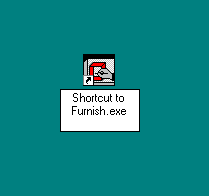
Pornirea programului Furnish
Pentru a porni programul dupa instalare, apasati de doua ori pe iconita programului de pe desktop, dupa cum vedeti mai jos.
Functiile programului Furnish
Urmatoarele titluri va vor introduce în interfata programului, meniuri si functii. Dupa acea va vom exemplifica cum sa folositi programul de la început pâna la sfârsit.
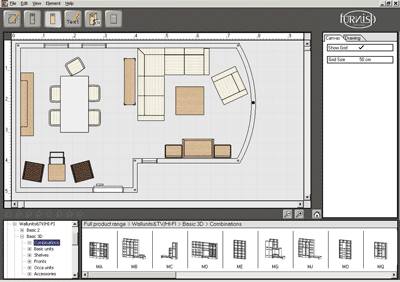
Ecranul principal al programului Furnish
Când ati pornit programul apasând de doua ori pictograma lui, apare ecranul principal, dupa cum puteti vedea mai jos:
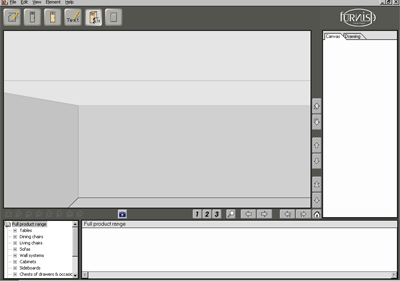
Dupa cum puteti vedea mai sus, ecranul principal este construit din 4 zone diferite:
1. O bara de instrumente se afla în partea superioara a ecranului, de unde puteti accesa diferite functii si niveluri ale programului.
2. În centrul ecranului se afla o zona de lucru (plansa) delimitata de linii. Acesta este locul unde va construiti camera si unde puneti aranja mobila.
3. În partea inferioara a ecranului este sub-meniul unde puteti accesa diferitele componente pentru designul camerei si diversele game disponibile.
4. În partea dreapta a ecranului, veti gasi panoul de configurare (configuration panel), care va ofera optiunile disponibile pentru produsul/produsele selectate.
Functiile barei de instrumente

Asa cum puteti vedea mai sus, designul meniului este simplu si logic. Mai jos va prezentam functiile meniului.
Designul camerei Primul buton (designul camerei) este folosit pentru a defini camera pe care doriti sa o mobilati. Acesta este butonul cu care ar trebui sa începeti. Aici puteti defini planul camerei, sa desenati linia camerei sau a casei si peretii interiori. Puteti de asemenea sa decideti locul si marimea ferestrelor si usilor. Schimbarea culorii pardoselii si a peretilor trebuie facuta în modul 3D. Va vom arata acest lucru mai detaliat ulterior.
Configurarea vederii de deasupra Odata ce ati construit camera asa cum va doriti si sunteti gata sa o mobilati, apasati pe al doilea buton. Acum puteti începe dispunerea mobilei în camera dupa ce ati selectionat linia produsului dorit si subcategoria din sub meniu. Apasati cu mouse-ul pe elementul dorit, deplasati-l si puneti-l în tablou, tinând în tot acest timp butonul de la mouse apasat.
Va rugam sa luati în considerare ca optiunea de schimbare a designului camerei este blocata atunci când înce 22222v2117w peti sa mobilati camera. Daca trebuie sa faceti modificari în aranjamentul camerei, apasati pe butonul Designul Camerei.
Configurarea culorii în vederea de deasupra Nu numai ca va puteti mobila camera dar puteti de asemenea vedea si schimba finisajele produselor pe care le-ati ales. Acest lucru poate fi facut cu al treilea buton, unde furnirurile si culorile disponibile sunt listate în Bara de Culori din Panoul de Configurare. Finisarile se schimba în functie de ce elemente ati ales. Puteti schimba culoarea unui element sau grup de elemente pur si simplu prin gruparea lor cu ajutorul mouse-ului. Va reamintim ca puteti schimba culoarea atât în Vederea de sus cât si în modul 3D.
Adnotari
Odata
ce ati mobilat camera si ati schimbat culorile dupa preferintele
dumneavoastra, puteti scrie texte si masuri pe desen.
Când selectati butonul Adnotari, puteti selecta un editor de text sau masuratori. Miscati caseta unde doriti sa scrieti textul si scrieti-l în Panoul de Configuratie, unde puteti alege marimea literelor si fontul care va place. Textul poate fi mutat sau rotit astfel încât sa îl puneti unde aveti nevoie de el.
Puteti de asemenea sa puneti o anumita marime în camera, folosindu-va de editorul de dimensiuni. Puteti introduce dimensiunea si un text care sa desemneze la ce foloseste. În acel moment, programul genereaza o rigla mica, ce poate fi miscata, rotita sau plasata unde doriti.
Configurarea modului 3D Al patrulea buton va ofera o imagine a camerei în modul 3D. Puteti de asemenea configura modul 3D, puteti lua obiectele si sa le puneti direct în 3D. Puteti alege sa construiti aranjamentul de baza în Vedere de Sus dupa care sa terminati utilizând modul 3D.
În modul 3D va puteti misca utilizând tastele directionale, înainte si înapoi, dreapta si stânga. Acelasi lucru poate fi facut daca utilizati bara de navigare a modului 3D din partea de jos dreapta a ecranului. Aici sageata se va îndrepta în directia pe care o indica.
Apasând simultan pe tasta Ctrl si folosind tastele directionale puteti roti camera; acest lucru se va face utilizând tastele pentru dreapta si stânga. În acelasi fel puteti schimba unghiul de vizualizare utilizând tastele pentru sus si jos. Rotatia si schimbarea unghiului pot fi facute si cu ajutorul barei de navigare.
Apasând pe tasta CTRL + "R" sau "Z" simultan, puteti roti sau mari un obiect apasând cu mouse-ul pe acesta. Miscati pur si simplu mouse-ul în timp ce apasati simultan tastele "R" sau "Z" si CTRL.
Acest lucru înseamna ca veti beneficia de mai mult decât de o simpla vedere a camerei în modul 3D, ci chiar va puteti misca în realitatea virtuala si va veti putea face o idee clara asupra modului în care aceasta camera va arata în realitate.
Lista de elemente Ultimul din butoanele principale reprezinta lista de componente, unde beneficiati de o lista completa a componentelor tuturor obiectelor care va folosesc la mobilarea camerei.
Zona de lucru
În centrul ecranului veti gasi o zona care arata în felul urmator:
În stânga sus aveti axele, care indica latimea si lungimea camerei. Acestea înconjoara zona de lucru. Programul poate lucra cu camere sau planuri ale parterului cu dimensiuni de pâna la 100 x 150 metri.
Din axa este posibil sa deplasati ambele linii albastre de ghidare în camera (atât cea orizontala cât si cea verticala, cum se vede si deasupra) care va ajuta la re-dimensionarea camerei sau la deplasarea mobilei - mai multe detalii mai târziu.
Sub meniul
Cum în textul de mai sus am facut referiri la Sub meniu, am gasit util sa va explicam în detaliu utilizarea sa.

Sub meniul are doua arii de sortare. În prima arie puteti alege intre categoriile disponibile.
În cea de-a doua zona veti gasi numele fiecarui produs din catalog. În acest mod veti avea acces rapid si usor la produsele de care aveti nevoie.
La dreapta câmpurilor de sortare veti vedea o ilustrata a fiecarui produs din subcategorie, desenat în linii si cu numarul produsului. Când sunt mai multe produse decât pot încapea pe ecran, puteti defila ecranul pentru a vedea restul obiectelor.
Panoul de configurare
"Panoul de Configurare" este panoul plasat în dreapta, dupa cum puteti vedea mai jos.
Panoul de configurare are trei functii. În prima functie (Element) alegeti modulele, în a doua functie (Culoare-Color) puteti schimba culoarea produselor selectate.
În a treia functie (Eticheta-Tag) puteti împarti module diferite în grupuri, astfel încât sa apara pe lista de produse în ordinea corecta.
Functiile meniului principal
În plus fata de functiile disponibile în bara de actiuni, mai exista un numar de functii sub meniu. Va vom explica mai jos fiecare meniu cu defilare.
![]()
Meniul FILE
Meniul File dupa cum puteti vedea mai jos, are functiile normale ale unui meniu File din majoritatea aplicatiilor Windows.
Prima sectiune a functiilor se refera la deschiderea si salvarea fisierelor si alegerea tastelor de acces rapid pentru aceleasi functii. Urmatoarea sectiune se refera la printarea si optiunile de printare; acest lucru fiind necesar a fi ajustat în functie de imprimanta pe care o detineti si de formatul hârtiei. Ultima sectiune este unde mergeti pentru a parasi programul.
Meniul EDIT
Meniul Edit, dupa cum puteti vedea mai jos, începe cu functii si taste pentru acces rapid asemanatoare cu cele utilizate în Windows.
Settings se refera la un numar specific de setari pe care le puteti face în program pentru a-l ajusta la nevoile dumneavoastra. În fereastra de setari, dupa cum puteti vedea mai jos, puteti schimba un numar de setari diferite.
Puteti schimba centimetrii în inch, acest lucru schimbând liniile programului si dimensiunile folosite în camera de design din centimetrii în inch. Puteti alege punctele zecimale si separatoarele pe care doriti sa le folositi. Puteti alege simbolul monedei si sa determinati plasarea lui. Puteti seta un curs de schimb sau rata de profit în legatura cu lista de preturi existenta în program. Dupa ce ati setat acest raport, puteri rotunji pretul fiecarei componente, în sus, jos sau sa se termine cu o anumita cifra.
Fiecare schimbare pe care o faceti, poate fi vizualizata în fereastra de exemplificare ce se gaseste în partea din dreapta. Retineti sa verificati caseta de jos pentru fiecare din setarile de valuta si de curs folosite în program.
Puteti activa Auto Save, care salveaza o copie a desenului dvs. în fisierul setari la intervalul la care doriti acest lucru. Acest lucru înseamna ca de cate ori programul se întrerupe involuntar, veti gasi ultima salvare Auto Save când veti porni programul.
Nu în ultimul rând aveti sansa de a seta modul 3D. Acest lucru este necesar numai atunci când aveti probleme cu vizualizarea si/sau printarea în acest mod.
Languages & Prices din meniul Edit se refera la posibilitatea de a schimba si adauga alte limbi straine si preturi folosite de program, în timp ce programul ruleaza.
Dupa cum puteti vedea mai sus, fiecare linie de produse are o lista de limbi si preturi disponibile. În functie de ceea ce doriti, tot ceea ce trebuie sa faceti e sa alegeti limba si pretul pentru fiecare linie de produse si sa apasati de fiecare data pe butonul de import
Dupa ce ati completat va puteti reîntoarce în program, unde limba si preturile s-au schimbat în functie de selectia dvs. Va rugam sa aveti grija : trebuie sa aduceti la zi ecranul prin selectia unei functii sau a unei taste functionale din bara de optiuni, înainte ca preturile sa intre în vigoare.
Meniul VIEW
Prima selectie a meniului View contine functii ale barei de optiuni, si din moment ce acestea au fost deja explicate nu vom mai intra în detaliu. Dorim numai sa scoatem în evidenta utilizarea tastelor functionale sau a altor combinatii de taste pentru a ajunge sa faca acelasi lucru ca si bara de optiuni.
Transparent este o functie care va permite sa vedeti prin tabliile meselor. Daca lucrati în 'Top View Color' si doriti sa vedeti prin furnirul meselor, doar alegeti Transparent din meniul View. Masa va arata în acest moment cum arata în Top View, unde puteti vedea prin partea de sus.
Urmatoarele trei functii sunt toate optiuni ale modului în care doriti sa vedeti desenul în modul 3D. Programul foloseste în mod automat vizualizarea Textured, în care vedeti structurile furnirului si culorile în modul 3D. În cazul în care calculatorul dvs. are o capacitate mai mica de calcul sau daca lucrati la desene foarte mari ati putea alege celelalte doua optiuni, deoarece ele lucreaza cumva mai repede fata de vizualizarea structurata. Wire Frame va reda un desen al produselor în modul 3D din contururi; Hidden Lines este o vedere alba în modul 3D fara textura.
Ultimele trei functii sunt de tipuri sau unghiuri diferite ale modului. Perspective este adevarata vizualizare în modul 3D, Isometric este o vedere 3D de sus simulata, dându-va sansa de a vedea camera de sus. Plan view este o modalitate de a vedea direct în camera, foarte des utilizata pentru a configura unitatile pentru pereti.
Meniul Element
În acest meniu veti gasi functii legate de elementele sau produsele puse în camera sau de aranjamentul pe care l-ati creat.
Cu functia Rotate puteti scrie gradele unghiului specific la cere vreti ca produsul sau grupul de produse sa se roteasca. Faceti acest lucru tinând apasat simultan tastele Ctrl si R.
Lock si Unlock se refera la optiunea de a bloca un produs sau grup de produse într-un loc specific din camera. Odata acest lucru facut produsul nu mai poate fi mutat înainte de a fi selectat si deblocat.
Lock Interior se refera la optiunea de a bloca politele si fetele. Odata blocate, acestea nu pot fi mutate fara a fi selectate si deblocate.
Unlock Interior se refera la optiunea de a debloca politele si fetele.
Hide Fronts este o functie cu care puteti ascunde fetele si puteti vedea interiorul modulului lucru care va permite sa adaugati sau sa îndepartati polite.
Tag este o functie care va permite sa puneti o eticheta sau un nume pe un obiect sau grup de obiecte. Acestea vor aparea împreuna în Lista de Elemente, cu un subtotal pentru grup. În acest mod, un desen de dimensiuni mai mari poate fi format din grupaje si evaluat pretul în sectiuni pe lista de componente, dându-va o mai buna evaluare a lor si a pretului lor. Un exemplu va va fi dat în sectiunea Cum sa folosim Furnish.
Meniul HELP
Meniul Help va garanteaza acces la informatiile programului si ale fisierului.

About Furnish, va da informatii despre ce versiune a programului folositi si listele de software ale programatorilor Furnish.
Taste rapide
În plus fata de functiile barei de optiuni pe care le puteti selecta în Program Menu, mai exista si câteva extra optiuni disponibile cu ajutorul tastelor de acces rapid, folosind numai tastatura.
Aceste functii au ca scop doar sa faca programul mai usor de utilizat pe tot parcursul proiectarii. Ulterior va vom lista câteva functii de folosire. Unele taste rapide sunt specifice pentru anumite portiuni din program, pe când altele sunt general valabile si au aceeasi functii pe tot parcursul programului.
Scurtaturi:
Configurarea Vedere de deasupra (top-view):
Mouse: Pentru a selecta un element sau grup de elemente trebuie pur si simplu sa apasati pe butonul mouse-ului si sa îl miscati pe modulele pe care doriti sa le selectati. Mouse-ul deseneaza un patrat deasupra obiectelor, acestea devenind mai deschise la culoare.
Ctrl + tasta directionala:
Puteti roti un element sau grup de elemente apasand simultan pe tasta
Ctrl
si tastele directionale. Pentru fiecare apasare selectia dvs.
se va roti cu 45 de grade. În acest fel puteti efectua toate rotatiile
necesare numai utilizând aceste taste.
Alt + mouse: Daca aveti nevoie sa copiati un element sau o selectie de elemente trebuie doar sa tineti apasat pe tasta Alt si sa deplasati o copie a selectiei cu mouse-ul.
Configurarea vederii 3D
Ctrl + mouse:
Când folositi modul 3D si doriti o vedere de mai aproape a unui
element dati click pe acel element cu mouse-ul în timp ce tineti
apasata simultan tasta Ctrl.
Apasati pe Home pentru a
reveni la vederea normala în 3D.
Ctrl + Shift + mouse:
Au aceeasi functie ca cea ce mai sus, dar acum vedeti partea din
fata a unui element mult mai îndeaproape.
Shift + mouse:
Pentru
a grupa un numar de elemente în modul 3D, faceti click pe fiecare
element în timp ce tineti apasat pe tasta Shift. Grupul de elemente selectat este încercuit cu o linie rosie.
Ctrl + R + mouse:
Acestea va dau posibilitatea de a roti un obiect. Apasati pur si
simplu pe cele trei taste si miscati mouse-ul.
Ctrl + Z + mouse:
Acestea va dau posibilitatea de a mari partea dinauntrul si dinafara
a unui obiect. Apasati cele trei taste si miscati de
mouse înainte si înapoi.
Taste generale:
Ctrl:
Apasând pe tasta Ctrl în timp ce
doriti sa puneti în loc un obiect selectat ignora toate
regulile programului. Acest lucru înseamna ca puteti plasa obiecte
atunci când restrictiile inteligente si regulile programului nu v-ar lasa
în mod normal.
Va mai listam înca o data tastele rapide :
Functii:
Ctrl + N:
Curata zona de lucru în care ati lucrat, dar trebuie salvat
proiectul în curs înainte de a face acest lucru.
Ctrl + O: Deschide fereastra în care au fost salvate anterior fisierele.
Ctrl + S: Se deschide o fereastra în care va puteti salva lucrul.
Ctrl + P: Mergeti la fereastra Print.
Ctrl + Q: În acest fel parasiti programul. Înainte de a-l închide programul sugereaza sa va salvati schimbarile care nu au fost salvate.
Ctrl + Z: Cu aceste taste anulati ultima actiune facuta.
Ctrl + Shift + Z:
Astfel refaceti
actiunea pe care ati ales sa o anulati.
Ctrl + X:
Programul sterge selectia si o plaseaza în clipboard
pentru a fi folosita ulterior.
Ctrl + C: Programul realizeaza o copie a selectiei în clipboard.
Ctrl + V: Programul plaseaza selectia de pe clipboard din nou pe plansa.
Ctrl + A: Cu aceasta functie selectati tot ceea ce se gaseste pe plansa de lucru.
Ctrl + R: Se deschide o fereastra unde introduceti unghiul de rotatie a obiectelor.
Ctrl + L: Se blocheaza un element sau elemente intr-un un anumit loc si acesta sau acestea nu mai pot fi mutate pana când nu sunt deblocate.
Ctrl + Shift + L: Se deblocheaza selectia.
Ctrl + T: Acestea deschid fereastra în care puteti face etichete pentru selectia dvs., astfel încât sa fie grupate într-un subtotal în lista de componente.
Cum sa folositi programul Furnish
În acest capitol ne vom axa pe cum sa va aratam utilizarea programului Furnish, purtându-va pas cu pas de la crearea unei camere pentru design pâna la o mobilare completa. Mai devreme v-am explicat toate functiile programului, acum vom pune aceste informatii în practica astfel încât sa puteti folosi programul.
Designul camerei
Când alegeti camera ce urmeaza a fi mobilata, veti putea gasi în Control Panel mai multe forme standard de camera. Acestea sunt sub forma de patrat, de L si de U.
Când porniti programul veti primi în mod automat o camera standard plasata în mijlocul plansei. Facând click în interiorul camerei veti primi dimensiunea camerei si metrii patrati /picioare în panoul de configurare. Apasând cu mouseul în afara camerei, veti primi informatiile generale despre aceasta, cum ar fi grosimea peretilor exteriori si înaltimea de la podea pana la tavan.
Va puteti
desena de asemenea propria camera. Selectati butonul pentru desen ![]() (patratul). Înainte de a începe sa desenati,
puteti selecta camera existenta (Ctrl+Alt) si sa o stergeti.
Acest lucru va va crea o plansa noua.
(patratul). Înainte de a începe sa desenati,
puteti selecta camera existenta (Ctrl+Alt) si sa o stergeti.
Acest lucru va va crea o plansa noua.
Veti desena noua camera marcând colturile, adica de fiecare data când faceti click, creati un nou colt. Puteti de asemenea desena peretii interiori cu acelasi instrument. Pentru a face acest lucru trebuie sa începeti de sus pe un alt perete (ceea ce va va da punctul de început). Când doriti sa terminati un perete trebuie sa faceti click dreapta si sa selectati Finish.

va rugam sa luati în considerare ca o camera trebuie închisa înainte ca ea sa fie acceptata drept camera. Daca aveti locuri deschise, nu va va aparea nici o camera în modul 3D. Drept ajutor, programul va va anunta când sunteti aproape de perete si sunteti gata sa îl terminati.
Puteti face pereti rotunzi. Facând click pe perete si activând optiunea Round Wall în panoul de configuratie, obtineti un punct pe perete. Puteti trage de el în pozitia dorita si în timp de îl deplasati veti primi informatii despre distanta actuala, dupa cum puteti vedea mai jos:
Peretii interiori pot fi deplasati ca si cei exteriori. Activati instrumentul pentru desen (caseta patrata) si faceti click pe peretele unde doriti sa înceapa peretele interior, si deplasati peretele interior pana la lungimea dorita. Când ajungeti aproape de un alt perete în timp ce va deplasati, veti gasi un punct de unire indicat de o sageata, lucru care va asigura ca peretii se îmbina. Puteti observa acest lucru mai jos:
Adaugarea usilor si a ferestrelor
Odata ce ati terminat aspectul general al camerei, pasul urmator este sa adaugati usile si ferestrele. Veti gasi acest lucru aici:

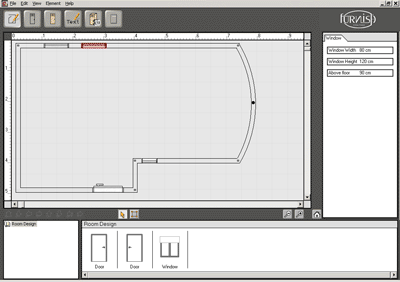
Puteti pune ferestre si usi pe desen. Usile vin automat cu mânere atât pe partea dreapta cât si pe cea stânga, în functie de ceea ce aveti nevoie. si ferestrele si usile pot fi modificate ca dimensiune selectându-le, si scriind masura dorita în Configuration panel.
Pentru a adauga ultimul retus ce îi confera camerei noastre realitate, puteti schimba culorile peretilor si podelei. Puteti face acest lucru în modul 3D în orice moment facând click pe podea sau peretele a carui culoare doriti sa o schimbati. În sectiunea din partea dreapta aveti disponibile selectii ale texturii si ale culorilor.
Acum dispunerea camerei este gata, având pereti, usi si ferestre si puteti începe mobilarea ei.
Mobilarea camerei
Pentru a începe sa mobilati camera, alegeti al doilea buton din bara de optiuni (Top View) si toate functiile privind designul camerei sunt acum blocate. Alegeti în submeniu gama de produse si subcategoria cu care doriti sa lucrati si puteti începe dispunea mobilierului în camera.
Deplasati si lasati în camera fiecare element pe care îl doriti. Daca elementele se potrivesc, în momentul în care veti încerca sa combinati doua dintre ele, o sageata mica va va arata locul de îmbinare. Gama de produse folosita de program urmareste aceleasi reguli ca si în realitate. Astfel inteligenta programului nu va va permite sa combinati elemente care nu pot fi combinate în realitate, acestea fiind respinse.
Alegeti pur si simplu elementele din subcategorii si plasati-le în camera pâna când este complet mobilata asa cum doriti. Ţinând minte functiile de rotatie si copiere mentionate mai devreme, mobilarea este mult mai usoara. Puteti gasi informatii si optiuni despre mobilier în panoul de configurare, dupa cum puteti vedea mai jos.
Pentru a schimba orice optiune trebuie doar sa faceti click pe sageata din caseta gri si va vor aparea toate selectiile disponibile. Alegeti optiunea pe care o doriti si obiectul se va schimba.
Continuati mobilarea camerei folosind functii pentru deplasare si lasare (drag and drop) a obiectelor, pentru a deplasa obiectele din submeniu în camera. Exersati mobilarea camerei si lucrul cu punctele de îmbinare plus functiile relevante, pana ce veti cunoaste functiile de baza pe de rost, moment în care va va fi mult mai usor sa folositi programul.
Schimbarea culorilor sau a finisajelor din furnir
Camera pe care tocmai am creat-o arata în felul urmator, vazuta de sus, color:
Optiunile de finisaj pentru un element selectat sunt aratate în Color Tab în Configuration panel.
Pentru a schimba finisajul unui element sau a unui grup de elemente, selectati-le folosind mouse-ul si schimbati cu ceea ce doriti în Color Tab din Configuration panel. Va rugam sa fiti atenti, deoarece nu toate produsele au aceeasi culoare.
Adnotari
Dupa terminarea desenului si selectarea culorilor, detaliul final este posibilitatea de a plasa text si masuri pe desen.
Când ati ales annotation puteti avea acces la editorul de text si de dimensiuni, dupa cum puteti vedea mai jos.

Folosindu-va de ele puteti scrie textul pe care în doriti, sa îi editati marimea, forma, rotind si punând unde doriti pe desen. Dupa cum puteti vedea în exemplu, textul poate reprezenta informatii legate de produs si de zona de lucru.
În acelasi fel, puteti alege editorul de dimensiuni si sa introduceti valoarea masuratorii/rigla pe care doriti sa o plasati. Puteti chiar sa introduceti text care se vede ca o parte din rigla, ca în schita urmatoare. Când lucrati cu inch, introduceti dimensiunile în feet, si acestea vor fi transformate automat. Puteti de asemenea sa rotiti si sa plasati rigla oriunde doriti.
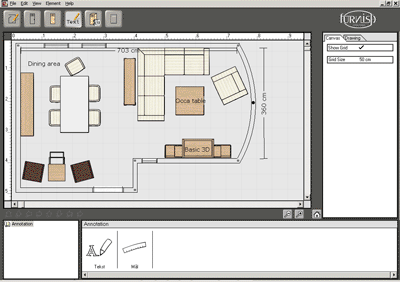
Atât textul cât si riglele vor fi imprimate odata cu desenul atunci când imprimati din ecranul Annotation.
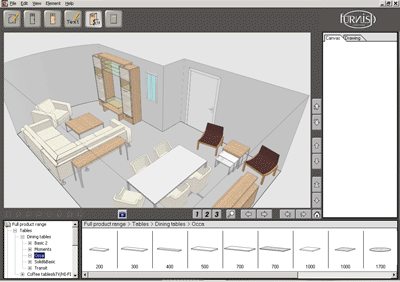
Configuratia 3D
Pentru a vedea camera în 3D, alegeti butonul 3D din meniul bara de instrumente. Atunci când intrati în modul 3D, puteti accesa o bara suplimentara, numita bara de navigatie 3D, care va permite sa va miscati în cele 3 dimensiuni.
În ceea ce urmeaza, bara de instrumente va fi descrisa si referinte catre aceasta vor fi facute în textul ce descrie configuratia 3D
În mod implicit, vederea 3D este afisata în mod texturat, culorile si structura furnirului fiind clare, asa cum se vede mai jos. Daca doriti un mod de vizualizare mai rapid, sau lucrati pe un computer cu o capacitate mai redusa, puteti încerca modurile Wire frame sau Hidden lines - le veti gasi în meniul View.
Functia de vizualizare 3D realizeaza o poza din fata a camerei. Peretele exterior dinspre dumneavoastra este transparent pentru a putea vedea prin el.
Acum puteti sa va miscati în jur în modul 3D folosind sagetile din dreapta barei de navigatie sau sagetile de la tastatura. Cum arata si sagetile, va puteti misca în fata sau în spate pentru a mari sau micsora camera. Puteti de asemenea sa va miscati la stânga sau la dreapta fata de centrul camerei sau sa miscati unghiul de vedere al camerei la stânga, dreapta, în sus sau în jos.
Deoarece programul permite miscare în spatiu, din orice pozitie, este util sa folositi modurile Hidden lines sau Wireframe pentru accelerarea procesului de redare. Deoarece computerul necesita mult mai putin timp de calcul pentru a reda în modurile mai simple, puteti sa va miscati mult mai rapid în interiorul camerei. În momentul în care ati ajuns în locul în care doriti, puteti sa reveniti la modul Textured view. Mai jos gasiti un exemplu de camera în Hidden lines.
Acest mod de vizualizare arata totul în alb, dar reduce timpul de redare semnificativ, pentru a reduce timpul pe care trebuie sa în petreceti asteptând daca lucrati la o camera mare si va miscati tri-dimensional, sau intrati si iesiti des din modul 3D.
Folosind meniul "viewpoints" din panoul de configuratie, puteti schimba între 3 puncte de vizualizare standard. Pentru fiecare document, puteti schimba între acestea. Pentru fiecare document, puteti schimba aceste puncte de vizualizare simplu, miscând catre noul punct si apasând butonul "save viewpoint" Puteti adauga oricâte puncte de vizualizare doriti. Dupa ce ati salvat punctele, puteti apasa pe butonul "start presentation". Acum Furnish va arata un mic film folosind punctele dumneavoastra de vizualizare.
Daca gasiti un punct din care va place cum arata imaginea, puteti adauga lumini si umbre apasând butonul "render viewpoint". Aceasta ar putea dura câteva minute în functie de configuratia computerului dumneavoastra, asa ca va rugam sa aveti rabdare.
Puteti oricând sa va întoarceti la imaginea de pornire, apasând Casa din meniul de instrumente, sau tasta home.
Folosind sagetile din stânga, puteti sa mutati piesa/grupul de piese de mobilier selectate. Va rugam sa luati în considerare ca nu toata mobila se poate deplasa în sus si în jos.
Pentru a satisface dorinta utilizatorilor avansati ai programului, este posibil sa configurati o camera întreaga în 3D. Toate obiectele sunt disponibile în meniul produs, în partea inferioara a ecranului si pot fi pozitionate în modul 3D, acolo unde punctele de îmbinare între produse sunt înca active.
În mod normal, ar trebui sa plecati de la vederea de deasupra, pentru a putea aseza corect obiectele în functie de dimensiuni si sa finisati în 3D. Unele lucruri sunt mai usor de plasat în 3D, cum ar fi usi si polite. Acestea ar trebui plasate în 3D, dupa plasarea obiectelor mari în vederea de deasupra.
Puteti de asemenea schimba culorile unui obiect sau grup de obiecte direct din 3D pentru a vedea diverse optiuni instantaneu, selectând culori din "Color Tab", în panoul de configuratie. Schimbarea culorii se poate realiza de asemenea pe pereti si podea. Schimbarea culorii poate fi realizata de asemenea pentru pereti si podele, pentru care aveti optiune pentru textura si culoare când apasati pe ele cu mouse-ul. Puteti selecta mai multi pereti în acelasi timp tinând apasata tasta shift înainte de a adauga un element la selectie. Culoarea si textura le puteti schimba dupa ce realizati selectia multipla.
Cum sa folositi listele de obiecte
Programul înregistreaza fiecare obiect care este folosit în desen si alegerea din butonul lista de obiecte (Items List) din bara de instrumente permite accesarea unei liste complete de obiecte.
Toate obiectele sunt listate dupa gama, numarul modulului, descrierea si culoarea. Numarul fiecarui obiect folosit este afisat; pretul, pretul extins si pretul total sunt afisate în partea de jos.
În ilustratia de mai jos, vedeti lista de componente pentru camera la care am lucrat mai devreme:
Pentru a avea o imagine despre preturile fiecarei sectiuni sau zone din birou, puteti sa etichetati (sau sa grupati) parti din camera, si sa le afisati împreuna în lista de componente. Acest lucru este ilustrat aici. Puteti numi grupurile cum doriti. Pentru a eticheta obiectele, trebuie sa le selectati si sa apasati Ctrl.+T.
Imprimarea din Furnish
Puteti realiza diverse tipuri de schite imprimate din Furnish. Puteti imprima din Top View, Top View Color, din 3D si din Items List.
Programul se va adapta automat la tipul de hârtie pe care îl folositi. Asta înseamna ca veti avea întotdeauna întreaga camera pe maximum de suprafata de pe hârtia aleasa.
Când imprimati vederea de deasupra, puteti opta pentru scara la care optati pentru imprimare. În sistemul metric puteti opta pentru: potrivire la scala, 1:50, 1:100, 1:250 si când lucrati în inch, puteti opta între potrivire la scara si scara ¼".
Când imprimati din 3D, puteti opta pentru diverse calitati (180, 300 si 600 dpi). Imprimarea cu 300 dpi si în mod special cu 600 poate dura foarte mult timp pentru a fi procesata.
Atentie: imprimarea 3D si Top view Color sunt activitati de imprimare mari, ceea ce pot consuma timp, de aceea va rugam sa aveti rabdare cu computerul cât timp proceseaza cererea.
Personalizarea imprimarii
Puteti sa va adaugati logo-ul în coltul paginii imprimate din Furnish.
Logo-ul dumneavoastra (sau orice logo) trebuie sa fie memorat ca logo.bmp (format Bitmap, 24 bit/culoare) în directorul Furnish/User asa cum este ilustrat aici:
Logo-ul va fi adaugat în coltul din stânga sus tuturor paginilor imprimate în Furnish, asa cum se vede aici:
Va rugam sa luati în considerare ca logo-ul îsi va adapta dimensiunile pentru a se potrivi în zona indicata.
Service si suport tehnic
Cerintele minime pentru a rula programul sunt:
Procesor Pentium II 400 MHz
128 MB RAM / 16 MB VRAM
(video)
Rezolutie XGA (1024 x 768 - culoare pe 16 biti)
Configuratia recomandata a sistemului este:
Procesor Pentium 4; 2 GHz
512 MB RAM / 128 MB VRAM
(video)
Rezolutie XGA (1024 x 768 - culoare pe 16 biti)
Important: Va rugam sa luati în considerare faptul ca pentru a rula programul pe un laptop la aceasta rezolutie este necesar un monitor de minimum 13.3".
Pentru orice întrebare în legatura cu gamele de produse, regulile de utilizare si limitele acestora, ar trebui sa contactati Compania Club 8 direct. Pentru probleme legate de partea fizica a computerului, va rugam sa contactati furnizorul computerului înainte de a contacta Compania Club 8.
Club 8 Company
Phone: +45 96 26 72 51
Fax: +45 96 26 72 16
Attn.: Mikkel Lautrup
E-mail: [email protected]

Please note when furnishing a room the option of changing the room design is blocked. If you need to make changes to the room layout, you need to go back to the Room Design button.
Top View Color Configuration
Not only are you able to
furnish your room, you are also able to see and change the finishes of the
products you have chosen. This can be done in the third button, where available
veneers and colors are listed in the Color Tab in the Configuration Panel. The
available finishes change depending on what element(s) you have chosen. You
change the color of an item or a group of items, simply by grouping them with
the mouse. Please note that you also can change colors in Top view and 3D.
Annotation Once you have furnished the room and changed the colors according to your desire you can place text and measurements on the drawing.
When you select the Annotation button you are able to select a text editor or dimensions. Move the box to where you want the text and in the Configuration Panel you write the text you need and edit the font and size. The text can be moved or rotated so you can place it where you need it.
You are also able to place a given measurement in the room, using the dimension editor you can enter a specific measurement and a short text naming the measurement. The program then generates a small ruler, which can be moved, rotated and placed where you would like.
3D Configuration
The fourth button gives you a 3D view of your room.
You are also able to configure in 3D, as you can pull up the items and place
them directly in 3D. You can also choose to build the basic layout in top view and
then finish it of with the last items in 3D.
You are able to move around in 3D, simply by use of the arrow keys, this way you can move back and forth and right and left. The same movement can be done if you click on the 3D navigational toolbar in the bottom and to the right of the screen. Here the arrows move you in the direction they point.
By holding down Ctrl and using the arrow keys, you can rotate the room; this is done with the arrow left and right key. In the same way you can change your view angle by using arrow up and down. Rotation and angle change can also be done using the navigational toolbar
By pressing "R" or "Z" + CTRL on your keyboard, you are able to rotate or zoom an object by clicking on it. Simply move your mouse, while pressing "R" or "Z" and CTRL at the same time.
This means that you get much more than a simple still picture in 3D, you are able to move about almost in "virtual reality" and get a good idea of how your room would look in reality.
Item list
The last of the main buttons
is the components list, where you get a complete parts list of all items used
when you furnished the room.
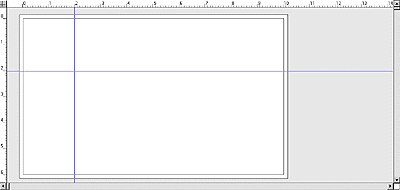
Working area
In the center of the screen you will find an area that looks like this:
At the left and top you have the axis, which indicates the depth and width of the room, surround the working area. The program can work with rooms or ground plans of up to 100 x 150 meters in size.
From the axis it is possible to drag both vertical and horizontal blue guidelines into the room (as seen above) and place them as a help when altering the room or placing furniture - more about that later.
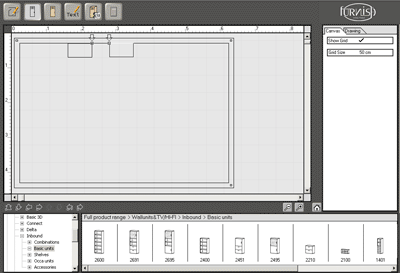
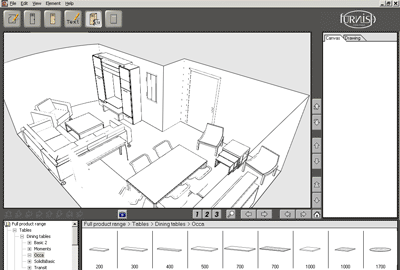
Sub menu
As there has been some reference to the "Sub menu" in the above text, we thought it useful to explain the menu, as shown below, in further detail.
The sub menu has two sorting fields. In the first you choose between the available categories.
In the second field you'll find the names of each product catalog. This way you have fast and easy access to the items you need.
To the right of the sorting fields you see an illustration of each item if the subcategory, with line drawing and item number. When there are more items than can be shown on the screen at one time, you are able to scroll and see the remaining items.
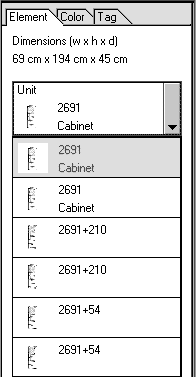
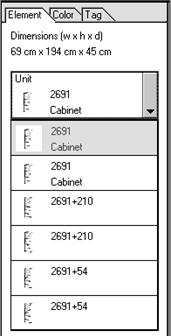
Configuration Panel
The "Configuration Panel" is the panel in the right hand side, as shown below.
The Configuration Panel has tree tabs. In the first tab (Element) you choose the options, and in the second tab (Color) you can change the colors on the selected element(s).
In the third tab (Tag) you are able to divide the different furniture in to groups, so they appear in the correct order on the Items list.
Program menu functions
In addition to the functions available from the tool bar there are also a number of functions available under the program menu. In the following each of the pull down menus of the program menu will be explained.
![]()
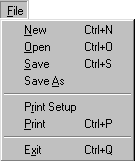
File menu
The File menu as shown below, has the normal functions of a file menu in a Windows® application.
The first section of functions refers to opening and saving the files and lists the short-keys for the same functions. The next section has to do with print and print setup; this needs to be changed to match you printer and paper size.
The last section is where you go to quit the program.
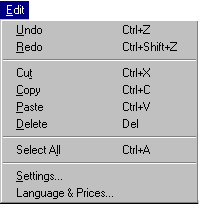
Edit menu
The Edit menu, as shown below, starts out with a number of normal Windows® functions and short-keys.
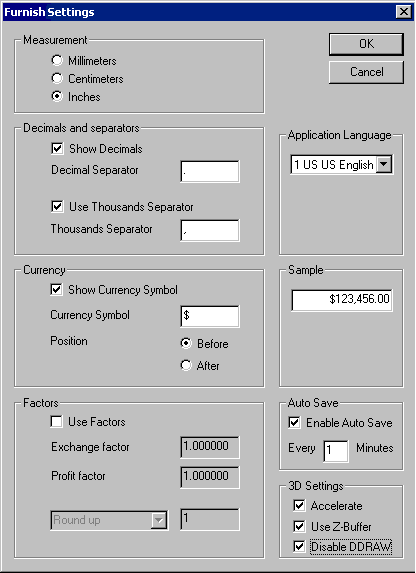
Settings refers to a number of specific settings you can change in the program in order to customize the program to your needs. In the settings window, as can be seen below you are able to change a number of different settings.
You can change from centimeters to inches, this changes the rulers of the program and the measurements used in room design to inches. You can set what kind of decimal points and separators you would like to use. You can set your own currency symbol and determine its placement. You are also able to set an exchange factor or profit factor in relation to the price list imported into the program. After having set your factor, you are able to round each components price, up or down or to end on a specific number.
For each change you make you can see what it will look like in the sample window to the right. Remember in order for currency and factor settings to be used in the program, you need to check the little box under each of the two settings.
You can enable Auto Save, which saves a copy of your drawing into the settings-folder (AutoSave.fpf) as often as you set up. This means that if you experience any unauthorized breakdown of the program, you will find the last Auto Saved setup next time you start up Furnish.
Finally you have the possibility to setup your 3D settings. This is only needed if you experience problems in viewing or printing from 3D.
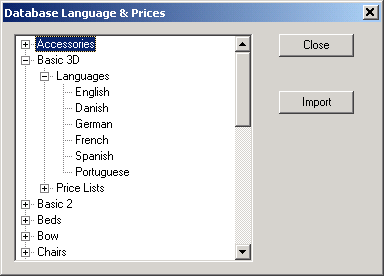
Languages & Prices of the Edit menu refers to the ability to import and change the languages and prices being used in the program, while the program is still running.
As can be seen above, each of the product lines in the program has a listing of available languages and prices. Depending on the one you desire, all you need to do is choose language and price for each product line and click the import button, each time.
After completion you can return to the program, where the language and price now has changed to your selection. Please note: you need to update the screen, by selection on of the other function keys of the toolbar, before the prices take effect.
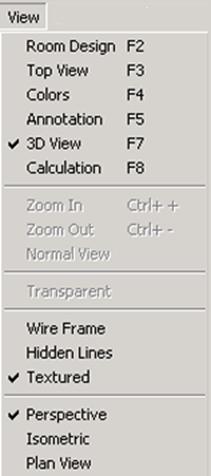
View menu
The first section of the View menu contain the functions of the toolbar, since these have already been explained we will not go into further detail here. Only to point out the option of using the function keys or other key combinations to achieve the same as with the toolbar
Transparent is a function that allows you to see through the tabletops. If you are working in 'Top View Color' and you wish to see through the veneer of the tables, just choose Transparent in the View menu. The table will now look like it does in regular Top View, where you are able to see through the top.
The next three functions are all options of how you want to see (or render) the 3D drawing. The program as default uses the Textured view, in which you get colors and veneer structure shown in 3D. If you have a lower capacity computer of if you are working in very large drawings you might want to choose the two other options, because they work somewhat faster than the textured view. Wire Frame gives you a wire or line drawing of the items in 3D, Hidden Lines is a plain white 3D view without texture.
The last tree functions are all different kinds or angles of 3D. Perspective is the true 3D view, Isometric is a simulated 3D seen from above, enabling you to get a birds-eye view of the room. Plan view is a view where you look straight into the room, mostly used for configuring wall-units.
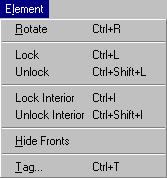
Element menu
In this menu you find functions related to the elements or items placed on the room or layout you have made
With the Rotate function you are able to write the specific angle in degrees you wish the item or group of items to rotate to. This is done simply by holding down the keys Ctrl and R at the same time.
Lock and Unlock refers to the option of locking an item or group of items in place at a specific point in the room. Once this is done the items cannot be moved before they are selected and unlocked again.
Lock Interior refers to the option of locking shelves and fronts. Once this is done they cannot be moved before they are selected and unlocked again.
Unlock Interior refers to the option of unlocking shelves and fronts.
Hide Fronts is a function with which you are able to hide fronts and then see what are inside the item and it allows you to add or remove shelves.
Tag is a function with which you are able to put a tag or name on an item or group of items. These items will then be shown together on the Items List, with a subtotal for the group. This way a larger drawing can be grouped and priced in sections on the components list, giving you a better overview of the items and their price. An example of this will be given in the section Using Furnish.
Help menu
The Help menu gives you access to program information and this file.
About Furnish, gives basic program information about what program version you are working in and lists the software developers of Furnish.
Keyboard shortcuts
In excess of the functions of the toolbar and the functions you can select under the program menu, there are some extra functions available only as short-keys using the keyboard.
These functions are all intended to make the program easier to use as you go from Room design to finished drawing, in the following they will be listed and examples of their use will take place in the next chapter. Some short-keys are specific for specific areas of the program others are general and can be used throughout the program.
Shortcuts:
Top View Configuration:
Mouse: In order to select an item or group of items you simply need to hold down the mouse button and move the mouse to the items you want to select. The mouse draws a square over the items and the selected items are highlighted.
Ctrl + arrow key: You are able to rotate an item or group of items by holding down Ctrl and tapping the arrow keys. For every tap your selection will rotate by 45 degrees. This way you are able to do most of the needed rotations by using these keys.
Alt + mouse: If you need to copy an item or a selection of items you simply hold down the Alt key and pull away a copy of the selection with the mouse.
3D Configuration:
Ctrl + mouse:
When you are standing in 3D and want a close-up view of one of the items in the
room. Click the item with the mouse while you hold down Ctrl and you get a close-up 3D view of the item, click Home to return to normal 3D view.
Ctrl + Shift + mouse:
Same function as above, but now you see the front of the item in close-up view.
Shift + mouse:
To group a number of items in 3D, click each item
while you hold down Shift. The
selected group of items gets a red outline.
Ctrl + R + mouse:
This lets you rotate around an object. Simply press the three buttons and move
your mouse.
Ctrl + Z + mouse:
This lets you zoom in and out on an object. Simply press the three buttons and
move your mouse forwards and backwards.
General:
Ctrl:
Holding down Ctrl while wanting to
place a selected item, overrules all existing rules. This means that you are
able to place items where the intelligence and rules of the program normally
would not let you.
Just to repeat the short-key functions listed in the pull down menus of the program menu, they are listed below.
Functions
Ctrl + N: Cleans the canvas you have been working in, you are asked to save unsaved work before the canvas is cleared.
Ctrl + O: Opens the window with earlier saved files.
Ctrl + S: This brings up a window in which you can save your work.
Ctrl + P: This takes you to the print menu.
Ctrl + Q: This way you quit the program, before closing you are asked to save unsaved work.
Ctrl + Z: With this key you undo your last action.
Ctrl + Shift + Z: Here you redo the action you just selected to undo.
Ctrl + X: This cuts the selection away and places it on the clipboard.
Ctrl + C: This makes a copy of the selection to the clipboard.
Ctrl + V: This places the selection from the clipboard back on the canvas of the program.
Ctrl + A: With this function you highlight or select all on the canvas.
Ctrl + R: This brings up the rotate window, where you enter a rotation degree.
Ctrl + L: This locks the item or items in place and they cannot be moved before they are unlocked again.
Ctrl + Shift + L: This unlocks the selection.
Ctrl + T: This brings up the window in which you can make a tag for your selection, so they are grouped with a subtotal on the components list.
Using Furnish
In this chapter we will focus on showing how to use Furnish, taking you through step-by-step from designing a room to a completely furnished layout. Earlier we have explained all the functions of the program, now we will use that knowledge so we can start using Furnish.
Room Design
When you choose room design, there are a number of standard room shapes selectable in the Configuration panel. These are standard sized square, L- and U-shaped rooms.
When you start the program you automatically get a standard room placed in the center of the canvas area. By clicking inside the room you get the dimensions of the room and square meters / square feet in the configuration panel. By clicking outside the room you get the general room information, the thickness of the outer walls and the height from floor to ceiling.
Instead of working with standard rooms you can also freely draw your
room. Select the drawing button ![]() (the square). Before starting to draw, you can
select the existing room (Ctrl+Alt) and delete this room. This gives you a
clean canvas.
(the square). Before starting to draw, you can
select the existing room (Ctrl+Alt) and delete this room. This gives you a
clean canvas.
You draw the new room by clicking corner-points, meaning that every time you click, you set a new corner point. You can also draw inner walls with the same tool, where you have to start on top of another wall (where it will give you a snap point). When you want to finish a wall you can right click and select finish.
Please note that the room must be completed before it is accepted as a room. If you have any open ends, no room will appear in 3D. As a help, the program will automatically snap when you are close to the wall and are about to finish it.
It is possible to make a wall round. By clicking the wall and activating the option Round Wall in the configuration panel, you get a dot on the wall. You can drag it into the desired position and while you are dragging you will get information about the actual distance as you can see on this picture:
Inner walls can be drawn in the same way as outer walls. You activate the drawing tool (the square box) and click on the wall where you need the inner wall to start, and you drag the inner wall into the desired length. When you come close to an outer wall while dragging, you will find a snap point (indicated by the arrow) that makes it simple to make sure that the walls adds together. You can see this functionality illustrated her:
Adding doors and windows
Once you have completed the overall room design your next step is to add doors and windows to the room. In the following it will be illustrated how this is done.
You can place windows and doors in the drawing. Doors come with both a left-sided and a right-sided hinge, depending on what you need. Both windows and doors can be edited in size by clicking them, and typing the desired size in the Configuration panel.
To add the last touch of reality to your room you are able to change the colors of the wall and the floor of the room. This can be done in 3D at any given time and is done by clicking the floor or wall you need to change. In the right-hand section you have a Texture and color selection available.
As your room layout is now complete with walls, doors and windows, you are ready to start furnishing the room.
Furnish the room
To start furnishing the room you choose the second button of the toolbar (Top View), and all features regarding room design are now blocked. In the submenu choose the product line and sub category you want to work with and you can now start placing furniture in the room.
Drag and drop each item you want into the room. If the items are able to fit together, a little arrow will indicate a snap point, once you try to set two pieces together. The product line in the program follows the same rules as the product line is controlled by in real life. The intelligence of the program will therefore not let you combine items that you cannot combine and elements will get rejected.
You simply choose the items from the subcategories and place them in the room, until it is fully furnished. Remember the functions for rotation and copying mentioned earlier, they make furnishing the room much easier. You are able to find information and options of the furniture in the configuration panel, as seen below.
To change any option you just click on the arrow in the gray box and all available selections will appear. Click on the option you want to select and the element will change.
Continue furnishing your room, using drag and drop function, to move the items from the sub menu to your room. Practice the routine of furnishing a room and working with the snap points and the relevant functions, once you know the basic functions by heart, the program will be very quick for you to use.
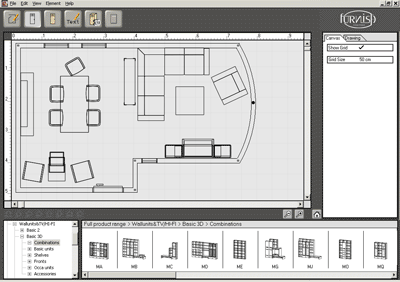
Changing colors or veneer finishes
The room we just designed looks likes the following in color top view:
The available finish options for a selected element are shown in the Color Tab in the Configuration panel.
To change the finish of an item or group of items, simply select them using the mouse and change to desired finish in the Color Tab in the Configuration panel. Please be aware, that not all products come in the same colors.
Annotation
After completing the drawing and the color changes the final touch is added by the ability to place text and measurements in the drawing.
When you have chosen annotation you are able to access a text or dimensions editor, as shown below.
Using these you can write the text you like, editing it for size and shape and rotating it and placing it anywhere in the drawing. As the example shows the text can be both product and workplace related information.
In the same way you can choose the dimension editor and enter the size of the measurement / ruler you would like to place, you are even able to enter a text to be shown as part of the ruler, as shown here. When working in inches, enter the dimensions in feet and they will be converted automatically. You are also able to rotate and place the ruler anywhere in the drawing you would like.
Both text and rulers will be printed with the drawing if you print from the Annotation screen.
3D Configuration
To view the room in, 3D choose the 3D button on the toolbar menu. When entering 3D you get access to an additional toolbar called the 3D navigational toolbar, this toolbar allows you to move around in 3D.
In the following the toolbar will be described and references to the toolbar will be made in the text describing 3D configuration.
By default the 3D view is shown in textured view, where colors and veneer structure of the furniture is seen clearly, as shown below. If you would like a faster 3D view, or you are working on a lower capacity computer, you might want to try Wire frame or Hidden lines - you find these under the menu View.
The 3D-view function takes a front view snapshot of the room. The outer wall facing you has been made transparent, so you can see through it.
You are now able to move around in 3D view using the arrows on the right of the navigational toolbar or the arrow keys of the keyboard. As the arrows show you can move forward or back in order to zoom in or out in the room. You can also move yourself left or right from the center of the room or move the viewing angle up or down. You can even rotate your viewing angle of the room right or left and up and down.
Since the program allows you to move about and render your view of the room, even completely to the other side, it is useful with the option of Hidden lines or Wire frame, to speed up the process. As the computer needs less rendering time for the less demanding views, you can move around much quicker in the other views. Once you reach the point of view you like, you can easily click back to Textured view. Below you see an example of the room in Hidden lines
This view basically shows everything in white, but it does render significantly faster, to reduce the time you have to wait if you are working on a large room and going back and forth to 3D.
Using the "viewpoints" drop-menu in the config panel, you can switch between 3 predefined viewpoints. For each document you can change these viewpoints simply by moving to the new viewpoint and pressing the "save viewpoint" button. You can add as many viewpoints as you like. When you have saved viewpoints, you can now click the "start presentation" button. Now Furnish will show a small movie using your viewpoints.
If you find a viewpoint that looks nice, you can add light and shadow, by pressing the "render viewpoint" button. Please note that this takes a few minutes, so be patient.
You can always come back to the start up view by clicking the House (or press Home on your keyboard).
With the arrows on the left side you are able to the piece or group of furniture you have selected. Please note that it is not all furniture that can be moved up and down.
To satisfy the demands of the more advanced user of the program, it is possible to configure a complete room in 3D. All items are available in the product menu below the screen and can be placed in 3D, where the snap points between products are still active.
Normally you would start in top view, in order to secure the correct placement of items according to the given dimensions and subsequently complete the units in 3D. As some things are much easier to place in 3D (like doors and shelves) these would normally be placed in 3D and the larger elements would normally be placed in top view.
You can also change the colors of an item or group of items directly in 3D to see the different options instantly, by selecting colors in the Color Tab in the Configuration Panel. Change of color can also be done on Walls and Floor, where you have a Texture and a color option available when you click on each of them. You can select more walls at the same time by holding down shift + click on them and change the texture and color afterwards.
Using the Items list
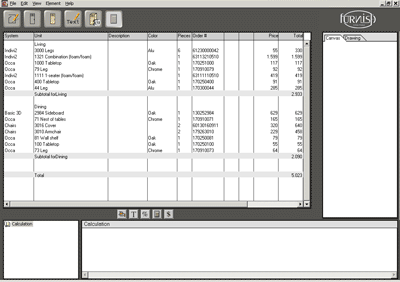
The program registers every item that is used in the drawing and choosing the Items List button on the toolbar menu can access a complete list of the items.
All the items are listed by system (product line), unit number, description and color. The number of each item used is listed, their price, extended price and the total price are listed at the bottom.
On the illustration below you see the components list for the room we have been working with earlier:
To keep the overview of the prices of each section or area of the office you are able to Tag (or group) parts of the room together, and have them shown together on the component list. This is illustrated here. You are free to name the Tags as you please. To Tag elements, you need to highlight them and press Ctrl.+T.
Printing from Furnish
You are able to make several printouts from Furnish. You can print from Top View, Top View Color, from 3D and the Items List.
The program will automatically scale the printout to the size of paper you are using. This means that you will always get the entire room printed on the maximum area of the paper size you have chosen.
When printing in Top View you get scaling options for your print, in metrics you get the options of: fit to scale, 1:50, 1:100, 1:250 and when working in inches you get: fit to scale and ¼" scale as options.
When printing from 3D you get different qualities to select from (180, 300 and 600 dpi). Printing in 300 dpi and especially 600 dpi can take very long time to process.
Please note: printing 3D and Top view Color is a large print job, which may take some time, so please have patience with your computer while it processes the print.
Customize printouts
You are able to add your logo on printouts from Furnish.
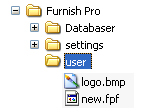
Your logo (or any logo) must be stored as logo.bmp (Bitmap format, 24 bit color) in the folder Furnish/User as illustrated her:
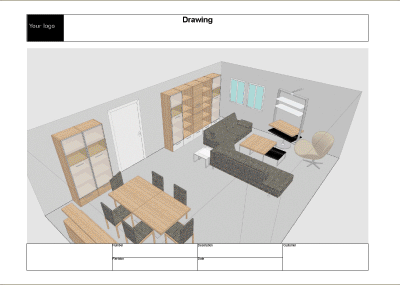
The logo will be added in the top left corner on all the printouts from Furnish as indicated with the Logo spot on this printout:
Please note that the logo automatically will scale to the best fit in the indicated area.
Service and support
The minimum hardware requirements for the program are as follows:
Pentium II 400 MHz Processor
128 MB RAM / 16 MB VRAM
XGA Screen resolution (1024 x 768 - 16 bit colors)
The recommended hardware requirements are:
Pentium 4; 2 GHz Processor
512 MB RAM / 128 MB VRAM
XGA Screen resolution (1024 x 768 - 16 bit colors)
Important: Please note that in order to run the program with this resolution on a laptop computer, it needs as a minimum a 13.3" monitor.
For all questions related to the product lines, their rules and limitations, you should contact Club 8 Company directly. For hardware related problems please contact your hardware supplier before contacting Club 8 Company.
|
