You may have scanned artwork that you want to convert into FreeHand paths. The Trace tool can recognize the different shapes in the artwork and convert them into vector paths. Before you use the Trace tool you need to import the scanned a 13213d36n rtwork into your FreeHand document.
To import artwork for tracing:
With your document open, choose File > Import.
Use the navigational tools to find the PICT, TIFF, or EPS file you want to trace. After the file is imported, your cursor changes to a corner symbol.
Click with the corner symbol to place the image on the page

TIP
Though you can trace art on any layer, most people put imported images on layers below the horizontal line of the Layers panel. This lightens the image so it is easier to work with and ensures that it does not print (see page 156).
TIP
For best results using the Trace tool, set the preference for Smart image preview resolution to Full Resolution (see page 397).
Realistic Expectations for Using the Trace ToolFreeHand's Trace tool is one of the best in the business - much better than its nearest competitor, and just about as good as the stand-alone tracing product, Adobe Streamline. However, no automatic tracing tool or dedicated tracing program can do it all! Most likely, when you trace, you will have to manually clean up the image to get it to look good. This is especially true if you are tracing company logos, text, or other artwork that has very graphic shapes. You may find that it is easier to use FreeHand's other creation tools to manually trace that type of artwork. For instance, it is easier to use the Ellipse tool to trace a circle than try to get the Trace tool to create a perfect circle. |
Before you can use the Trace tool, you need to set its options, such as how many colors should be created, what kind of image you are working on, and so on.
To set the trace options:
Double-click the Trace tool in the Tools panel . This opens the Trace Tool dialog box

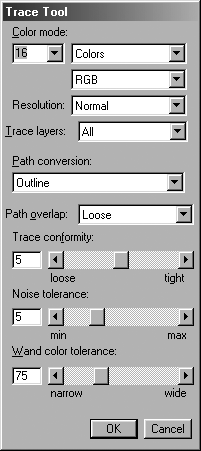
Set the Color mode, Resolution, Trace layers, Path conversion, Trace conformity, Noise tolerance, and Wand color tolerance as detailed in the following exercises.
Click OK to apply the settings.
To set the Trace tool Color modes:
Use the pop-up list or type the number of colors or shades of gray that you want in the final image.
Choose between Colors or Grays for the final objects.
If you have chosen Colors, use the second pop-up list to select RGB or CMYK colors.
To set the Trace tool Resolution options:
Set the Resolution options as follows:
o High sets the Trace tool to look at the most details in the image.
o
o Low sets the Trace tool to look for the fewest details.
TIP
High resolution traces take longer and require more memory.
To set the layers to be traced:
Set the Trace layers options as follows:
o All uses all the layers in the document.
o Foreground uses just the foreground layers.
o Background uses only those layers in the background of the Layers panel.
To set the how the paths are converted:
Set the Path Conversions as follows:
o Outline traces the ouside border of the image to create closed, filled paths. This is the option most often used to trace scanned images.
o Centerline traces the center of graphic strokes. Use this option if you have an image that has many lines, but few filled areas.
o Centerline/Outline uses both options together.
o Outer Edge traces only the outside contours of the image. Use this option if you want to mask the silhouette of an image against a background.
To set the sensitivity of the Trace tool:
Set the three sensitivity sliders as follows:
Trace conformity controls how close the traced objects follow the original. Set the value from 0 (lowest conformity) to 10 (highest conformity).
Noise tolerance lets you eliminate any stray pixels, such as dirt or paper grain, in the scan. Set the value from 0 (more noise kept) to 10 (more noise eliminated).
Wand color lets you set how broad a range of colors the Trace tool recognizes as one final color. Set the value from 0 (narrow range) to 255 (broadest range).
To trace an image:
Use the Trace tool to drag a marquee around the part of the image you want to trace

Release the mouse button to finish tracing the artwork. The traced objects appear on top of the original image

TIP
When tracing photographic images, the Trace tool may create many objects. Choose Modify > Group to join the objects into an easily selected group.
Rather than draw a marquee around the image, you can also use the Trace tool to select individual areas of a scanned image. This makes it easy to isolate a particular area from the rest of the scan.
To trace specific areas of an image:
Click the Trace tool on the area you want to capture. A blue line appears around the area that has been selected

If you want to add to the selection, hold the Shift key and click in another area of the image. Continue as many times as necessary to select all the areas you want.
Release the Shift key and click the Trace tool inside the selected area. The Wand Options dialog box appears
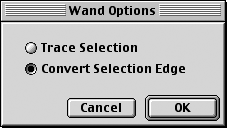
Choose Trace Selection to trace the selected areas as if they had been part of a marquee selection.
or
Choose Convert Selection Edge to merge all the selected areas into one selection with a default color of black

|
