ALTE DOCUMENTE
|
||||||||
If you find it difficult to remember all the moves with the Pen, you may find it easier to create objects with the Bezigon.
To create straight sides with the Bezigon tool:
Choose the Bezigon tool from the Tools panel

Position the cursor where you want the path to start and click. A corner point appears as a white square
![]()
Position the cursor for the next point of the object and click. A line extends from the first point to the second point.
Continue clicking until you have created all the sides of your object

Create a closed path by clicking the first point again.
TIP
Once you finish a path, press Tab to deselect the path. This lets you start a new path instead of continuing the old one.
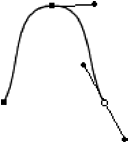
When you place curve points with the Bezigon, you only plot the position of each point. After you are done, you reshape the points to the exact shape of the curve.
To draw a smooth curved path with the Bezigon:
Choose the Bezigon tool and place your first curve point holding down the Opt/Alt key.
Hold the Opt/Alt key and click to create a second curve point. Although the segment between the points may not look correct, don't worry.
Keep holding the Opt/Alt key and click to create all the curve points.
Use the Pointer tool to adjust the point handles so the curve is the proper shape
When you use the Bezigon tool to create a bumpy path, you need an extra point at the top of the bump.
To draw a bumpy path with the Bezigon:
Click to create the first point, which is a corner point.
Hold the Opt/Alt key and click to add a curve point at the top of the bump. This adds a handle to the first corner point.
Click to create a corner point. A handle is added because this point is connected to a curve point.
Hold the Opt/Alt key and click to add a curve point at the top of the second bump. A handle is added to the previous corner point
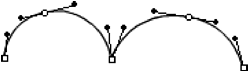
Click to create the final corner point. A handle is added because this point is connected to a curve point.
To draw a straight-to-bumpy path with the Bezigon:
Click to create a corner point.
Click again to create a corner point. The two points are connected by a line.
Hold the Opt/Alt key and click where the top of the bump should be. This creates a curve point. It also adds a handle to the corner point created in Step 2.
Click to create the next corner point . This adds a handle to the corner point that is connected to the curve point.
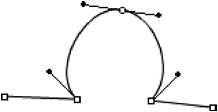
Click to create the final corner point that creates the straight line.
You create connector points with the Bezigon the same way as you do with the Pen.
To create connector points using the Bezigon:
(Mac) Hold the Control key (Mac) and click to create a connector point.
(Win) Hold the Alt key and click with the right mouse button.
|
