Unlike the strokes covered in the previous chapter, you need to create the artwork that is used in a brush stroke.
To convert selected objects to a brush:
1. 13313f54n ; Select the object that you want to use as the brush tip.
2. 13313f54n ; Choose Modify > Brush > Create Brush. A dialog box appears asking how you would like to use the selected object
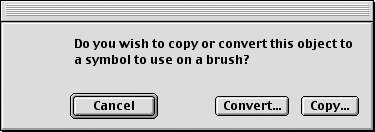
3. 13313f54n ; Click the Copy button to create a symbol to be used as the brush. This leaves the selected object unchanged.
or
Click the Convert button to create a symbol to be used as the brush, and replace the selected object with an instance of that symbol.
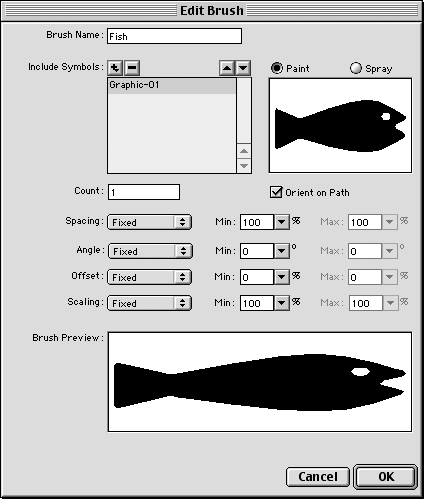
4. 13313f54n ; In the Edit Brush dialog box, use the Brush Name field to create a name for the brush.
TIP
The Include Symbols field automatically uses the symbol that was created from the selected artwork.
5. 13313f54n ; Set the options as described in the following exercises.
6. 13313f54n ; Click OK. The brush is available to be applied to paths. (See page 210 for how to apply a brush to paths.)
To set the brush mode:
1. 13313f54n ; Click Paint to create a brush tip that stretches along the length of the path
or
Click Spray to create a brush tip that repeats along the path
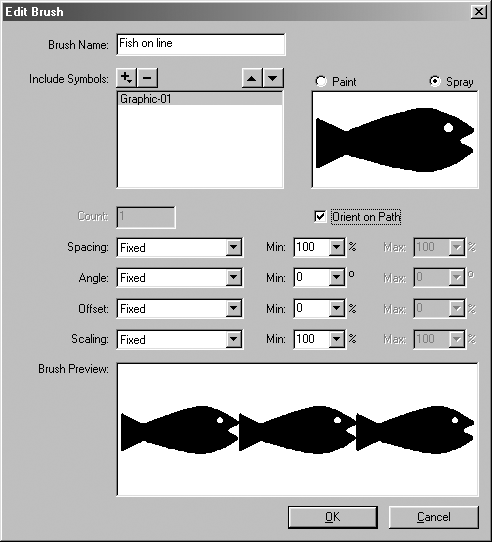
2. 13313f54n ; If you choose Paint, enter a number from 1 to 500 in the Count field. This sets how many times the brush tip appears along the path.
To control the orientation of the brush:
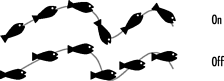
· 13313f54n ; 13313f54n ; Check Orient on Path to have the artwork follow the orientation of the path to which it is applied
To set the spacing options:
1. 13313f54n ; Use the Spacing list to choose one of the following options for the space between each instance of the brush tip
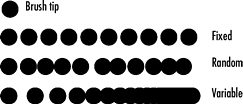
o 13313f54n ; Fixed sets a specific space.
o 13313f54n ; Random lets you set minimum and maximum amounts that are applied randomly.
o 13313f54n ; Variable lets you set the minimum and maximum amounts that are applied linearly.
2. 13313f54n ; If the Spacing is set for Fixed, enter an amount between 1% to 200% in the Min field.
or
If the spacing is set for Random or Variable, set an amount in both the Min and Max fields.
TIP
The percentage of spacing is based on the width of the symbol used as the artwork.
To set the angle options:
1. 13313f54n ; Use the Angle list to choose one of the following options for the rotation of each instance as it is applied to the path

o 13313f54n ; Fixed sets a single rotation for all instances.
o 13313f54n ; Random lets you set minimum and maximum rotations that are applied randomly to each instance.
o 13313f54n ; Variable lets you set the minimum and maximum amounts that are applied linearly to the instances.
2. 13313f54n ; If the Angle is set for Fixed, set an amount from 0° to 359° in the Min field.
or
If the spacing is set for Random or Variable, set an amount in both the Min and Max fields.
To set the offset options:
1. 13313f54n ; Use the Offset list to choose one of the following options for the distance of the brush tip from the path
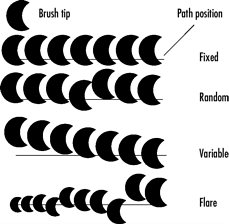
o 13313f54n ; Fixed sets a single offset for all instances.
o 13313f54n ; Random lets you set minimum and maximum amounts that are applied randomly to each instance.
o 13313f54n ; Variable lets you set the minimum and maximum amounts that are applied linearly to the instances.
o 13313f54n ; Flare is available for Spray brushes. Flare lets you change the offset amount according to the Scaling amounts.
2. 13313f54n ; If the Offset is set for Fixed, set an amount from -200% to 200%° in the Min field.
or
If the spacing is set for Random or Variable, set an amount in both the Min and Max fields.
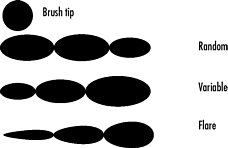
To set the scaling options:
1. 13313f54n ; Use the Scaling list to choose one of the following options for the size of the instances
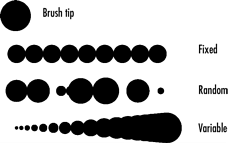
o 13313f54n ; Fixed sets a single size for all instances.
o 13313f54n ; Random lets you set minimum and maximum sizes that are applied randomly to each instance.
o 13313f54n ; Variable lets you set the minimum and maximum sizes that are applied linearly to the instances.
o 13313f54n ; Flare is available for Paint brushes. Flare lets you change the scale amount according to the minimum and maximum scaling values
2. 13313f54n ; If the Offset is set for Fixed, set an amount from -200% to 200%° in the Min field.
or
If the spacing is set for Random or Variable, set an amount in both the Min and Max fields.
You're not limited to using only one piece of artwork as a brush tip. FreeHand also lets you create brushes that use more than one graphic.
To create a multi-graphic brush:
1. 13313f54n ; Select the graphic you want to use as a brush tip.
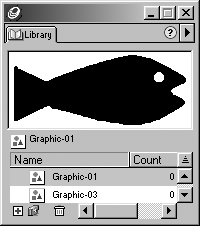
2. 13313f54n ; Choose Modify > Symbol > Copy to Symbol. This creates a symbol of the artwork that is available in the Library . (For more information on working with symbols, see Chapter 22 Symbols
3. 13313f54n ; Repeat steps 1 and 2 to create as many symbols as necessary.
4. 13313f54n ; With the Stroke inspector list set to Brush, choose New from the Stroke inspector menu . This opens the Edit Brush dialog box.

5. 13313f54n ; Click the Add Symbol button to choose a symbol from the Library . The name of the symbol is displayed in the symbol list.
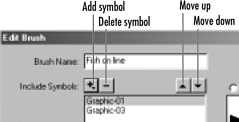
6. 13313f54n ; Add as many other symbols from the Library.
7. 13313f54n ; Use the Move up or Move down buttons to change the stacking order of the symbols in the brush.
8. 13313f54n ; Set the rest of the options in the Edit Brush dialog box as described in the previous exercises.
TIP
You can have both Paint and Spray brush tips in the same brush.
9. 13313f54n ; Click OK. The brush is now available to be used on paths

|
