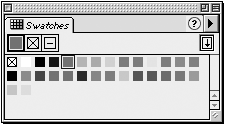
Once you have defined a color in the Color Mixer, you need to store that color so you can define other colors. To do that, you use the Swatches panel.
To add a color to the Swatches panel:
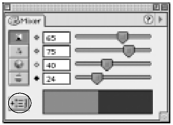
Define the color in the Color Mixer.
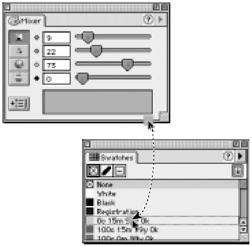
Click the Add to Swatches panel button in the Color Mixer . The Add to Swatches dialog box appears
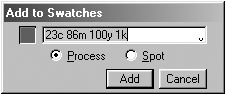
Name the color.
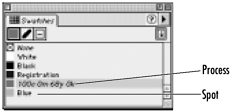
Set the color as process or spot. (See the sidebar, " Process or Spot? " on page 164.)
Click OK. The color is added to the Swatches panel.
TIP
The Add to Swatches panel button works even if the Swatches panel is not visible onscreen.
TIP
Hold the Cmd/Ctrl key to bypass the Add to Swatches dialog box.
To drag colors to the Swatches panel:
Press and drag the color at the bottom of the Color Mixer. 848k1023i
Move to the drop box in the Swatches panel
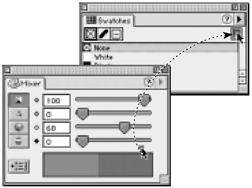
Release the mouse button. The color appears in the Swatches list.
To rename a color:
Double-click or drag across the name of the color in the Swatches panel. This highlights the name, indicating that it is selected
Type the new name for the color.
Press Return/Enter to complete the process of renaming the color.
You can change any color from process to spot color, which is separated onto its own plate.
To convert process to spot color:
Select the color you want to convert in the Swatches panel
Choose Make spot from the Swatches panel menu.
To convert spot to process color:
Select the color you want to convert from the Swatches panel.
Choose Make process from the Swatches panel menu.
Process or Spot?Process colors are colors printed using small dots of the four process inks, cyan, magenta, yellow, and black. Spot colors are printed using special inks that are mixed to match a certain color. For example, if you look at the process color green printed in a magazine, that color is actually a combination of cyan and yellow printed together in a series of dots. However, a spot color green is printed using actual green ink. The benefit of spot colors is that you can exactly match a special color or use a specialty color such as fluorescents or metallics that could never be created using just process inks. When you define a color as spot, you are designating that color to be separated on its own printing plate. When you define a color as process, you are designating that color to be broken down into its CMYK values. Some people use spot colors instead of process colors for one- or two-color jobs. Others use spot colors in addition to process colors for five- or six-color printing. |
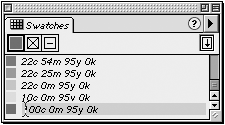
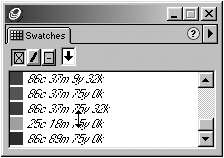
When you add colors to the Swatches panel, they appear in the order that they were added. You may want to move the colors in the Swatches panel to different positions.
To change the order of the colors on the list:
Select the color you want to move.
Drag it to the new position and then release the mouse button
TIP
In Windows, a double-headed arrow indicates you are moving the color to a new position.
Once you have added a color to the Swatches panel, you can still change the color values. If you have used the color in your document, the changes will be applied to all the objects that use that color.
To redefine colors:
Use the Color Mixer to define the new color.
Drag the color swatch from the Color Mixer directly onto the name of the existing color . All objects that use the color will be redefined.
TIP
If you have used the values to name the color, the color name is changed to reflect the new definition.
To duplicate colors:
Click the name of the color you want to duplicate.
Choose Duplicate from the Swatches panel menu. The duplicate color appears on the Swatches panel with the name "Copy of [Color Name]."
You can remove colors from the Swatches panel.
To remove colors:
Click the name of the color you want to remove. The name highlights.
If you want to remove a group of adjacent colors, click the top name. Then hold the Shift key and click the bottom name. All the names between highlight.
Choose Remove from the Swatches panel menu. All the highlighted colors are deleted.
TIP
If the color you remove is in use one of the following happens:
o Process colors are kept in use but are not listed in the Swatches panel.
o Spot colors are converted to process and then kept in use as un-named colors.
You can also direct FreeHand to replace one color with another.
To replace colors:
Click the name of the color you want to replace. The name highlights.
Choose Replace from the Swatches panel menu. The Replace Color dialog box appears
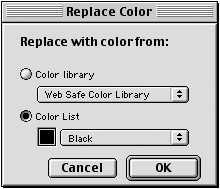
Choose a replacement color from the current Swatches panel.
or
Choose a replacement from one of the Color Libraries (see pages 169).
Click OK. The original color is replaced by the new one throughout the document.
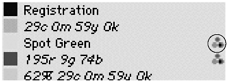
The Registration ColorYou may notice that one of the default colors in the Swatches panel is called Registration. Registration is a color that has been specially defined so that it will print on all plates. You should not use the Registration color for ordinary artwork. It will create objects that have much too much ink. Use Registration for items such as crop marks or notes to the printer that you want to see on all the separations. Registration is usually shown as black, but you can change its appearance by dragging a swatch onto the name. |
You can also add colors from objects or imported images to the Swatches panel.
To drag colors from objects to the Swatches panel:
Choose the Eyedropper tool from the Tools panel
![]()
Press and drag on an area of color. A swatch appears
Drag the swatch to the drop box of the Swatches panel.
TIP
You can also use the Eyedropper tool to move colors directly from one object to another.
If it is difficult to scroll through a long list of color names. FreeHand lets you hide the names of the colors in the Swatches panel.
To hide the color names:
Choose Hide names from the Swatches panel menu
To show the color names:
Choose Show names from the Swatches panel menu to display the names.
FreeHand also lets you switch a color between the CMYK and RGB modes. This can be helpful if you are moving from print to the Web.
To change the color mode:
Select the color you want to convert.
Choose Make RGB from the Swatches panel menu to change the color from CMYK to RGB.
or
Choose Make CMYK to change the color from RGB to CMYK.
TIP
RGB colors may shift when converted to the CMYK mode.
TIP
Colors defined using either the RGB or HLS mode have a small tricolored icon to the right of their name
|
