ALTE DOCUMENTE
|
||||||||||
TriSpectives is a sophisticated tool for creating 3D graphic
images.
It provides all the features you need to build realistic 3D models on your
computer display. TriSpectives users create models of consumer products, machine
parts, buildings and rooms, and many other subjects.
Along with its modeling capabilities, TriSpectives has powerful features for illustrators and graphic designers. You can use TriSpectives to create polished, professional illustrations that incorporate 3D graphics.
This chapter introduces the core features of TriSpectives that you use for most projects. For information on installing TriSpectives and running it for the first time, see Chapter 2 of the TriSpectives Getting Started guide.
Working with TriSpectives
Scenes and pages
The TriSpectives window
Menus
Toolbars
Catalogs
Property sheets
Important functions
TriSpectives is the first program to bring 3D graphics into the mainstream of desktop computing. Using TriSpectives is very much like working with a word processor or spreadsheet program. It offers the same kind of performance and compatibility you expect from other advanced applications.
Instead of cryptic commands, TriSpectives uses an instinctive, "hands on" interface. With TriSpectives, you can build complex, realistic models with a few clicks of the mouse.
|
To build a model, use the mouse to select parts from catalogs. |
For example, if you work for an architectural firm, you can use TriSpectives to create the space plan for a new building. Choose walls, doors, windows, and other items from the TriSpectives |
catalogs. Then use the mouse to drag them into place. To add sunlight, click on the spot where you want the light to come from.
What's more, you can experiment with an image and see the results immediately as you work. In the architectural example, you might want to move a window from an east wall to a west wall. Just drag the window from one wall and drop it onto the other one. TriSpectives immediately redraws your building with the window in its new location.
A document is a collection of data you create with an application program. A word processor creates text documents like letters and reports. Spreadsheet documents consist of numbers and formulas.
|
You can share 3D documents with coworkers over a network. |
A TriSpectives document is 17317h718r a 3D image. Aside from their contents, TriSpectives documents behave like any others on your system. For example, you can share TriSpectives documents with other people in your work group through network file servers or email. |
Furthermore, it's easy to link and embed 3D images with your other documents. Drag a model from the TriSpectives window and drop it into a report or spreadsheet. Any program that supports OLE 2.0 is compatible with TriSpectives.
TriSpectives has two kinds of 3D documents. One is for building models, and the other is for creating illustrations that combine models and other elements. The one you use depends on the kind of work you do. This section describes both types of documents as well as the WorkBook, the organizer for TriSpectives documents.
The scene is a view into 3D space. Use scenes as your workspace when you build a model. The following illustration shows a scene with a model in progress.
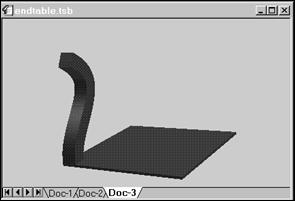
3D scene with model
In the scene, you have no fixed point of view. Everything is relative to the model. If you want to see the model from a different side, move your point of view using the TriSpectives camera. For an introduction to its tools, see "Using the camera tools" in Chapter 2.
Product designers and other model builders spend much of their time with TriSpectives working in the 3D scene. Illustrators and graphic designers, on the other hand, work with the page, the other kind of 3D document.
The 3D page is like a showcase for your models. It's a display area where you can combine models, text, 2D drawings, and other elements. Use the page to create display advertisements, logos, illustrations, and other images. Here's an example of the kind of work you can do on the 3D page:
Page with collage
|
For details on creating collages, refer to Chapter 6, "Illustration techniques." |
The collage in the previous illustration includes several models. You can drag models out of a catalog, drop them on the page, and move them into position. Once they're in place, you can adjust the lighting and reflection so all the elements on the page appear to |
reside in the same space.
Aside from its purpose, the page differs from the scene in other ways. For one thing, you always see its contents from a fixed point of view. To see a model from a different angle, you move the model instead of your viewpoint.
|
Combine pages and scenes by embedding one on the other. |
Using the powerful embedding technology in TriSpectives, you can insert entire scenes on a 3D page and vice versa. By positioning or overlaying several finished scenes on a page, you can develop |
complex technical illustrations and designs.
By embedding a finished page in a scene, you can apply a complex design, including text and several layered scenes, directly on the surface of a model. For details on both embedding styles, see Chapter 6, "Illustration techniques."
A WorkBook is a collection of related documents. You can use a WorkBook to collect all the images for a project, all the images from members of a work group, or any other category you want.
The documents in a WorkBook can be scenes, pages, or a combination of both. For example, you might want to create multiple images that show the floors of a new building. You could build a model of each floor in a 3D scene and assemble the scenes in a WorkBook.
To quickly see how many scenes and pages are in your WorkBook, check the Doc tabs at the bottom of the TriSpectives window. In the following illustration, for example, the WorkBook has three documents. The active document is the third one.
![]()
Document tabs
To see more detailed contents of your active WorkBook, open the View menu and select WorkBook Browser. The resulting window shows your WorkBook in the form of a tree chart, starting with the WorkBook itself and going down the various levels, from documents to models, and finally to each IntelliShape in the model.
Before you can build a model or create an illustration in TriSpectives, you need a place to work. That means you need a WorkBook with a fresh document.
The following instructions show how to create a new scene in a new WorkBook. If TriSpectives is not open already, begin at Step 1 of the procedure below. If TriSpectives is open, begin at Step 2.
u To create a new WorkBook and scene in TriSpectives:
1 If necessary, start TriSpectives.
The method you use depends on your operating system. There are separate procedures for Windows NT and Windows 95. For a description of each procedure, see "Starting TriSpectives" in Chapter 2 of the TriSpectives Getting Started guide.
2 On the Welcome dialog box, select Create a New WorkBook and then choose OK.
If TriSpectives is already open, choose New from the File menu. The WorkBook Wizard appears.

WorkBook Wizard
3 On the WorkBook Wizard dialog box, choose 3D Scene.
4 Choose Finish.
You see the main TriSpectives window:
![]()
![]()
![]()
![]()
![]()


![]()

![]()
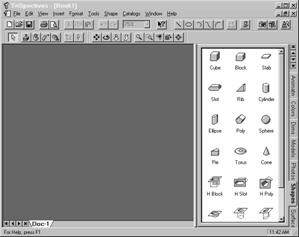
TriSpectives window
Here are the components of the TriSpectives window:
3D scene. This document is a view into 3D space. Use it as a work area to build models.
Catalog. A catalog is a group of related shapes or graphic tools, such as models and surface finishes. To use catalog items in your projects, simply drag their icons into the scene. See "Catalogs" later in this chapter for more information.
Tabs. To see a particular scene or catalog, choose its tab. Many property sheets have tabs, too.
Navigation buttons. Use these controls to scroll through a WorkBook or catalog that has more items than the screen can hold. These buttons, from left to right (or top to bottom), let you move to the first WorkBook or catalog in the list, move backward or forward through the list one item at a time, or move to the last WorkBook or catalog in the list.
Toolbars. The toolbars contain some of the most important features for working with TriSpectives. See "Toolbars" later in this chapter for more details.
· Property sheets. These dialog boxes have settings that control the appearance or function of a particular object. To see an object's property sheet, right-click on the object. From the resulting pop-up menu, select Properties.
The main menu bar gives you access to most of the commands in TriSpectives. Menu options appear in the appropriate context throughout this guide. For thorough descriptions of every menu option, see Chapter 2, "Menus," in the TriSpectives Reference Guide.
In addition to the main menu bar, many parts of TriSpectives have pop-up menus. For example, right-click one of the following items to see its pop-up menu:
· Catalog IntelliShape
· Page Model
· Scene
The pop-up menus contain commands for the particular item you select. Here's the menu you see when you right-click a model:
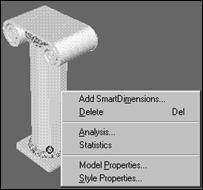
Model pop-up menu
Use the TriSpectives catalogs to help you create and organize projects. TriSpectives comes with more than a dozen catalogs of shapes, colors, textures, and other resources. You can also create your own catalogs or acquire them from coworkers.
Catalog items appear on the right side of the main TriSpectives window, as shown earlier in this chapter.
Here are some of the basic catalogs that come with TriSpectives:
Shapes. This catalog contains IntelliShapes, the building blocks for TriSpectives models. Some IntelliShapes are basic 3D solids such as cubes and spheres. Some are holes for removing parts of solids. For more on IntelliShapes, see the next chapter.
Showcase. These are completed models that show off the capabilities of TriSpectives. You can use these models for ideas or incorporate them into your own designs.
Collage. This catalog contains more completed models, although they're not quite as spectacular as those in Showcase.
Colors. Paint an entire model or its components. Colors include Shiny Red, Matte Salmon, Silver, and many others. If you're designing a lamp, you might cover it with a Gold color.
Surfaces. This catalog includes shiny colors and metallic finishes.
Decals. Unlike Colors, Tiles, and Surfaces, the items in
this catalog cover only part of a model's surface. Decals behave like stickers.
The decals include darts, twenty-dollar bills, and bullet holes.
Animation. Use the entries in this catalog to make your models spin and fly. You can choose one of the standard forms of motion or define other movements with the animation editor.
Dimensions (Dims). This catalog contains annotation dimensions, lines that measure the distance or angle between IntelliShapes and appear on your printed image. See Chapter 6, "Illustration Techniques," for more on using annotation dimensions.
Text. Use the shapes in this catalog to create text in a 3D scene.
The preceding items are just the beginning. Enjoy looking through the rest of the catalogs, whether you're just browsing or looking for the perfect texture or background for your models. Some of the additional catalogs are listed below:
· Abstract.
· Astral.
· Backdrop.
· Interior.
· Masonry.
· Metals.
· Plants.
· Textiles.
· Wood.
You do a great deal of work with catalogs while building a model. Often, the process begins by selecting a 3D solid or other item from the Shapes catalog.
Click the appropriate tab to see the catalog items that
interest you.
If the catalog contains more items than the screen can display, use the scroll
bar to view the rest of the items. You can also see more catalog items by
dragging the left edge of the catalog to the left.
u To start building a model, drag an item from the Shapes catalog and drop it in the 3D scene.
Beginning a model
|
Use the mouse to select colors and textures from catalogs. |
Use the same method to add colors, textures, and other elements to your model. For example, you can add a carpet texture to the shape in the previous illustration. Drag an icon you like from the Interior |
catalog and drop it on the shape.
When you're done with a model, you may want to save it in a catalog for later use. Here's how:
u To save a model in a catalog, drag it from the 3D scene and drop it in the catalog.
This technique makes it easy to use the model from project to project. If you only need the model for one project, you would probably save it in a WorkBook file instead of a catalog.
TriSpectives puts a miniature version of the model at the bottom of the catalog, so you might have to scroll down to see it. The new catalog entry has an "UnNamed" label.
To name the new catalog entry, click on it in the catalog. Next, click on the "UnNamed" label itself. When a box appears around the label, type a descriptive name for the model.
|
Make lasting changes to catalog items by editing objects directly in their catalogs. |
If you want to make a permanent change to a catalog item, you can edit a shape, texture, or other object directly in the catalog. The editions become part of the catalog item, and appear whenever you drag it into a page or scene. By contrast, editing an item in the page |
or scene affects only the document you're working on.
u To edit an item within its catalog, double-click it.
The display you see depends on what you're editing. If you double-click an item in the Shapes or Showcase catalog, for example, the shape or model appears in the scene, ready for editing. When you double-click an entry in the Tiles, Colors, or Decals catalog, a property sheet appears. Use this sheet to customize the item you selected.
When you finish editing the item, close the scene or click OK in the property sheet. TriSpectives saves your changes and returns the item to its catalog.
|
You can rename catalog items. |
To rename the catalog item, click on it in the catalog and then click on the name label. When a box appears around the label, type the |
new name.
As you create models, you'll probably want to organize them into categories for future use. TriSpectives makes it easy to group related models by letting you make new catalogs. For example, if you do design work for a lamp maker, you might need a special catalog called Finials.
u To create a new catalog:
1 From the Catalogs menu, choose New.
TriSpectives places a new tab called Catalog1 at the bottom of the catalog listings.
2 From the Catalogs menu, choose Save As.
If Catalog1 does not appear in the File Name field of the resulting dialog, you selected another catalog in the interim. Choose Cancel to close the Save As dialog, click the Catalog1 tab, and repeat Steps 1 and 2.
3 In the Save As dialog box, type a descriptive name for the new catalog in the File Name field.
4 Click Save to make the new name appear on the catalog tab.
To save all your finial designs in the same place, drag each of your completed models to the new Finials catalog.
If you want to expand the working area of your scene or page and you don't need the catalogs for a while, you can hide them by choosing Catalog Browser from the View menu. Repeat this step to see the catalogs again.
You can also close individual catalogs by selecting one and then choosing Close from the Catalogs menu. To close them all, choose Close All. To open a catalog again, choose Open from the Catalogs menu and double-click the catalog name in the resulting dialog.
If you find yourself working with a certain group of catalogs more than the others, you can group your favorites into a set and work with them exclusively. This prevents you from having to scroll past catalogs you never use.
u To create a catalog set:
1 From the Catalogs menu, choose Catalog Sets.
2 From the resulting Catalog Sets dialog box, choose New.
3 In the next dialog box, type a name for your new set in the Catalog Set Name field.
4 Select the catalogs you want in your set.
The current catalogs selected for your set are shown in the List of Catalogs. Use the following buttons to edit the list.
To delete a catalog from the set, click it in the list and then choose Remove.
To add a catalog to the set, choose Add. In the resulting dialog, double-click the name of the catalog you want.
The catalogs you select will appear in the TriSpectives window according to their positions in the list. To reposition catalogs within the list, click a catalog name and then choose Move Up or Move Down.
5 Click OK when you finish.
6 In the Catalog Sets dialog box, double-click the name of your new catalog set to open it in the TriSpectives window.
You can also open the set by selecting it and choosing Open.
7 Choose Done to close the Catalog Sets dialog box.
TriSpectives opens only the catalogs in your set and closes the rest. To open all the catalogs again, choose Catalog Sets from the Catalogs menu and select Default from the list of sets.
|
You can also delete and edit catalog sets. |
To delete a catalog set from TriSpectives, choose Catalog Sets from the Catalogs menu, click the set you want to delete in the resulting |
dialog, and then choose Remove. To add or remove catalogs
from your set, select it and then choose Edit.
The catalog sets you create are also available from the WorkBook Wizard when
you start TriSpectives. Instead of selecting Finish after choosing a page or
scene in Page 1 of the WorkBook Wizard, choose Next to move to Page 2, select
the catalog set you want to use, and then choose Finish.
TriSpectives has seven toolbars that contain buttons for some of the most important functions in the program. This section introduces each toolbar and tool. Thorough explanations of each toolbar appear as appropriate throughout the guide.
|
|
u To see the name of a tool in TriSpectives, place your mouse pointer on the tool icon. For a brief explanation of a tool's function, click the Help tool and then click the tool. |
The name that appears when you point to a tool is called a Tooltip. To turn off these tips, select Toolbars from the View menu. In the resulting dialog box, click the Show Tooltips box and choose OK.
You can choose which toolbars you want to display in TriSpectives. The toolbars on the screen when you close TriSpectives appear again when you start the program the next time.
u To hide or display a toolbar:
1 From the View menu, choose Toolbars.
2 In the resulting dialog box, check the box for each Toolbar you want to display, and then choose OK.
To hide a toolbar, click the box again to remove the check.
When you start TriSpectives, the toolbars appear beneath the main menu. If you prefer a different location, you can move the toolbars anywhere you like within the TriSpectives window.
u To move a toolbar, drag it from its current location and drop it elsewhere.
Move the toolbar by clicking the empty background behind the buttons and then dragging. You can drop it along one of the edges of the TriSpectives window or somewhere in the middle.
The following sections introduce each toolbar.
These tools move the TriSpectives camera, which represents your viewpoint as you look into a 3D scene. These tools do not work on a 3D page.
Feel free to experiment with the camera tools and see how they affect your view of the shape in the scene. Remember as you use the tools that only your viewpoint is changing, not the shapes or scene itself. Chapter 2, "IntelliShapes," explains these tools in detail.
![]()
Camera toolbar
From left to right, the Camera tools are:
Pan Camera. Move the camera up, down, left, or right across a 2D plane in front of the scene.
Orbit Camera. Rotate the camera around the model.
Dolly Camera. Move the camera forward or backward.
Walk Camera. Roam around the scene as if you have a hand-held camera.
Zoom Camera. Widen or narrow the camera angle.
Window Zoom. Specify a rectangular region that fills the scene.
Fit Scene. Zoom and reposition the camera to make the entire model fit within the scene.
Look At. Look straight at one surface of a model or shape.
Target Camera. Position the selected model in the center of the scene.
The Standard tools perform housekeeping functions such as printing and saving files. Some of these tools may be familiar to you from other computer applications.
![]()
Standard toolbar
The Standard tools, from left to right, are:
New. Use this tool to create a new TriSpectives WorkBook.
Open. Open an existing TriSpectives WorkBook.
Save. Save the contents of your current WorkBook in a disk file.
Print. Print the active document, the one that appears in the 3D scene or page of the TriSpectives window.
Print Preview. See how the document will look when you print it.
Cut. Remove the current selection, such as a model or IntelliShape, from your document and place it on the Windows
clipboard.
You can then paste it elsewhere.
Copy. Make a copy of the current selection and place it on the Windows clipboard.
Paste. After cutting or copying, retrieve an item from the Windows clipboard and place it in your document.
Undo. Reverse the effects of the last action you performed.
Redo. Perform the action you just canceled with the Undo tool.
Zoom Control. Move your viewpoint toward or away from the 3D page. This tool does not work in a 3D scene. Type a value into the Zoom box or click the in the box and choose a setting from the resulting list.
Help. See online help information about a feature in TriSpectives. Click this tool and then click the item for which you want more information.
These tools change the appearance of text you create on a page or scene. For more information, see Chapter 5, "Text."
![]()
Text toolbar
The Text tools, from left to right, let you select a special typeface and typeface size for the selected text, display text in boldface type or italics, and align text along the left, center, and right margins of the text box. Use the last two tools to increase or decrease the size of selected text.
Use these tools to draw 2D graphics such as lines and circles. For more information on this toolbar, see Chapter 4, "2D Drawing."
![]()
2D Drawing toolbar
The first three items on this toolbar, from left to right, let you draw a line, circle, or semi-circular arc. The toolbar also has these tools:
Bezier. Use this tool to draw a Bezier curve, also known as a spline.
Fillet. Round off the corners of lines.
Mirror Curve. Create mirror images of 2D shapes.
Project Edges to Drawing Grid. When using a 2D grid on the face of a 3D shape, use this tool to make the grid cover the entire face.
Angle-Distance Drag Mode. When you click this tool, TriSpectives shows the angle and distance measurements of the 2D shapes you create.
Use these tools to manipulate 3D IntelliShapes and create new 3D shapes from 2D cross-sections. For more information on this toolbar, see Chapter 3, "Building models," and Chapter 4, "2D Drawing."
![]()
3D Shapes toolbar
The 3D Shapes tools are, from left to right:
Select. Click the pointer to select objects in TriSpectives.
Extrude Shape. Extrude a 2D cross-section into a 3D shape.
Spin Shape. Spin a 2D cross-section around an axis for a 3D shape.
Sweep Shape. Sweep a 2D cross-section along a path to create a 3D shape.
Loft Shape. Create free-form 3D shapes using several cross-sections.
TriBall. Use this tool to rotate an object around any axis, move an object in any dimension, or create and position multiple copies of objects.
Move In-Out. Change the vertical position of an object on the 3D page.
Move From-To. Precisely align two 3D shapes.
Group. Combine selected shapes into one.
Ungroup. Ungroup previously grouped shapes.
These three tools, from left to right, let you select various aspects of a model, shape, or WorkBook.
![]()
Selection toolbar
Edit IntelliShapes. Select one IntelliShape in a model.
Edit Surfaces and Edges. Select one surface or edge of one shape in a model.
WorkBook Browser. Opens the Browser, which lets you select any object in any document of your WorkBook.
The animation features in TriSpectives add a fourth dimension time to the three spatial dimensions. Use the following tools to control animation sequences.
![]()
Timeline toolbar
The Timeline tools probably look familiar if you have a VCR. From left to right, use the tools to turn on animation, play the animation sequence, stop the sequence, and rewind it to the beginning.
Use the timeline grid to see the current location of the animation sequence, or click the grid to move to a certain point in the animation. For more information, see Chapter 7, "Animation."
You can customize almost anything in TriSpectives using its property sheets. These dialog boxes have settings that control the appearance or function of a particular object.
u To see an object's property sheet:
1 Right click the object in the 3D scene or page.
Its pop-up menu appears.
2 Choose Properties.
The property sheet for the object appears. For example, the following property sheet appears when you right-click a model and select Style Properties from the pop-up menu.
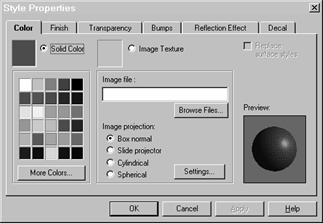
Style Properties sheet
Just about everything in TriSpectives has a property sheet. Here's a partial list:
· A model.
· Each shape within a model.
· Each surface of each shape within a model.
· A 3D scene.
· A 3D page.
Light sources.
You'll learn more about using particular property sheets throughout this guide.
TriSpectives is a comprehensive system with hundreds of tools and techniques for the model builder and graphic designer. The kind of work you do determines the features of the software you use. For example, graphic designers use the Move In-Out tool more often than model builders. This tool works with a 3D page, and model builders spend most of their time in 3D scenes.
No matter what you do with TriSpectives, however, some functions are always useful to know and keep in mind. This section introduces a few of the most important.
After you've spent some time developing a model or illustration, it's a good idea to save your work and name your WorkBook.
u To save your work in a disk file, click the Save tool or choose Save from the File menu.
|
|
When you save a WorkBook for the first time, TriSpectives prompts you for a file name. This file holds all the documents the pages and scenes in your current WorkBook. |
Enter a descriptive name so you can find the WorkBook later when you need to retrieve it. TriSpectives adds a .tsb extension to your file name.
TriSpectives automatically assigns names such as Doc1 and Doc2 to the pages and scenes of your WorkBook, but you might need more descriptive names if the WorkBook contains many documents.
u To name a document within a WorkBook:
1 Right-click the appropriate Doc tab at the bottom of the TriSpectives window.
2 From the pop-up menu, choose Rename.
3 In the resulting dialog box, type a name for the document and then choose OK.
The new name appears on the tab.
The process of building and editing a model often involves experimentation. For instance, you might try adding a series of textures to your model to see which one looks best. If an experiment doesn't work out, TriSpectives makes it easy to reverse the results.
u To reverse the effects of your last action, choose the Undo tool.
|
|
For example, if you drop a cube shape onto your model and then click Undo, TriSpectives removes the cube. To put the cube back again, choose the Redo tool. |
You can delete almost anything from the TriSpectives window, including catalog items and shapes in the scene or page, by right-clicking them and then choosing Delete from the pop-up menu.
To delete a WorkBook document, right-click its tab and select Delete from the pop-up menu. If you have only one document in your WorkBook, you cannot delete the document.
|
|
To see information about a feature in the TriSpectives window, click the Help tool and then click the feature. You can also read online Help by selecting options from the Help menu. |
If you have questions that the manuals or online Help do not answer, please contact us at:
3D/EYE Asia Pacific Pty Ltd, 236 Balaclava Road, Caulfield North, Victoria, Australia 3161 Tel: +3.9.500.1335
For other technical support options, refer to the support card insert in the TriSpectives box or visit our Web site at https://www.eye.com/.
|
