Instructors: Erick Miller, Paul Thuriot
This seminar focuses on the
character pipeline and developing tools for a character pipeline. Topics of Mel scripting, using Maya's Api to
write custom nodes and deformers, as well as various Character Setup / Rigging techniques
will be discussed in much depth and detail.
Disclaimer: The techniques and concepts of this class may in fact contain similar or parallel concepts used in many large digital production facilities due to the nature of the topic of this class, similarities of which are either purely coincidental or based on common knowledge. There is in no way any proprietary information contained in or hinted at in this documentation. The tools and implementations offered in the class and instructional materials are purely based on the sole use of Alias Wavefront's Academy award winning third party software, Maya, which has its own Application Programming Interface, custom scripting language, and project management mechanisms. All Tools, methods, scripts, plug-ins and source code taught in this class, or found within the accompanying instructional materials are explicitly the property of Erick Miller and Paul Thuriot, and are meant to be a building block for learning basic principals behind building an advanced character pipeline using Maya. The materials contained are in no way what-so-ever advocated by or created in conjunction with the companies Digital Domain, or Tippett Studio, or any other digital production facility.
The object of this class is not to advocate any one solution, but instead to bring ideas and concepts together as proposed solutions to problems based on the combination pre-existing publicly defined successful workflows developed strictly using Alias|Wavefront's software architecture, tools and programming interface technology.
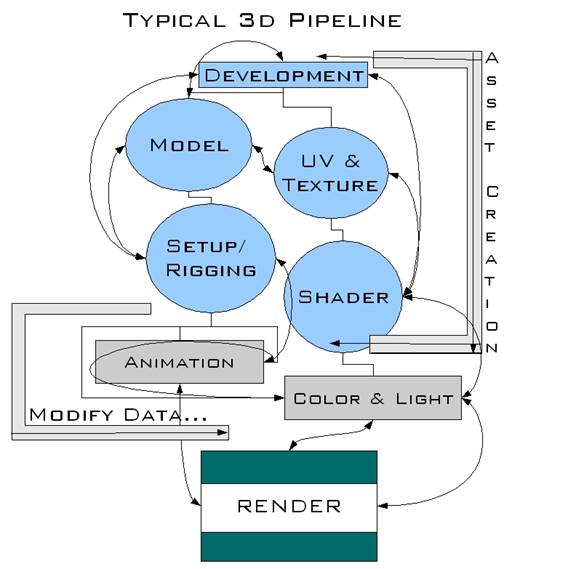
Generally, there are a few basic and fundamental components behind our concept of an "advanced" character pipeline, which can be generalized with a few simple pre-requisites, into basic categories.
First, the mechanism to build a pipeline must exist. This means that there must be a simple and clean environment w 24424d320y here shared scripts, tools, plugins and programs can be concurrently developed, checked into, and checked out of, and accessible to all of the users of the pipeline. A minimum number of hard-coded paths or "constrained by name" situations is the most ideal and logically appealing for a portable expansive solution. Maya partially allows for this in the standard way of using environment variables as search paths for it's relative data. "XBMLANGPATH", "MAYA_PLUG_IN_PATH", and "MAYA_SCRIPT_PATH" are the three most commonly used environment variables which are searched when Maya attempts to locate the components of a pipeline tool. The Maya.env file, as well as the userSetup.mel file can be used in a custom pipeline to build all the needed relative elements in order to write and access shared libraries of functions. Second, there must be a strong definition of what the work space of the project is defined as - the concept of relative hierarchical storage of data is usually one of the most powerful ways of structuring a large set of shared data; and Maya implements this concept through the means of it's "project" and "workspace" concepts, as well as it's relative file referencing mechanism. The final, and most important component which form the basis of this Master Class are the tools that are built to drive the production pipeline. Character tools can be broken down into a few overlapping categories:
a) Tools to help users create data.
b) Tools for users to modify and update data.
c) Tools to manage the version dependencies and sharing of data.
a) Modeling tools - say polygonal or subdivision mesh tools or custom uv creation tools
b) Character Rigging automation scripts
c) New node types, such as new types of interpolation nodes, or math nodes.
d) Plug-in Deformers Nodes and complex deformation systems
e) Complex Shading and Lighting setups.
f) Crowd Systems
g) Complex Particle Setup automation scripts
h) Any tool that is written as a re-usable modular device - with variable inputs that act simply to create data that can be used outside of any pre-defined constraints that would otherwise limit it as being un-usable in other unknown circumstances.
a) a skin cluster save weights tool that did not use point order or bitmap images, but instead a better solution for saving the weights of the character, and then re-applying them after the resolution of the mesh has changed
b) an animation export tool and import tool that allowed the users to import the animation on completely different hierarchies by representing the transformations in some sort of procedural space.
The general problem of generically defining a pipeline conceptually is that the very challenge or problem of remaining generic becomes a constraint of the system that you are attempting to construct. Keeping portions of a pipeline defined within the strict standards of file formats and known parsing structures can be highly beneficial.
Of course we all know that Maya's MEL scripting is one of the software's most powerful features. It enables the user to complete complex tasks in a matter of seconds. Also with MEL, you can create your own unique toolsets and workflows for individual pipelines and needs. Without it some possibilities are just not practical.
General Rule:
If you need to do it more than once, make a MEL script/tool.
What are Variables
When you are scripting, it is always a good idea to establish the different variables that will play a role in
your script. By starting with a variable, you can make sure that you are using descriptive names that make
your script more readable.
In MEL, all variables ALWAYS start with a $.
Variable Types
Along with grasping the idea of abstract variables, you must remember that all variables are typed.
Some Variable Types:
integer
whole numbers--positive and negative.
fractional numbers
collection of 3 numbers (i.e. XYZ coordinates, or RGB values).
<<1, 0, 1>> or <<-5, -2, 1>>
one of more characters
"Hey there...ho there...?!"
Declaring a variable simply tells Maya that you have created a new variable. Assigning the variable means
you've giving that variable a "value" of it's relating type. Of course, you always need to declare a variable
before you actually use it!
Declaration Examples:
int $temp;
float $Temp;
string $tEmp;
Assign Examples:
$temp = 3;
$Temp = 333.333;
$tEmp = "Hey There!";
You can also declare and assign in the same line:
string $hi = "Hey there!";
float $radius = 4.567;
NOTE: Maya will automatically let you declare a variable and assign it without having to specify a
variable type. It's good practice to always specify the type at declaration.
//EXAMPLE
// make a sphere with a radius of a variable
// that stores the sphere name in an array variable.
float $radius = 4.03;
string $sphereName[] = `sphere -r $radius`;
NOTE: Maya will automatically convert any type of variable to a string if used in the print command.
//EXAMPLE
float $test = 3.780;
print $test;
Array Variables
An array variable is like a normal variable, except it can store more than one value.
//EXAMPLE
float $test[];
In the above example, Maya knows that $test is an array and can hold multiple values. The square brackets are for determining which value in the list you want to use.
A simple explanation of procedures are: specified grouped commands called by one, user-defined
"command." You can think of this as creating your own Maya Commands for your Maya session.
Syntax of a procedure:
proc procName ( arguments--if any
To use a procedure, first you must declare it, then execute it.
//EXAMPLE
Here's an example to rename all selected objects.
proc renameAllTo ( string $newName )
//select any number of objects, source and run this command.
There are two "types" of variables and procedures you can use: local or global. Local procedures are only available within another procedure. While global procedures can be called and executed anytime during the Maya session, they also suffer from the problem of users being able to re-declare them and completely write over the contents of them, which will result in "unknown" behavior when the script that originally declared the variable that was written over tries to use the newly declared variable.
A General rule of thumb: Use absolutely as few global variables as possible.
Here are a number of examples showing how to use and change variables within different procedures:
//EXAMPLE
global proc variableTestA()
proc passTest(int $var)
variableTestA
//EXAMPLE
global proc variableTestB()
proc int passTest(int $var)
variableTestB
//EXAMPLE
global proc variableTestC()
proc int passTest(int $var)
variableTestC
//EXAMPLE
//same as the examples above, tho this time with a global variable.
global proc variableTestD()
proc passGTest()
variableTestD
While coding a script, it's always a good idea to remember to include:
Two simple Maya commands you can use as this are: warning and error.
//EXAMPLE
simple warning code.
int $warning = 3;
if ($warning != 2)
// as in the code, notice that a warning statement just calls out
// a warning, it still will continue with the code //if it can..
//EXAMPLE
simple error code.
int $error = 3;
if ($error != 2)
// same code, as in the above warning example, but notice, if the
// error is true, the script fails to continue.
The very first thing that needs to happen when building a tools pipeline in Maya, is deciding on a shared location for all of the resources (scripts, plugins, icons, etc) that will make up your tools pipeline. Maya allows the simple use of environment variables to do such things, and has made is quite simple to add an entirely new module into their program. Adding a new path into the environment variable, MAYA_SCRIPT_PATH will define a new relative location for any mel scripts to get sourced from.
Doing this is quite simple, and requires adding a single line into your Maya.env file. You can locate where your Maya.env file exists by typing this into the script editor:
getenv MAYA_APP_DIR;
The result of executing this (inWindows) was:
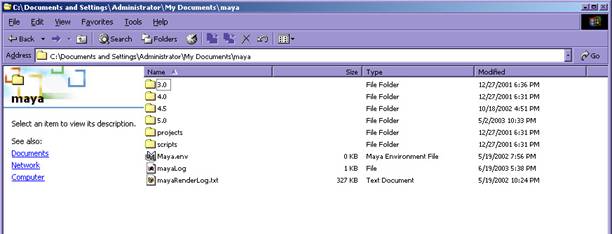
// Result: C:/Documents and Settings/Administrator/My Documents/maya //
Next, browsing to the previous folder, you should see a directory structure similar to the following image:
Open up the Maya.env file in a text editor and add the following line to define what the path is to your new Maya Module (in this case, we are installing all the tools onto our local disk on our computer - in the case of a real example, you would probably want to use a full network path, or a location on a shared disk on the network so that all of the users can have access to the files as long as they are on the network):
MAYA_SCRIPT_PATH=C:\CharacterTools\scripts
XBMLANGPATH=C:\CharacterTools\iconsIn Unix it would look like this:
MAYA_SCRIPT_PATH CharacterTools/scriptsYou could also have done this in a MEL script using the MEL commands `about`, `fopen` and `fwrite`, like this:
string $maya_env = `about -env`;
int $fileId=`fopen $maya_env "a"`;
string $addThis = "\n";
if(`about -nt`)
else if( `about -linux` || `about -irix` )
fwrite $fileId $addThis;
fclose $fileId;
Since Maya.env is an external text file, you could have even used a perl script or a other external scripting language such as cshell or windows cmd batch scripting, to set the MAYA_APP_DIR enviornment variable directory, and write some paths into it to set up where the root of your tools directories will go before ever even launching Maya. The best thing would be to have this happen in a login script the first time the user logs into the computer, or to have it "disted" in a scripted distribution script that runs across the network and installs the Maya.env file properly to each one of the computers on your network.
Maya has implemented something very simple which will allows you to automatically execute MEL when the Maya starts - it is called userSetup.mel. All you have to do is make the MEL script file in your favorite text editor, put some MEL commands into it, and save it as "userSetp.mel" into one of the folders that shows up in your MAYA_SCRIPT_PATH. In our case we can put it right into the same folder that we just declared in the Maya.env file as being our custom script path location. Maya will source this file automatically when it loads on startup, and execute any code that is in the file right before it initializes a new scene for the user to begin working.
Our userSetup.mel file has the following lines in it:
source sourceMelLibrary.mel; sourceMelLibrary;
source setupPluginPath.mel; setupPluginPath;
source advCharTools.mel; advCharTools;
These three lines in turn are all we need to set up the rest of our entire pipeline when Maya loads, as long as we have the above paths set properly from the previous section in your Maya.env file:
The way we have set this up in our case is by having a folder labeled "mel_library" that exists in the scripts folder which we set to be included in the MAYA_SCRIPT_PATH already. Now, from within the userSetup.mel file, you should notice the lines:
// this next line will launch a script that automatically finds
// it's location and sources
// all of the scripts that are in the flat directory called
//"mel_library". this is the default place
// that script writers can put generic code that they are writing for
// code sharing or for non-gui
// script and tools releases.
source sourceMelLibrary.mel; sourceMelLibrary;
What this above line does is source and execute the sourceMelLibrary MEL script. If you open this script, you will see what it does:
sourceMelLibrary.mel
This script will be initialized in userSetup.mel,
and will source all of the scripts that can be kept
in the shared mel library folder.
global proc sourceMelLibrary()
}
}
}
Using the mel_library directory to store scripts that either need to get sourced on Maya startup, or that contain generic library functions can really come in handy. A good example of a MEL script that contains a bunch of "generic" utility functions is the file example_utilities.mel. Here is one of the functions (it does number padding):
global proc string numPadAnInt( string $number, int $howManyZeros )
while ( $size < $howManyZeros )
if($negative);
return $number;
One thing that I would highly recommend is generating auto-documentation from this directory, as web pages that documents the generic scripts and functions that have been written. This way all the TDs and script writers can browse this documentation and easily link to the functions they may want to use, to see their arguments and return types, etc... I would also recommend against allowing direct write permission into this folder by anyone, but instead having a version control system setup for checking scripts into and out of this directory, such as cvs.
Of particular interest in the userSetup file, are the lines:
// this next line will setup for a custom plugin
// path - a directory where all of the custom developed
// plugins can all go, which is independent from
// maya's plugin path.
// all of the compiled plugins should be in thier
// corresponding versioned directory inside of "plugins".
// this is the default place
// that plugin writers can put custom command or node
// modules for each new version of Maya, so that they are
// accessible through the simple
// relative search path mechanism.
// example - for a plugin called "myNode" it can then simply be
// loaded using :
loadPlugin "plugin";
// without having to worry about absolute or relative paths.
source setupPluginPath.mel; setupPluginPath;
This is of interest because it uses a cool technique to dynamically detect it's location, and then will create and set a new plugin path for the current version of your Maya that is running (since plugins do not maintain binary compatibility in between versions, you have to compile new versions of plugins for new versions of Maya. If you want to have more than one version of Maya work in your pipeline, you need to have different paths for each new compiled version of the plugin).
Here is the simple code involved with executing this logic:
file: setupPluginPath.mel
This script will be initialized in userSetup.mel,
this is a really simple script, as an example of
setting up a shared custom plugin directory.
Note: Alternately, you could have done this in the
Maya.env file, which is a file built for
the modification of Maya's environment variables.
The choice was made to do it this way, in order
to give an example of adding to Maya's search paths
dynamically from within a script after Maya has
already loaded.
global proc setupPluginPath()
putenv $env ($path+";"+$new_plugin_path);
print ( "\""+$new_plugin_path
+"\" has been added to Maya's \""+$env
+"\" enviornment variable.\n");
The following environment variables (some undocumented by Alias|Wavefront manuals) are either set by or used by Maya 5.0:
MAYA_SCRIPT_PATH
MAYA_PLUG_IN_PATH
XBMLANGPATH
MAYA_MODULE_PATH
MAYA_APP_DIR
MAYA_MOVIE_DIR
MAYA_LOCATION
MAYA_PLUG_IN_PATH
MAYA_PRESET_PATH
MAYA_PROJECT
MAYA_SCRIPT_BASE
MAYA_SCRIPT_PATH
MAYA_REVERSE_FILEFORMAT_EXT
MAYA_SHADER_LIBRARY_PATH
MAYA_DEBUG_ENABLE_CRASH_REPORTING
MAYA_DISABLE_BACKSPACE_DELETE
MAYA_HELP_URL
MAYA_OVERRIDE_UI
MAYA_PAINT_EFFECTS_THREADS
MI_CUSTOM_SHADER_PATH
MI_CUSTOM_SHADER_SUPPRESS
MI_RAY3_SERVICE
WINEDITOR
TMPDIR
TEMP
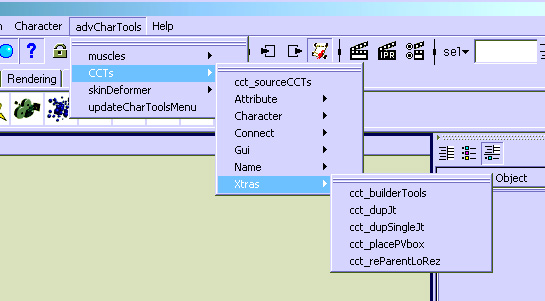
The advCharTools menu in your Maya UI.
The advCharTools menu script allows you to place and organize your scripts within a singular directory. It will create a new menu in your Maya UI that allows you to easily source any script at any time. The menu script will find all directories under the parent directory and use those as parent menus. It will then place all *.mel scripts under each appropriate parent menu.
The nice thing about this tool, is you don't have to source all your scripts at Maya startup. Once you click on a script in this menu, it will source, then make the call to the tool. I find it extremely helpful when bug hunting a tool.
Note the line in the userSetup.mel file that sets it up:
// this line will setup the fully expandable dynamically built
// custom menu that all the script writers/ tds can add into by
// simply adding scripts or folders there...
source advCharTools.mel; advCharTools;
To write scripts for the advCharTools menu, follow these simple steps:
The first global proc in the script will be the call to the tool. Have as many global and/ or local procedures as you need, but the FIRST global proc will be found and called to run the script.
Don't use arguments for the first global proc. If you need to use arguments to properly use your tool, first create a UI window that'll prompt the user to enter the options that the true procedure needs to run.
Use as few global procedures as possible.
Here's the simple layout of any script that could be used by the advCharTools menu.
/*comments section
.telling a user the hows, whats, and whys..
proc()
global proc(no arguments)
global proc()
This little trick using `whatIs` will return the directory path that the currently running script is located in!
string $mainDir = substitute
( "Mel procedure found in: ", (string)`whatIs "advCharTools"`, "");
string $filepart = (string)`match "[^/\\]*$" $mainDir`;
$mainDir = `substitute $filepart $mainDir ""`+"advCharTools";
You could also edit the script using an ablsolute path by entering your parent directory path into the line:
string $mainDir = "<enter your script directory path here>";
Since Maya was setup to launch with the advCharTools.mel script automatically, by having it in our MEL script folder <`getenv MAYA_SCRIPT_PATH`> - you don't have to do anything extra for it to get automatically sourced and executed.
After the advCharTools appears in your Maya UI, it will include all your directories and scripts (with the .mel extension) found under the parent directory you set up in the script. To launch a script, simply click on the script name. The tool will parse the file and find the very first global proc and use that procedure's name to call the tool.
Creature Creation Tools (or CCTs for short), are a toolset of MEL scripts that can be used singularly, or together as a massive tool. Each of these scripts is a multi functional entity. Some tools are utterly simple, some can be very complex, but all serve a single purpose that can be called by other tools in the set at any time.
This toolset was mainly designed to help me in my work process with character rigging. Each tool is a stand alone tool that serves a singular purpose (i.e. creating an fkIk chain, or adding an orient constraint to a chain and setting up all the setDrivens/ connections needed, etc.). Some of the tools aren't used unless the entire set is used (i.e. cctBuilder).
Each tool is multi functional. Meaning that each is either a "button" type tool that works at a click or brings up a window UI, and at the same time, is a single-line, scriptable tool, giving me all the functionality of the tool with just one line of code.
Basically by having all these tools in my arsenal, I can create an entire complex character rig with just a few clicks of a button, or-using Builder-with just ONE!!!!
NOTE: It should be said that all the cctTools included in this class are either grossly edited or simple recreations of the original versions. Meaning that they don't do all of the things they [the real scripts] do. Sorry.proprietary tool/ studio reasons.but we know you'll understand.
When you typically write a lot of tools, you'll run into the "problem" of having to reuse code from one tool in another. If you write many little tools like this example/idea you can simply just call tools from within other tools at any time, thus breaking up one big script into many smaller tools. The hardest thing about this is figuring out what sections of code may be useful to other tools.
Another reason for using an entire toolset as this, is simple standardization. If everyone has access to such tools, than all creatures can easily be created the same even if being completed by different individuals.
Another main "feature" of the CCTs are that they are all "scriptable" tools. Meaning you can either use the tool as a standard tool, or you can use ALL of the features of each tool via a single line. This really isn't anything new, but once you grasp and embrace the idea, the power of these tools grows.
Something to note about scriptable scripts are that they typically return something to the user. This return can then be used by another tool at some other time.
Here's the simple layout of a script that you can use as a "button-clickable" tool or as a command line script.
comments
.the how, what, whys..
global proc( no arguments
global proc( the info from the UI above
proc( arguments
global proc( any argument needed
Before you can do any magic with any of the CCT script tools, you need to source them so that they can all "talk" to each other. Do so by using the cct_sourceCCTs.mel script. Otherwise you'll most likely get "cannot find procedure" errors since one script may call multiple others.
Simply click on the script in your advCharTools menu and a directory browser should appear. Point to the TOP level CCT directory holding ALL the CCT script tools and hit OK.

Select the top level directory of your CCT scripts.
In a second or so, you should notice that the tool sourced and printed out each file in your script editor.
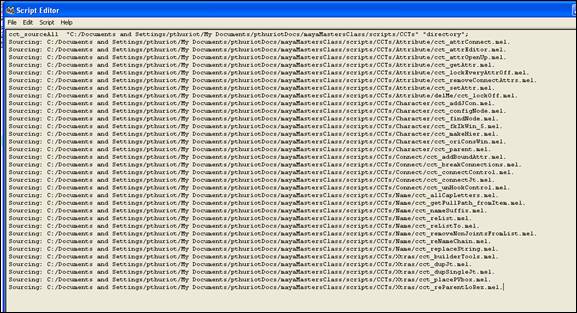
The output to the scriptEditor after sourcing all your CCTs.
Now you're good to go with any of the tools in the set for your Maya session.
cctBuilder is a tool that empowers the character set-up artist. This tool uses the power of the scriptable MEL scripts in the CCT toolset. Basically, you, as the setup artist, would build a simple single hierarchy rig for your character, then write a simple macro MEL script that is read by the cctBuilder gui. This gui gives an animator individualized choices for building their own "custom" rig for the character. After choices are made, the tool makes use of all the cctTools and builds an entire character rig.
As a creature TD/ character setup artist, the main issue to overcome for every creature, is to give the animator as much control as possible as easily as possible. But there always is the issue of each animator you're rigging this creature for wants something different for their shot. Builder empowers the animator to build his or her own custom rig for the creature based off of a number of standardized "rules."
Another reason for using builder to create a character rig is overall speed. You as the character rigger, set up a "simple" complete rig, something like a motion capture rig. A simple hierarchy based rig (something you can actually use for just straight moCap animation). In this rig-we'll call it the creatures' baseRig--set all the joint rotations that the creature will need to move correctly. Then with the builderFile, create all the standard options you need to create the fully complex setup with cctTools, and just hit a button! The end result will be the fully rigged animation model for the animators to use in shots-the builtRig.
At the *complete* end, you'll have 3 different rigs. The:
BASE RIG: The single hierarchy character. This model can/ should actually be the loRez, scrubable geometry representations of the character. If you allow the animator to build his own rig, this is the creature they build it on.otherwise you are the only one that needs this file.
On this rig, you should add some type of prefix to all your joints. Since Maya is "name" driven, this way you'll be sure to have the correct namespace during a build (meaning no duplicates of the same name in the scene). You'll state what this name prefix is in the builderGui at build time in the "PreName" field.
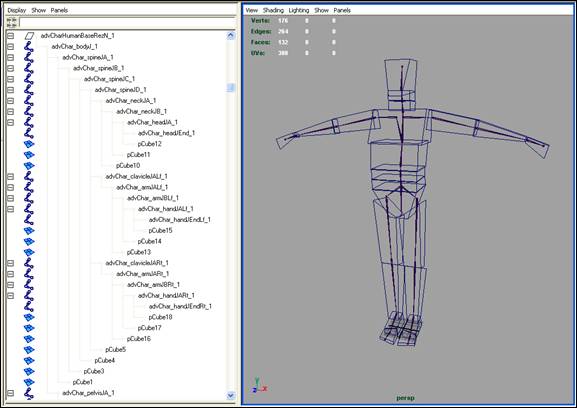
baseRez
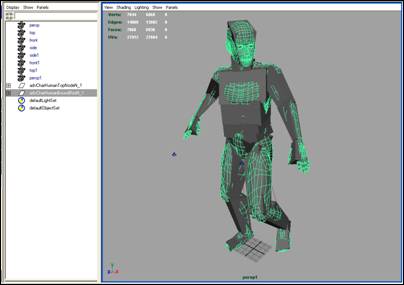
BUILT RIG: This is the creature after builder has run-the output. This will have all the animation controls/ setup that the animator needs to get the shot done. On this should be the loRez geometry for "scrub-ability."
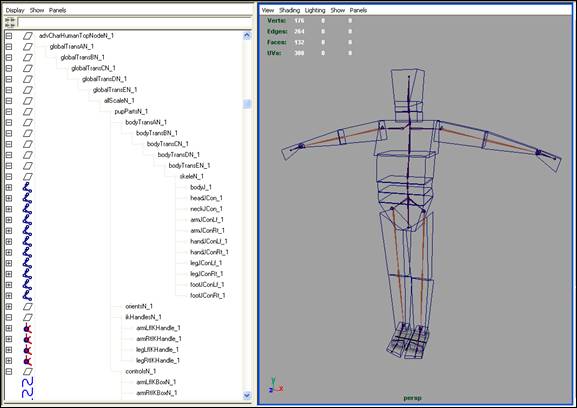
builtRez (notice the new hierarchy)
BOUND RIG: This is the hiRez, renderable geometry with the single hierarchy rig (the baseRig). So no extra setup is needed for this rig (unless there are secondary automatic controls like wrist twists, etc). Just take your baseRig and bind the hiRez geo to it. (tho you may want to clean up the file if needed.meaning you can add some simple controls in or move them around). In the end, this boundRig gets "connected" to the builtRig and is driven by it.
On each joint that gets controlled by another in the builtRig, you'll add a hidden message attribute that will let the connection tools to find and hook up the joint to it's "driver." Do this by simply selecting all the joints in this bound character and run the addBoundAttr.mel tool.
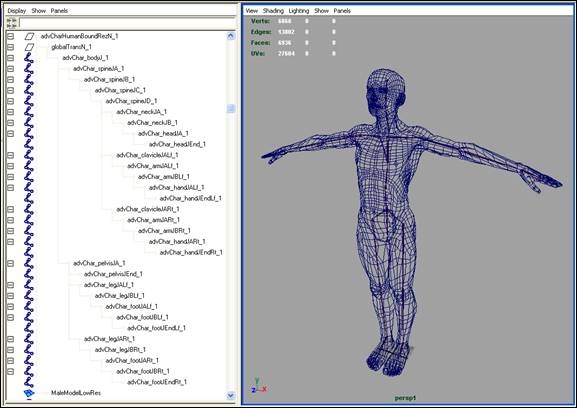
boundRez (model by Sven Jensen)
The reason for having 3 complete rigs at the end is to make the builtRig, you need a basis. That basis is the baseRig. This tells builder where the joints are located and their orientations-something, you the rigger, need to set up since this isn't always (and shouldn't be) an automatic step.
The builtRig is the full blown animation rig that holds all controls needed by the animator. These two rigs have just the loRez model parented to the controls. This allows the animator to have a real-time, scrubable animation rig. These 2 rigs are also easily/ quickly built with builder, and can be handed off pretty quickly so that the process of animating the shot can be started sooner than the usual having to wait for the full, hiRez model rig being completed. Meaning you can spend some extra time on getting the boundRig set up correctly before an animator needs to see it in a shot.
Another nice thing about this type of set-up is that you can actually add in extra controls into the builtRig that help the animator get from A to B as easily as possible without having to worry about animation transfer issues.
So, in the end, the baseRig is used to make the builtRig AND the boundRig.
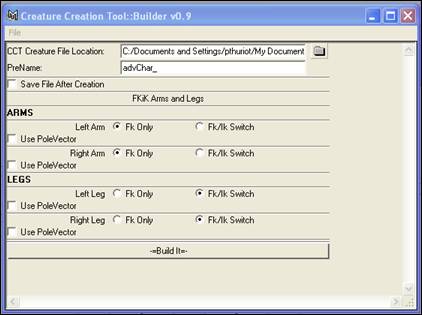
The cctBuilder_Gui tool is just a UI window that reads a builderFile and calls to the build procedure for a character. To create a creature with a builderFile, launch the creature gui UI with cctBuilder_gui.mel. This will open the UI window version 0.9. Click the folder icon button to point to your character builder file.

cctBuilder GUI window
Once you load the builderFile, the Gui will update with all the options available for the creature.
cctBuilder GUI with loaded builderFile
Select all the options you want in your builtRig, and hit the Build It button with the baseRig loaded up in your scene.
The hardest thing about making a builderFile, is making the first one. After that, basically it's just copying/ pasting names and adding character specific details.
Included in this class is one defaultHuman builder file. It also uses all the cctScripts included in this class. It should be noted that the builderFile [and included tools] are more for an idea of the procedure, not an actual "be all, end all."
Inside the builderFile are all the commands to create the UI for the builderGUI. This means all the options you wish to include for a creature should be in this file (reason being that not all creatures are "created equal").
Start off with the global proc called by the builderGUI to update the window and add in all the UI controls. Of course, make sure that the GUI actually exists first.
global proc cct_updateBuilderGui()
For this example, the only "options" are simple fkIk options. Make global string variables to read and store the UI your going to make, and to send them to the buildIt command.
//global ELF gui pieces to send to BUILD IT.
//these are just string arrays holding the ELF names of UI pieces.
global string $fkIkSelections[];
global string $ikPoleVSelections[];
clear($fkIkSelections);
clear($ikPoleVSelections);
$fkIkSelections = ;
$ikPoleVSelections = ;
Now start adding all the UI calls for your creature. Again, this example only holds simple fkIk options; either a straight fk arm or leg (for both right and left), or add an ikHandle so you can use Maya 5.0's fkIk switching options. Then on top of that, you have the option to add a poleVector constraint or not per chain.
text -fn "boldLabelFont" -l "ARMS" -align "left";
separator -w $width;
radioButtonGrp -cl2 "left" "left" -l "Left Arm"
-numberOfRadioButtons 2
-labelArray2 "Fk Only" "Fk/Ik Switch"
-sl 1
armFKiKLf_ui;
checkBox -align "left" -l "Use PoleVector" -v 0
armPVLf_ui;
separator -w $width;
Continue adding all the UI options you need for the creature. Then end the UI options with the "Build IT" button. When pressed by the user, this will call the actual command, read the UI, and send a call to build the entire creature with the options you selected:
separator -w $width;
button -l "-=Build It=-" -c ("cct_buildIt");
Now create the true command to build your creature. This command will take the options set in the UI and use all the appropriate cctTools needed. In between each tool is a call to pt_progressUpdate. This just updates a progressWindow to show you the overall build.
global proc cct_builder_build(string $pre, int $fkIk[], int $pv[])
Reparent the loRez geometries from the baseRig to the builtRig.
//parent geometries over to control rig from bound.
//============================================================
cct_reParentloRez;
Finally, just about done. Just clean up the scene. Delete the baseRig.
//remove base rig from scene!
//============================================================
select -cl;
delete "advCharHumanBaseRezN_1";
Rename the topNode of the builtRig.
//rename topNode....
//============================================================
rename $hier[0] "advCharHumanTopNodeN_1";
//print done....
//============================================================
select -cl;
pt_progEnd;
Ok. Now that you've done the "hard part"-creating your first builderFile-you can reap the benefits of doing so! Now, if you ever need to create a character similar to this again (another humanoid we'll say). All you ever need to do is create its specific baseRig, change the names in the "create pieces" and "connect to bound sections" (or make sure that the names are already correct), and add any "extras" if need be. That's it!
A feature--touched on above--of the Builder idea is that the animator works on their customized loRez character, while the creature TD continues to work on the hiRez, renderable character. When it's time to render, the animator imports the hiRez character into his/her scene and physically "connects" the hiRez to the loRez. You also have the power of adding in as many "extra" controls into the animation rig to "correct" or give the animator more control without having to worry about in not "transferring" into the new puppet rig correctly.
The connection tools use message attributes to find and connect to each other between creature rigs. On the builtRig, during it's build with builder, hidden message attributes are added to specific joints telling them which joints to "look for" at connection time and drive them. On the boundRig, you have to add the boundAttr, another hidden message attr. The reason message attrs are used is this way, if the names of the objects get changed, etc.the correct joints are still found.
To connect the boundRig to the builtRig, simply:
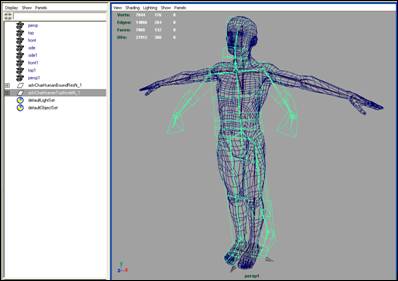
built and boundRigs in the same scene
boundRig connected to the builtRig
The connection tool searches through both hierarchies and finds every node with the correct "from" or "to" attributes. After it makes the list of nodes, it searches through each and matches them. When the tool finds a "driver" and "driven" node, it connects them via point and orient constraints.
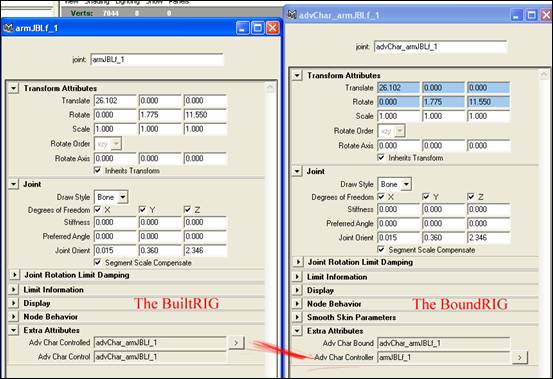
the builtRig on the left and it's corresponding joint in the boundRig on the right after connection
MEL is extremely powerful, and gives you freedom to do just about anything you need to. Though sometimes you need to take it to the next level and create more powerful tools via the Maya API. Working in production environment, a good and quick way of prototyping any tool is specking out the entire tool and workflow with MEL. This can be used as a tool to show the a programmer ideas of use or to show the "people with the money" what exactly you're trying to accomplish and giving the reasons of why you need to write a plug-in. (Pictures are much better than the, "hey, I want this.to do this" talk, right?!)
Why reinvent the wheel? Just as the MEL procedures should be simple and to the point, plugins should be as well. If there is already a tool that does what you're trying to accomplish (one that's available to you, that is), use that along with whatever you need to add to it to realize your new tool. This is a general rule of software development - and is the sole purpose of using an API in the first place (since the API is simply protected access to a huge library of private C++ source code that your code can link with, and that teams from Alias Wavefront have spent many long years developing).
How you actually implement any solution into your workflow is one of the things that generally is what makes or breaks your tool in the studio. If it is well integrated with what everyone is doing, it becomes almost "transparent" to most (other than the one(s) whom actually have to apply it).
If you're designing a tool that you are going to use.think about how it'll go thru the entire pipeline and what/ whom it'll affect. If the new tool is going to change everything down the pipeline without having a significant result (basically making the entire show 1000 times "better"), than it most likely isn't going to be welcomed by most.
Basically think about whom this new tool or workflow will effect and how. Then come up with ways of implementing this idea without making a significant impact on how someone else is already working, unless they favor a change.
There really is no need for a "which one is better?" type of thing. They both are needed for specific tasks, but here's a quick rundown.
For *most* simple cases, I'd recommend keeping as much in MEL as possible. The upsides to doing this are:
Now the upsides to writing your own API plugin:
So best case: USE BOTH IN COMBINATION. The chances that you have to do every little bit of your tool in the api are very sparce, and it will be much more likely that you will want to write a mel script wrapper for your plugin that does stuff like:
if ( !`pluginInfo -q -l myCustomPlugin`)
Well, actually, you do compile MEL, but the compilation happens at run-time. MEL is what is known as an interpreted scripting language, the Maya executable parses and interprets the scripts and compiles them into machine language on the fly. The Maya API is C++, which is still interpreted by a compiler in the end, but is nothing like a scripting language. C++ is an extremely powerful high level programming language used for serious software development projects, and it just so happens that it is the same language that Maya itself was written in. Writing a Maya plug-in can make use of as many features of C++ as the author of the plug-in chooses. With that said, writing and compiling a plug-in is actually quite a simple process and anyone can do it.
Compilation is simply the process of converting your C++ code into a binary form that can be directly executed by your computer and in the end, directly interact with memory and have direct access to the cpu. Compiled C++ code is therefore many magnitudes faster than any interpreted scripting language, and wins hands down when it comes to performance over MEL. Next is a quick run down on what happens and why, when a compiler executes it's process and links your code all together in order to create your plug-in module.
The compilation process is a multi stage process, each stage playing an important role in creating your final output file. Most compilers have all sorts of options, flags and settings that help to control what happens at each stage of the process. Here is a simple description of
1. Preprocessor: The preprocessor resolves all "directives" that are in the code, and combines all the necessary header files needed into one big text file, in order to perform compilation.
Preprocessor directive processing is a vital part of compiling, but happens just before actual compilation occurs.
Examples of using preprocessor directives:
#include <iostream>
This basically takes the iostream header file, and inserts it into the current C++ file.
#define _SPECIAL_MAYA_PLUGIN
This defines _SPECIAL_MAYA_PLUGIN as existing, and will now return true for the other pre-processor directive, like #ifdef
So, we can check if the definition exists, and make a "compilation time" decision based on it by:
#ifdef _SPECIAL_MAYA_PLUGIN
#ifndef _WIN32
#include "maya_unix_macros.h"
#endif
#endif
#define MY_PI 3.14159265358979323846264338327950
This will simply cause the preprocessor to substitute the text MY_PI with the actual numerical value in body of the code where ever it may be used - it is not a variable, it is a #define, which means that by the time the code gets to the compiler, it will have the hard coded 3.14. number in the place of wherever you typed PI.
The #define directive can be used to define small bits of logic, called macros, as well.
#define ABSOLUTE_VALUE(x) ((x) < 0 ? (-(x)) : (x))
Note that if you want to define a macro that spans over more than one line, you need to escape each newline at the end of each line (except for the last line):
#define McheckErr(stat,msg) \
if ( MS::kSuccess != stat )
2. Compiler: Processes the high level programming language's keywords, detects any logic errors or syntax errors, and converts the code into object files
3. Linker: Links the object files and libraries, and resolves dependencies, in order to create the executable code. The part that gives it an entry point into Maya as a plug-in happens at the end of the linking process as well.
Writing a plug-in for Maya requires the knowledge of few extra things, other than just knowing how to use Maya well. Although Alias Wavefront supplies amazingly excellent documentation, and sample files for writing tools in their API, they (for obvious reasons) don't really teach you how to compile, although they do have a new section about it in the newest version 5.0 docs, and they supply sample Visual Studio projects with the devkit, which are excellent. They also have a great plug-in wizard for Visual Studios, as well as sample make files for Linux and Irix. Setting up and using a compiler to properly link with and compile with an external Api to produce a plug-in can sometimes be a frustrating process, especially if you are doing it as a beginner, but Maya makes it extremely easy, so let's jump in!
You will need Microsoft Visual Studio Version 6.0, and have the plug-in wizard installed. If you do not have the plug-in wizard installed because you installed Visual Studio after Maya, then simply re-install Maya after you have installed Visual Studio, and be sure to include the full devkit in the installer options.
Using the plugin wizard is incredibly easy:
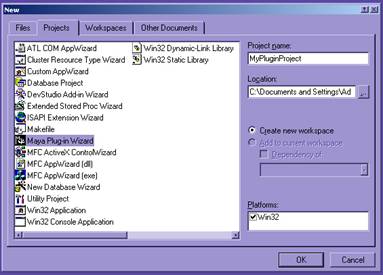
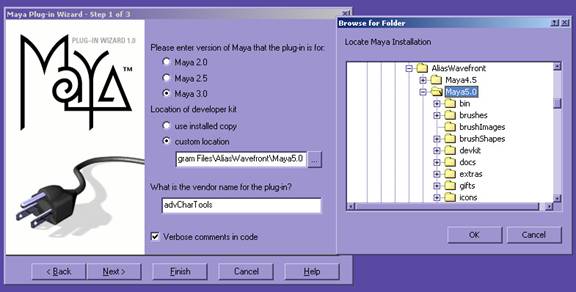
First, launch Visual Studio, and choose the menu item "File->New.".
If Maya Plugin Wizard does not show up, as it does below, then you need to install the plug-in wizard first, before continuing with this tutorial.
Next, choose the custom location option, as shown below, and browse to the root of your Maya5.0 directory, where Maya is installed. This folder should have an "include" and a "lib" folder within it, and so, this will be the path that the plug-in wizard will set in your Visual Studio options to be a search location for the "preprocessor" portion of compilation to parse any include directives, and that the linking portion of compilation will use to link with all the Maya library modules.
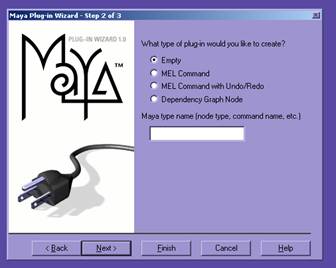
Next, choose what type of plug-in you want to compile. It doesn't really matter what you choose, since the real thing using this wizard buys you is just the monotanly of all the various compiler settings that you would have to set if you didn't use the wizard. its not like it is going to write your plug-in for you!
Now, choose the libraries that you will be "linking" with (it's ok to have some extras in there, it won't hurt):
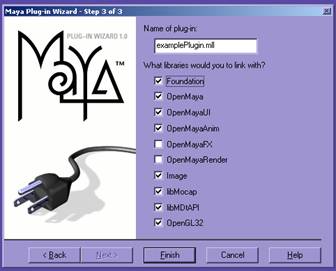
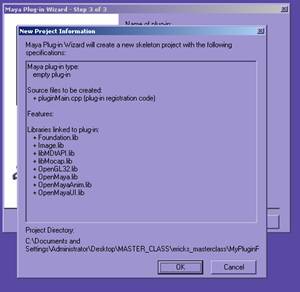
Click finish, and you will get the confirmation window..
You should now be able to start writing a plug-in. Starting from an example source file, and testing if it compiles, etc is a good place to begin.
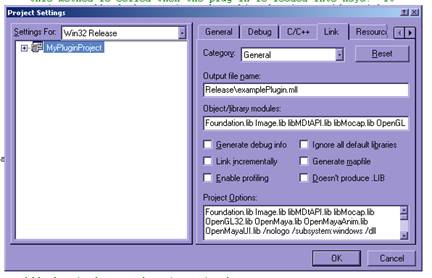
All of the possible compilation settings for Visual Studio can be found under one singular location, the "Project->Settings" window:
The Settings window will open, and it will have several tabs, the ones that will be important to us are the "C/C++" tab which handles code generation settings, and the "Link" tab, which, obviously, handles linker settings. Select the "C/C++" tab, and click on the "Category" drop down menu. Scroll down and select the option labeled Preprocessor as seen in the following image. There is an option in the GUI now that will read "Additional include directories". New directories can be added to this list, using commas to separate between different paths:
Next, is the "Link" tab. From the Category menu, choose the "Input" option, and you will see the text box for "Additional library path:" Add in new paths separated by commas, just like before. You will also need to be sure that the library that you are trying to link with is added into the Object/library modules list. A good example of this would be trying to use OpenGL inside your plug-in, but forgetting to add openGL32.lib into this list of libraries.
Compiling your plug-in in the "Release" mode configuration is very important, because if you are compiling in Debug mode, and you try to distribute your plug-in for users that do not have certain Visual Studio libraries installed, then they will not be able to load your plug-in. Besides, you should always compile in release mode whey you are ready to release anything, because the compilation process includes less code, and the plug-in will run much more efficiently.
It is important to note that Visual Studio will store different settings for the different Project modes (ie, Debug, Release, Etc). If you switch to Release mode, and you start having problems compiling, you probably need to tweak some settings for release mode, that never got updated because you were working in debug mode the whole time (like re-add in some extra libraries into your settings for release mode this time). Here is where you can change to Release Mode, this doesn't actually put you into Release Mode, it simply lets you modify the compiler settings for Release Mode:
Now you are almost ready to compile the final release version. If you go to the Link tab of Project->Settings window, you can change lthe output name and location of your plugin by typing something different into the "Ouput file name:" text box:
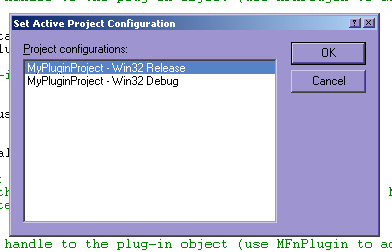
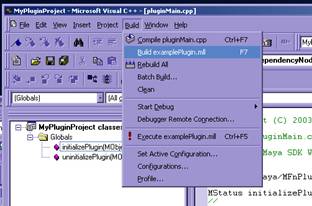
Next, all you have to do is set the Active Configuration to "Release":
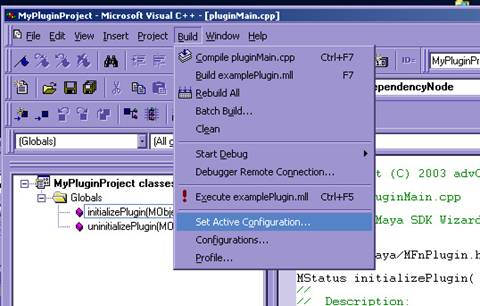
And finally, compile your plugin, by choosing "Build-> Build pluginName.mll" or just hitting F7!
Additional things that you should know about compiling plug-ins in Visual Studio for Windows:
When you are compiling a Maya plug-in, you are compiling what is known as a dynamic link library or .dll in Windows. To create a Maya plug-in project from scratch, without using the plug-in wizard, you will need to make a Win32 Dynamic-Link Library project, add the include and lib paths manually (as outlined above), and change the following settings:
In the "Project->Settings" window, select the C/C++ tab, and from the "Category" drop down menu, choose the "Code Generation" option. Now, from the "Use run-time library" drop down menu, choose the "Multithreaded DLL" option. This is how Maya was compiled, and so it is necessary that our plug-in be compiled the same way.
Now, switch to the Link tab, click inside the Project Options Section, and scroll to the very bottom, and add the following line at the end- this defines the external entry point functions for the .dll
/export:initializePlugin /export:uninitializePluginFirst off, you will need to know that compilation will be done using the "gcc" complier, but, for Maya 5.0 it will need to be version gcc.3.2.2. Maya for Linux itself is compiled on RedHat 7.3 with gcc 3.2.2. Plug-ins built using any other version of the compiler will be incompatible since Maya was created with this version, and any plug-ins need to have the same C++ Application Binary Interface as Maya does.
If you have the correct version of the gcc compiler installed, compiling the plug-in is a simple process of modifying the sample "makefile" from the developers kit used for compiling the example plug-ins that ship with Maya.
After that it is as simple as launching a shell, cd to the directory with your plug-in source code and modified makefile, and execute the "make" command in the shell:
The API is a really well designed interface to the full power of developing truly powerful tools in Maya. Before you begin programming in Maya's API there are a few things about programming in C++ that should understood.
C++ is an ANSII standard language, and it is very easy to write code that is cross platform compatible, if you try. C++ embraces the concept of reusable software libraries, and "object oriented" programming. Object oriented programming is merely one programming concept that has become a standard in C++. Another highly adopted standard is the use of "templates", and the Standard Template Library, or STL. C++ has many really cool features, and new more versatile techniques for programming in C++ are emerging everyday. but, one of the great things about it's backwards compatible design, is that it's standard definition allows for the static declaration of old-school C style functions at any time.
Object Oriented Programming. In C++, and in the Maya Application Programming Interface, the way that you write code is by writing a class. A class is an object, and hence the term object oriented is directly in regards to the use of classes in C++. A class is like a data type definition, but with the ability to be within a namespace, and to have it's own special member functions that only an object of it's type (and it's derived types) can use. The biggest benefits of object oriented programming are two concepts, called inheritance and polymorphism.
Inheritance is the ability to derive your class off of the already existing capabilities of another class, and Polymorphism is the ability to override the functions of one class with new functions in a derived class.
In Maya, it's not very often that you need to write your own class from scratch. Instead, the way that Maya has created an interface to writing a plugin is through inheriting from a certain group of special Maya classes called Maya Proxy Classes, or MPx classes, and then overriding certain functions in order to perform operations inside of Maya. Through the use of these Proxy classes, you can create your very own node, command and more, all in Maya quite safely and easily.
Currently the existing number of possible MPx classes (and therefore the number of completely different plugin types) that are available for version 5.0 of Maya are:
|
MPx3dModelView MPxEmitterNode |
MPxManipContainer MPxMidiInputDevice MPxSpringNode |
A few simple to pick up on, and commonly used plugin classes would most likely be:
MPxCommand
MPxNode
MPxDeformerNode
MPxLocatorNode
Whenever you inherit from a MPx class, there functions that are declared as "virtual" functions, which are the functions available for you to override. The process of inheriting from an MPx class, and overriding it's virtual functions is what is as Polymorphism.
Together Inheritance and Polymorphism form the basis for the concept of Object Oriented Programming, and are also very important to keep in mind when writing a Maya plug-in, which will use these techniques with Maya's proxy classes as it's way to plug into Maya.
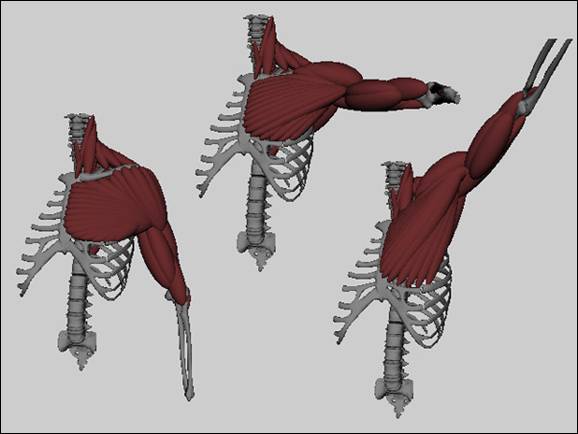
Muscles within the body are made up of a belly and two extremities, the origin and the insertion points. The origin is usually more stationary, while the insertion is the point that "moves." The belly contracts in two ways: either 1. isotonic contraction in which the muscle length changes and the muscle moves, or 2. isometric contraction where the muscle tenses and changes shape without changing length.
A standard Maya sphere will be used as the belly, and 2 separate locators used for the origin and insertion points. One more locator is used for the bellies up vector. The origin and insertion points get parented as needed in the creature. The up can be placed anywhere as well, though the default will be parented under the origin.
This is the MEL implementation of the muscle creation tool. This proto-type MEL (not the following API) tool is loosely based off a Siggraph '97 paper [1]. This works with expressions to calculate the volume, meaning you have to scrub in the time-slider to update the volume. Not the ideal, but quickly implemented for a proof of concept.
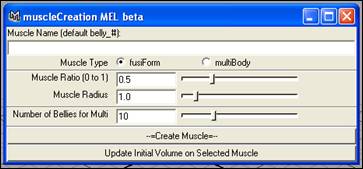
The MEL muscle builder GUI
The MEL muscle creation tool is relatively simple. It can create 2 different types of muscles. Either a fusiform or a multibelly muscle type. A fusiform muscle is simply an origin, an insertion, an up, and a singular, contracting belly. This implementation fits perfectly for muscles like a bicep.
To create a fusiForm muscle
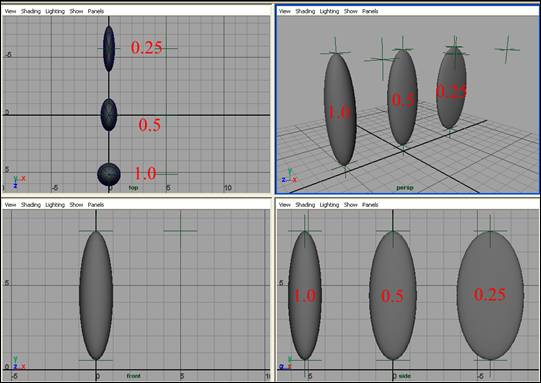
Showing Radius setting of 1.0 and different ratio settings
Now that the muscle is created you can place/ parent the origin and insertion locators in your hierarchy. Any deformations will translate into the expressions to output new volumes based off the length between the 2 locators.
If the width needs to be adjusted, the MEL UI comes with an Update Initial Volume button. If you select any muscle belly, notice a new attribute in the channel box named radius. You can adjust this to any positive value and hit the Update button. This will adjust all the needed equations and volume. A limitation to note on this implementation is you can't adjust the Ratio after creation.
On each belly you also have a tension (0.0 to 1.0) control that can be animated to simulate isometric contraction.
Now that you can create a singular muscle belly with the fusiform, this MEL tool takes it a small step further by implementing into it the multiBelly muscle type. The implementation of a multiBelly muscle type is you have an origin and insertion CURVE and any number of fusiform bellies lying between the curves in even divisions. All the same attributes apply to these bellies as the fusiform.
To create a multiBelly type of muscle:
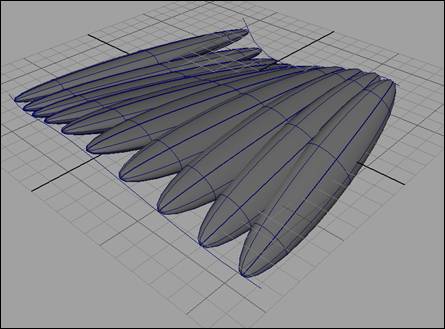
A multiBelly muscle created with the MEL muscle tool.
Now that we've covered the version of a muscle in MEL, we move in recreating what we learned in the proto type into an API node that doesn't rely on expression to update its volume. Another good reason to do prototyping is that you learn if the tool needs to be rethought in some way. In the above MEL example, the limitation of not being able to truly adjust the height and width of the belly at any time was poorly implemented (imho). Our API version will have more control. The final outcome/ idea of the node will be relatively the same (the look in the end result), but how we get there will be different.
A simple node that you can use within your character rigs is the fusiMuscleNode. This node can be used to simulate standard fusiform muscles. It takes two inputs (origin and insertion points), and can be used to calculate muscle volume during deformation.
The fusiMuscleNode is a simple part of a network that makes up a "fusiform" muscle. It's the part that calculates the volume of any Maya transform. Though, remember that it still uses Maya's nurbsSphere, locators, and an aimConstraint, so this is NOT a stand alone.
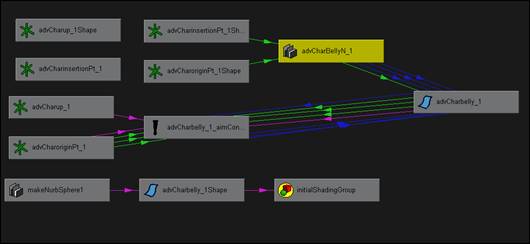
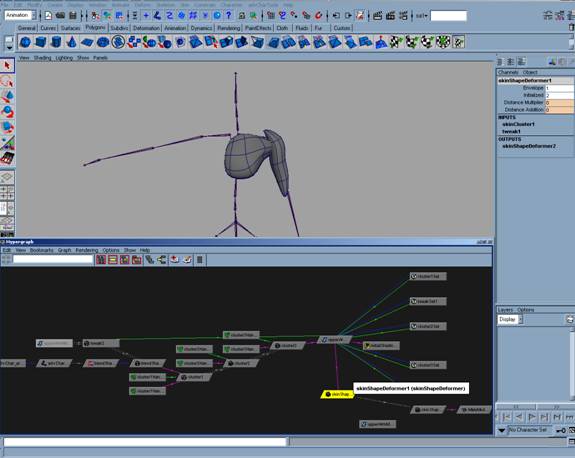
Hypergraph view of the upstream/ downstream paths of the fusiMuscleNode
Included with this class is the fusiVolume.mel script. This simple code will create and hook up all necessary nodes to create a simple fusiForm muscle with the API node.
Make sure that the plugIn is loaded and source the script. In the command line/ script editor, enter:
fusiVolume <name of the belly/ muscle>;
This will create a simple muscle "primitive." Select the fusiMuscleNode and in the channel box you have:
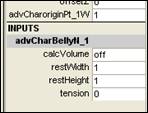
The channel box attributes for the fusiMuscleNode
Just like the MEL version, now just parent the origin/ insertion/ up locators in your hierarchy, set your restWidth and restHeight, and turn the calcVolume attr to ON. The big difference is that the volume will always update without having to scrub in the timeline.
The main thing to note about this code is it's use of defines. Using defines in your code will save you time in the long run, although they are a C style technique, they are really handy for quick coding when you don't want the overhead of separate function calls each time. With things like Maya's API Error checking, etc, you typically have to type 3 or more-albeit simple-lines of code to do one thing.use a define to make a quick macro, and you can just type that 3 lines once and use it just like a call to a function.
You'll find the defines in the fusiMuscleNode.cpp code look quite cumbersome, but are set up pretty well for you to follow. Under normal circumstances there would be a separate file that would be included which contains all of the macro definitions, so that they can be used from other plugin projects, and not clutter up the plugin code - but they were included into this file for compactness of the code in this case, since they are not being used in any other source files included other than this class.
The fusiMuscle node is a regular plugin node, and is derived from the Maya proxy class MPxNode. Here you see the process of inheriting from the MPxNode class, of course you must include the MPxNode header files in oderder to have acess to it's class declarations:
#include <maya/MPxNode.h>
class fusiMuscleNode : public MPxNode ;
The initialize function, once again is used to create attribtutes and add them onto the node. One area of particular interest would be the ability in the API to create an attribute of type "nurbs surface", and later, be able to actually connect a nurbs surface into it for reading.
MFnTypedAttribute nurbsSurfaceAttr;
nurbs_input_object = nurbsSurfaceAttr.create( "nurbsObject", "nbo",
MFnData::kNurbsSurface);
nurbsSurfaceAttr.setStorable(false);
nurbsSurfaceAttr.setConnectable(true);
addAttribute( nurbs_input_object);
attributeAffects( skinShapeDeformer::nurbs_input_object, skinShapeDeformer::outputGeom );
All the v
// Function: deform()
// Description: Deform the points
// Arguments:
// data : the datablock of the node
// iter : an iterator for the geometry to be deformed
// m : matrix to transform the point into world space
// mIndex : the index of the geometry that we are deforming
MStatus skinShapeDeformer::deform( MDataBlock& data, MItGeometry& iter,
const MMatrix& m, unsigned int mIndex)
dirArrayData.set( dirArrayBuilder );
uvArrayData.set( uvArrayBuilder );
distArrayData.set( distArrayBuilder );
Ok, now all the "initialized" data has been collected. Now set the internal node attribute to 2, so that on next evaluation of the deform function, it will not enter this block of code, but instead the switch will evaluate to 2, which is the next case - do the deformation using the data we have collected!
MDataHandle initialized_handle data.outputValue(initialized_data);
int & do_initialize = initialized_handle.asInt();
do_initialize = 2;
initialized_handle.setClean();
data.setClean( initialized_data );
nurbs_muscle.updateSurface();
return MStatus::kSuccess;
case 2: //deformer data initialized. begin deform.
}
Well, that does it for the plug-in deformer code as far as making it paintable. It implements the envelope attribute and the paint-able weights attributes - both of which already exist on all deformer nodes by being inherited from one of it's private parent classes, weightGeometryFilter. But, in order to actually make a deformer paintable, you have to do a whole bunch of little things in MEL which allow the deformer to show up in the artisan list of available nodes.
First, in the mel script wrapper for creating the deformer, notice the following lines. What this does is creates the deformer, and then connects the nurbs surface into the deormer node as an input to deform the polygon. Next, note the last line which states makePaintable. You must call this when you create the deformer or you may not be able to paint the weights using artisan. but, wait, there's more!
string $skinShapeDeformer[] = `deformer -type skinShapeDeformer`;
connectAttr ($skinObj+".worldSpace[0]")
($skinShapeDeformer[0]+".nurbsObject");
setAttr ($skinShapeDeformer[0]+".initialized") 1;
makePaintable -attrType "multiDblArray" -sm "deformer" "skinShapeDeformer" "weights";
Ok, now we have set up all the right stuff in order for our deformer to have paint-able weights when it is created, but in order to get our custom deformer to show up through the standard paint weights window in Maya, you have to make new versions of the following default MEL files, and then put them in a location where they will get sourced on startup of Maya.
artAttrCallback.mel
artAttrProperties.mel
artAttrToolScript.mel
ArtisanRegistPaintAttrCmd.mel
ListPaintableRegist.mel
In our case, the scripts are kept in the mel_library folder, so that we know they will be sourced over the default scripts that are still in the Alias Wavefront directories. The main thing that needs to happen in all 5 of these files is the addition of our deformer into each place that Maya uses to register the ones that it uses already.
In artAttrProperties.mel you have to add (around line 140):
popupMenu -button 1 artAttrNodeFiterMenu;
menuItem -l "cluster" artAttrFilterMenu1;
menuItem -l "jiggle" artAttrFilterMenu2;
menuItem -l "particle" artAttrFilterMenu3;
menuItem -l "skinShapeDeformer" artAttrFilterMenu5;
menuItem -l "all" artAttrFilterMenu4;
In artAttrCallback.mel, you have to add this near the mid top (around line 90):
else if ( $node == "skinShapeDeformer" )
As well as an additional menu item twords the bottom of the script (around line 330):
menuItem -e
-c ( "artAttrSetFiler \"skinShapeDeformer\" " + $artCommand )
artAttrFilterMenu5;
In the file artAttrToolScript.mel there was this stuff added:
else if ( $attrFilter == "skinShapeDeformer" )
In the file ArtisanRegistPaintAttrCmd.mel, the following lines were added:
attrPaintCtx -e -rpn "skinShapeDeformer" true `currentCtx`;
attrPaintCtx -e -rpa "skinShapeDeformer" "weight" "multiDblArray" "weights" "" "" `currentCtx`;
And in the file, ListPaintableRegist.mel, the following lines were added:
// skin deformer paint:
listPaintable -rpn "skinShapeDeformer" true "attrPaintContext";
listPaintable -rpa "skinShapeDeformer" "weight" "multiDblArray" "weights" "" "";
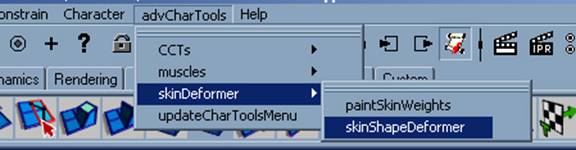
.and finally to call the artisan window from the advCharTools Menu, I made a simple script, that does:
global proc paintSkinShapeWeights()
You can use the deformer on the entire mesh, or just select vertices. It will work by selecting the object you want to deform, and the nurbs surface, and executing the menu command below.
Here is what the nurbs surfaces that will be deforming the mesh look like, as well as the upstream nodes that are created and connected after the deformer has been created:
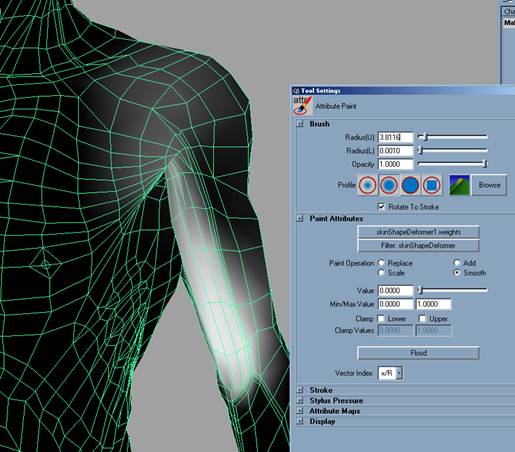
Here is an image of the actual weight painting in progress J
advCharTools.mel
sourceMelLibrary.mel
setupPluginPath.mel
userSetup.mel
artAttrCallback.mel
artAttrProperties.mel
artAttrToolScript.mel
example_utilities.mel
ArtisanRegistPaintAttrCmd.mel
ListPaintableRegist.mel
updateCharToolsMenu.mel
pt_muscleBeta.mel
fusiVolume.mel
cct_sourceCCTs.mel
cct_attrConnect.mel
cct_attrEditor.mel
cct_attrOpenUp.mel
cct_getAttr.mel
cct_lockEveryAttrOff.mel
cct_lockOff.mel
cct_removeConnectAttrs.mel
cct_setAttr.mel
cct_addJCon.mel
cct_configNode.mel
cct_findNode.mel
cct_fkIkWin_5.mel
cct_makeHier.mel
cct_oriConsWin.mel
cct_parent.mel
cct_addBoundAttr.mel
cct_breakConnections.mel
cct_connectControl.mel
cct_connectJt.mel
cct_unHookControl.mel
cctBuilder_Gui.mel
cct_allCapLetters.mel
cct_getFullPath_fromItem.mel
cct_nameSuffix.mel
cct_reList.mel
cct_reListTo.mel
cct_removeNonJointsFromList.mel
cct_reNameChain.mel
cct_replaceString.mel
cct_builderTools.mel
cct_dupJt.mel
cct_dupSingleJt.mel
cct_placePVbox.mel
cct_reParentLoRez.mel
paintSkinWeights.mel
skinShapeDeformer.mel
defaultHuman_builder.txt
Maya.env
pluginMain.cpp
MyPluginProject.dsp
MyPluginProject.dsw
baseRez.mb
boundRez.mb
builtRez.mb
skinDeformerTest.mb
fusiMuscleNode.mll
fusiMuscleNode.cpp
skinShapeDeformer.mll
skinShapeDeformer.cpp
skinShapeDeformer.dsw
skinShapeDeformer.dsp
fusiMuscleBack.mov
fusiMuscleFront.mov
AFTER_skinDeformerTest.avi
BEFORE_SkinDeformerTest.avi
The following Siggraph Paper was used as a reference and inspiration for our Muscle System:
[1] Scheepers F, Parent, R. E., Carlson W. E., May, S. F. Anatomy-Based Modeling of the Human Musculature Siggraph, 1997.
|
