![]()

 Publisher
2000
Publisher
2000
What you will do: Create a newsletter using a wizard. Use the Clip Gallery to enhance the
newsletter layout. Insert a text file into existing frames. Review and edit existing text, including
checking your spelling. Add a "drop cap" to a story to add
visual interest. Add or delete extra pages. Convert your newsletter to a Web page.![]()
Microsoft Publisher 2000 is an easy-to-use desktop publishing
program that helps students and teachers create eye-catching newsletters,
flyers, brochures, programs, and Web sites. Publisher 2000 complements writing
and learning activities in your classroom, and can help you expand the
visibility of your school events and activities.
Publishing is a necessary, final stage of the writing process. It gives students the opportunity to further develop their personal styles, reach out to an audience, and acknowledge their own work. Desktop publishing with Publisher 2000 moves publications beyond word processing and helps you and your students create professional, distinctive publications without any design experience. Publisher 2000 lets you and your students focus on creativity, instead of learning how to use software.
In this chapter, you can learn about Publisher 2000 by doing the following:
Use a wizard to create a publication.
Use the Design Gallery to change layout.
Insert text and graphics into frames.
Edit text and check spelling.
Add interest to the newsletter with a Drop Cap.
Add or delete pages.
Convert a publication to a Web page.
New for 2000
![]() Whether
you are new to Publisher 2000 or are already familiar with it, the new features
will make it easier than ever to create eye-catching pub 13413q1614n lications:
Whether
you are new to Publisher 2000 or are already familiar with it, the new features
will make it easier than ever to create eye-catching pub 13413q1614n lications:
Improvements and additions to Publisher 2000 have made it even easier to learn and use.
Publisher 2000 looks and works like Office 2000. The most obvious similarities include the familiar menus and toolbars. You can also add automatic bullets and numbering to your publications, similar to Word and Excel documents. The File Open/Save feature is common to all Microsoft programs, and themes are shared across Office, so your Word documents, PowerPoint presentations, and Publisher 2000 publications all share a consistent look and feel.
Publisher 2000 has made it easier than ever for you to get professional looking results without professional design expertise.
Quick Publication Wizard, Catalog Wizard, and 400 new publication templates have been created by professional designers. Flip Graphics and the Advanced Editing Toolbar help you add even more design elements.
Publisher 2000 is your complete publishing solution.
Publisher 2000 publications can be printed to your black and white or color desktop printer, taken to a copy shop, or taken to a commercial printer, and printed. New features for publishing include:
Pack and Go Wizard which makes it easy to transport a large publication on multiple diskettes (including fonts, graphics, and text) for easy travel to a copy shop or commercial printer.
New commercial printing support includes automatic conversion to spot or 4-color Process (CMYK) with automatic color separations.
Support for PANTONE® colors, Color Matching, and device-independent layout.
All of these features make it possible for you to create professional caliber publications.
Exploring the Publisher 2000 window
![]() Before
we begin, let's take a moment to explore the elements of the Publisher window.
Before
we begin, let's take a moment to explore the elements of the Publisher window.
Depending on your publishing needs, skills, or experience, you can choose to
modify your publications using Publisher's tools. Each publication type also
has a unique set of wizards. More complex publications, such as newsletters or
catalogs, have more wizards than simpler publications, such as business cards
and letterhead. You'll find the wizards located in the left pane of the screen.
They are available to you any time during the design process. ScreenTips and
the Office Assistant provide additional help and are described in greater
detail below.
The Formatting
toolbar contains buttons that change according to what the type of

frame you have selected (text frames for text editing, picture frames for
picture

editing). Each button acts on the text or object you select.
The Measurements toolbar contains buttons that give you the ability to do more precise higher-end work.
|
|
These fields show position and size of text and line spacing and allow you to make precise adjustments. |
|
|
|
||
The Objects toolbar is located on the left side of the screen and can also float on the screen. You can also place it with other toolbars by dragging it to the top or bottom of the screen. The Objects toolbar contains buttons that help you create frames, place objects, and format for the Web.
|
|
Creates a WordArt frame. |
Buttons used to create custom lines and shapes. |
Use to select objects from the Design Gallery. |
||||||||||||||||
|
|
||||||||||||||||||
|
|
|
|
Creating a publication
Exploring the Publisher 2000 Catalog When you open Publisher 2000, the Publisher Catalog appears on the desktop. The Publisher Catalog is a visual directory of publication designs. It appears each time you start Publisher 2000. You can use the Publisher Catalog to open existing publications or create new ones: Select the Publications by Wizard tab to create personalized publications using wizards. Select the Publications by Design tab to create a set of publications, such as letterhead, business cards, and a brochure, all with a common design theme. Select the Blank Publications tab to create a publication without using wizards. Click Existing Files to work on files you have already created.
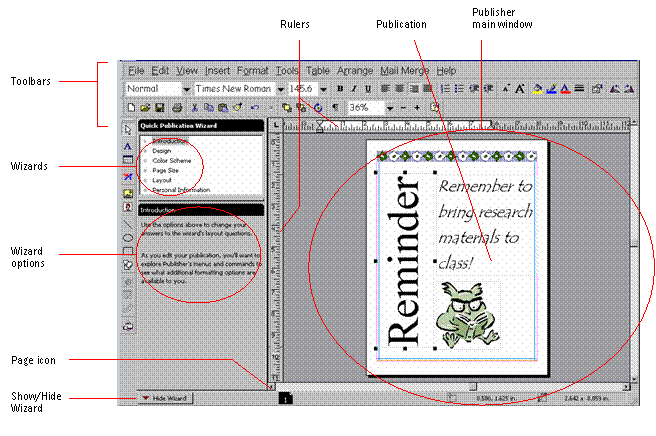
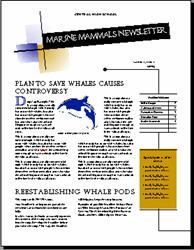
The Publisher 2000 Newsletter Wizard helps you create a professional looking layout for your newsletter. The Newsletter Wizard takes you step-by-step through the design process by asking you questions about layout, color scheme, and printing. This lesson guides you through creating a four-page newsletter with your own articles. You will be able to add pages with various layout designs and add graphics with captions that enhance your articles. To use the Newsletter Wizard If the Microsoft Publisher Catalog is not visible, click New on the File menu. Click the Publications by Wizard tab. In the Wizards pane, click Newsletters. Click Blends Newsletter and then click Start Wizard. Read the introduction and then click Next. Select Mountain as your color scheme and then click Next. Select the number of columns (1, 2, or 3) for your newsletter and click Next. Select the No option and then click Next. Select the Double-Sided option and then click Next. Select the Other Address option and then click Next. Select the Other Organizations option. Click Finish. Save your newsletter by clicking Save on the File menu and supplying a name for the file. Customize your newsletter Now that you've created the basic newsletter layout, you can drop in headlines, articles, and clip art to customize your newsletter. To enter information on the first page of your newsletter Zoom in on the publication in one of the following ways: On the Standard toolbar at the top of the screen, click the plus sign (+) to zoom. Click the Zoom box next to the plus and minus signs and then select a magnification from the list. Press F9. Click the placeholder text "Newsletter Title" and type Marine Mammals Newsletter. AutoFit is activated, so the text gets smaller as you type to fit in the text box. Click the placeholder text "Newsletter Date" in the upper-right corner of the newsletter and then type Spring or the month the newsletter will be published. Click the placeholder text "Lead Story Headline" and type Plan to Save Whales Causes Controversy or the title of the lead story. Click the placeholder text below the Lead Story Headline. Type the story directly into this frame or paste a story into the frame from Word (or other word-processor). Double-click the lead story graphic. When the Clip Gallery appears, select a graphic appropriate to the story. (For more information on selecting graphics, see the Office 2000 Professional Overview chapter earlier in this book.) When you've placed the graphic, click the Close button to get back to Publisher. Click the text "Secondary Story Headline" and type Reestablishing whale pods or the title of the secondary story. Click the placeholder text below the Secondary Story Headline. Type the story directly into this frame or paste a story into the frame from Word (or other word-processor). In the "Inside this Issue" frame, click anywhere on the text "Inside Story" and type the title of the next article you want in the newsletter. Add as many stories as you plan to have in your newsletter. On the File menu, click Save to save the changes you have made to the newsletter. To enter information in the inside of the newsletter To go to the second page of the newsletter, click the page icon with the number 2, which is at the bottom of the Publisher window. You should see a page icon for each of the pages currently in the newsletter. On the Newsletter Wizard in the left pane, click Inside Page Content. The Inside Page Content wizard allows you to change the layout of the page to accommodate the information types you may want to add to the newsletter. In the lower-left pane, click the Calendar with 1 story option. The left inside page now contains a one-month calendar. In the drop-down box in the left pane, select Right Inside Page. Click the Response form with 1 story option. The right inside page now has one story and a form that can be used to accept donations for a fundraising event. Continue to add headlines and articles as described earlier in this lesson. On the File menu, click Save to save the changes you have made to the newsletter. Zooming to change the view In Publisher 2000, viewing text and graphics is easy when you increase and decrease the magnification of the image on screen with Zoom mode. Located on the Standard toolbar, Zoom shows the current magnification of your page. The percentages for increasing and decreasing the size of the image are preset. This does not change the actual size of the publication. There are five ways to change the view: On the Standard toolbar, click the Zoom drop-down box next to the plus and minus signs and then select a new view. Click the plus sign ( ) on the Standard
toolbar to increase the magnification (view size) of the newsletter up to 400%. On the View menu, click Zoom and select a new view. Right-click on the publication and then click Whole Page, Page Width, Actual Size, or Selected Objects. Click an object in your publication. Press F9 to zoom in or out to 100%. Enter captions for graphics No matter how good an illustration is, a caption can tell the readers even more. In the newsletter, each of the Picture frames also has a caption frame attached. You can also insert caption frames in the publication. To change the caption Click anywhere on the text "caption describing picture or graphic" below the lead story graphic to select the text. Zoom in to get a closer look at the caption. Type a sentence describing the significance of the graphic or picture to the lead story. Click outside the Text Frame. Press F9 to zoom out to see the whole page again. Adding or deleting extra pages The newsletter you created may contain fewer or more pages than you'll need. Adding and deleting pages is simple. If you need six pages to fit the content in your newsletter, follow the instructions for adding extra pages. If you need only two pages to fit the content in your newsletter, follow the instructions for deleting extra pages. To add extra pages To go to the third page of the newsletter, click the page icon with the number 3, which is at the bottom of the Publisher window. On the Insert menu, click Page. The Insert Page dialog box appears. In the Left Page drop-down box, select the layout you want for the page. In the Right Page drop-down box, select the layout you want for the page. Click OK to add two pages. To delete extra pages To go to the third page of the newsletter, click the page icon with the number 3, which is at the bottom of the Publisher window. On the Edit menu, click Delete Page. Select Both pages. Click OK to delete the pages.
Sometimes a fancy first letter (called a drop cap) in a paragraph catches the reader's attention. The drop cap can also help fill a page that does not have a lot of text. In order to perform this task, you must already have a story in the text frame. To insert a drop cap Go to the lead story on the page 1 of the newsletter. Click in the lead story text frame on the first paragraph. If you have not already added a story in this text frame, then add at least one line of text before continuing. On the Format menu, click Drop Cap. Click the Drop Cap tab, if necessary, and then click one of the drop-cap options in the Available drop cap box. You can scroll in the Available drop cap box to see additional drop-cap options. Click OK to add the drop cap you selected. Checking spelling Publisher 2000 includes some of the same features found in Microsoft Word, including background spell checking. To check spelling If you misspell a word or Publisher 2000 does not recognize it, a red wavy line appears directly beneath the word on the screen. Right-click the underlined text to see suggested options. You can select a correction, add the word to the
dictionary, or tell Publisher 2000 to ignore all instances of the word. On the Tools menu, point to Spelling and then click Check Spelling. The spell checker checks one story at a time. A dialog box appears at the end of the first story asking if you want to check the rest of the publication. Click OK to continue checking spelling. The Check Spelling dialog box appears when a misspelled word is found. You can change, ignore, or add the word to the dictionary. If a misspelled word is not recognized (no spelling suggestion), you can right-click on the word and select Check Spelling. Then type the word in the Change To field and click Change. Converting your newsletter to a Web site Like the other Office 2000 programs, Publisher 2000 lets you convert any publication to HTML format so the publication can be viewed with a Web browser. If you create a publication in Publisher 2000, you can easily transfer its content to a Web site. This is useful when the information you present and promote in the newsletter may be of interest to students and to your entire community. To save the newsletter on the Web or school intranet
In the top Wizard pane, click Convert to Web Site. In the bottom Wizard pane, click Create. In the Convert to Web Site dialog box, click OK. The newsletter content appears in the Web site format. Notice that you can now control most aspects of the web pages' appearance through the Wizard. Just select an aspect from the top wizard pane and follow the instrucitons that appear in the lower wizard pane. On the File menu, click Save as Web Page. The page is saved in the folder you select. On the File menu, click Web Page Preview. In the Web Page Preview dialog box, click OK to view your newsletter with a browser. When you're finished previewing the Web site, close the Web browser.
Explore the Clip Gallery and add additional graphics to the newsletter to add emphasis and interest. Have students interview an older neighbor or member of their family for an interesting personal account of an historical event to include in a newsletter; community members can provide a wealth of information about many topics. The newsletter can increase communication in your school and community. Find a non-profit organization in your community and volunteer to create and publish a newsletter for the organization. Students can gather information from the organization and the community. Assign students roles as editors, copyeditors, reporters/writers, and layout designers to create a club or school organization newsletter. Then have students plan, design, create, and distribute the newsletter within the school and the community. Create and distribute flyers or other announcements for a non-profit group, school, or community event, or service project. Use the Quick Publication Wizard whenever you want to create a simple one-page publication. Publish your syllabus as a calendar. Add relevant community and campus events. Have students create a weekly calendar to take home to keep parents informed and involved. Use the Publications by Design tab to create business cards and flyers for a fundraiser that have the same look and feel as the publications you have already created. Organize a canned food drive, coats for kids, books for the public library, or other service activity. Create promotional materials that advertise and inform. Use invitations to invite alumni, parents, and community leaders to important events. Create a Web site based on a unit you are studying, with information from research done in class. Create links to other educational Web sites that have additional information about the topic. Publish the school newspaper on the Web instead of on paper to cut down on production costs. Document InfoAccesari: 1642 Apreciat: Comenteaza documentul:Nu esti inregistratTrebuie sa fii utilizator inregistrat pentru a putea comenta Creaza cont nou A fost util?Daca documentul a fost util si crezi ca meritasa adaugi un link catre el la tine in site in pagina web a site-ului tau.
Copyright © Contact (SCRIGROUP Int. 2025 ) | |||||||||||||||


 Designing
with the Newsletter Wizard
Designing
with the Newsletter Wizard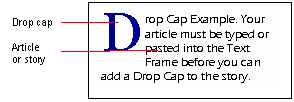 Inserting
a drop cap
Inserting
a drop cap