Introduction
Congratulations on choosing the sound card! Now you can experience high quality sound for all your games, applications, and digital audio recordings. Because the sound card is 100% compatible with Sound Blaster, Sound Blaster Pro, and AD Lib sound cards you can play any game out there in the market. You can also choose from a wide range of compatible MIDI instruments to compose and mix music to your heart's content!
You'll find the world of multimedia will expand your musical endeavors, visual creativity, and smart communication as your PC comes to life with sound-making personal computing, game playing, or just pure music listening more enjoyable and interactive with just a few clicks of your mouse!
The Sound Card includes the following features:
16-bit stereo high-quality sound
Spatializer 3D sound
Plug & Play Ready
Support Full Duplex Mode
Record, compress, and playback voice, sound and music
Stereo inputs for line-in, CD-ROM, and music synthesis and a mono input for
microphone
Audio mixer controls for inputs and outputs
6 channel mixer
Mixer controlled recording
Data transfer via DMA or programmed I/O
Integrated 16-bit A/D and D/A converters
ADPCM as well as patented ESPCMT compression for lower bit rates
Programmable volume control for both record and playback
Programmable sample rate from 4,000 to 44,100 Hz for record and playback
Windows compatible and OLE compliant
Supports The Microsoft®WindowsT Sound System
Sound BlasterTand Sound Blaster ProT compatible
Supports the largest library of third-party software
Joystick/MIDI port-attach a joystick, MIDI instrument, or both if you are using
a MIDI Kit
Built in power amplifier
Installation of the Card
Introduction
The MF-1869 complies to the industry recognized Plug and Play standard. Manual selection of hardware jumper is not needed. Hardware installation can be easily completed by inserting the card onto the ISA slot.
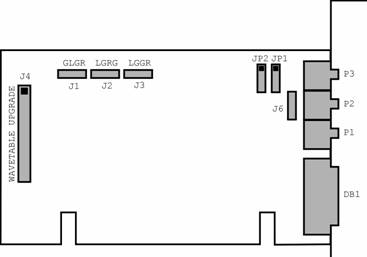
J1, J2, J3 : CD-In
JP1, JP2 : Audio Switch
P1 : Audio Out P2 : Line In P3 : Mic In
DB1 : Game/MIDI Port
IBM PC 486, or compatible system with VGA card
Minimum 4MB system memory
Minimum 4MB of free hard disk space
Mouse
Available 16-bit expansion slot for MF-1869
3.5" floppy disk drive
MS-DOS 5.0 or higher
Microsoft Windows 3.1 or higher
Turn off your PC before you install the MF-1869 sound card.
Remove the cover of your computer case. Locate an unused 16-bit ISA slot. Remove the screw holding the slot cover. Keep the screw for later use.
Insert the sound card firmly into the ISA slot.
Anchor the card's mounting bracket using the retaining screw.
Plugs the speaker or headphone into the Audio Out jack and selects the audio out as following.
|
Audio Out |
JP1 |
JP2 |
|
Speaker | ||
|
Line Out |
The joystick port on the MF-1869 is the same as that on a standard PC game control adapter or game I/O port. You can connect any PC standard joystick with a 15-pin D-sub connector to the port; it works with any application that is compatible with standard PC joysticks.
MF-1869's MIDI interface is compatible with MPU-401 UART and Sound Blaster MIDI standard. To connect a MIDI device to MF-1869, you need a MIDI kit. The MIDI kit contains a MIDI adapter cable with a joystick port so you can have both a MIDI instrument and a joystick attached to sound card at the same time.
MF-1869 has a connector (J4) for Wave Table daughter card, a general MIDI expansion module. This Wave Table add-on daughter card contains a sound generation subsystem that uses sampled wave synthesis to produce extremely high fidelity stereo sound for computer audio systems.
The MF-1869 has two input jacks, Mic In and Line In, which allows various consumer electronics devices to be connected. Such as Microphone, Cassette player... etc.
Utilities & Driver Installation using Windows 3.1
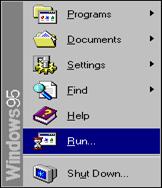
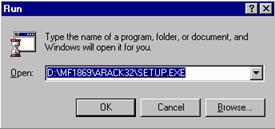
The first thing to do after entering Windows 3.1 or higher is to choose Run from the File Menu of the Program Manager. Next, place the Driver CD in a CD-ROM drive. In the Run dialog box, type the letter of the drive, directory and name of the program to be run (for example d:\mf1869\win31\setup) , then click the OK button. The AudioDrive Setup window appears.
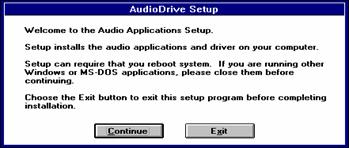
Note the instructions, then click Continue to go on or Exit to leave Setup.
After clicking Continue, the next window appears.
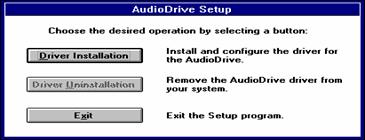
Click Driver Installation to install and configure the driver for the MF-1869 sound card.
After the installation completed, the next window appears
Click Reboot System to restart the system.
The following lines will be added to the AUTOEXEC.BAT
C:\WINDOWS\ESSCFG.EXE /A:220 /I:5 /D:1 /E:0 /B:330 /J:E
C:\WINDOWS\ESSVOL.EXE /V:8 /L:8 /W:8 /M:0 /C:8 /S:8 /A:8
To use a CD-ROM Drive for playing Audio CD, be sure to load the MCI CD Audio driver under the Control Panel icon in the Main group. Check your hardware manual about the installation of a CD audio cable between the CD-ROM drive and the sound card.
1. Start Windows 3.1.
2. Insert the Driver CD in a CD-ROM drive.
3. In the Program Manager, click Run on the File Menu.
4 In the Run dialog box, type the drive, directory and name of the program to be run (e.g. d:\mf1869\arack\setup).
5. Follow the on screen instructions to complete the installation.
Driver & Utilities Installation using Windows 95
Before installing the MF-1869 sound card, your system must have the operating system (Windows 95) pre-installed on your hard disk. Otherwise, the driver will not be probably loaded onto Windows 95.
Windows 95 first release
1. Make sure that the MF-1869 sound card sits firmly in an ISA slot of the PC
system.
2. Allow the PC system to boot from the hard disk, loading Windows 95. When the system detects a new hardware device, the New Hardware Found Dialog Box is displayed.
3. Place the Driver CD in the CD-ROM drive.
4. Select "Driver from disk provided by hardware manufacturer" and then click O.K.
5. Point to the directory d:\mf1869\win95 and then click O.K.
Windows 95 OSR2
1. Make sure that the MF-1869 sound card sits firmly in an ISA slot of the PC
system.
2. Allow the PC system to boot from the hard disk, loading Windows 95. When the system detects a new hardware device, the Update Device Driver Wizard Dialog Box is displayed. Click Next and then select Other locations.
3. Place the Driver CD in the CD-ROM drive.
4. Point to the directory d:\mf1869\win95 and then click O.K.
5. The system will make an attempt to copy files and the Insert Disk Dialog Box appears. Click O.K. The user is requested to specify the driver location once more. Point to the directory d:\mf1869\win95 to inform the Windows 95 system to copy files from that directory.
REMINDER : MF-1869 Software Wavetable Installation
DirectX is needed to run the software wavetable. Ensure that DirectX 3.0, or higher, is installed in the system. For a copy of DirectX, please contact Microsoft Corp., downloading the software from the Web site.
After installation, double click the system icon in the Control Panel Group. Use
the Device Manager to check that there are 3 devices have been added under the
Sound Video and Game Controllers. They are:
1> ESS ES1869 Control Interface
2> ESS ES1869 Plug and Play AudioDrive
3> Gameport Joystick
Moreover, a Joystick icon should be added in the Control Panel group.
At the Windows 95 main display, click the Start Button on the lower left corner. Select RUN. Next place the Windows 95 utilities Driver Disk in the floppy drive.
In the Run dialog box, type the drive, directory and name of the program to be run (e.g.. d:\mf1869\arack32\setup)
After clicking OK, the welcome dialog box of AudioRack32 Setup appears, then click Next to go on and Cancel to leave setup.
Follow the instructions on the screen to complete the installation.
Modify MF-1869 Configuration using DOS Utility
In DOS you may change the configuration of the hardware without rebooting by using ESSCFG.EXE. Type ESSCFG at the DOS prompt to run it.
Note: If your system has PnP BIOS or ICU supported, ES1869 will be configured by PnP BIOS or ICU. The following information will be displayed.
ESSCFG Version V 5.1
ES1869 configured by PnP BIOS or ICU
Audio IO:220h IRQ:5 DMA0:1 DMA1:0 MPU401:330h
Joystick IO:201h
ESSVOL.EXE allows you to change from the default volume settings of your mixer under DOS. Note that some programs have their own mixers that will override settings previously set by ESSVOL.EXE. Type essvol at the DOS prompt and the current AudioDrive settings will be displayed from 0 (the lowest) to 15 (the highest) for each source. To change the setting for a source, type essvol, switch, the source letter code, colon, and the new setting. For example, essvol /W:12 will set the wave volume level to twelve. Following is a list of the letter codes for each source.
V master volume C CD audio volume
L line volume S Synthesizer volume
W wave volume A AuxB volume
M mic volume
Type essvol /? to see a list of commands.
The AudioRack allows you to take advantage of your computer's audio capabilities with the convenience of the controls all being in one place. You can play audio CDs, wave files (in .WAV and .AUD formats), and MIDI files. With the multi-source mixer, you can blend these sources with line in and microphone sources in any way you choose. Then you can record these creations as wave files and edit them with the Audio Recorder.
The AudioRack has five main parts. The Command Center customizes the appearance of the AudioRack. The Digital Audio Player plays and records files in the .WAV or .AUD formats. With the Compact Disk Player, you can play audio CDs on a CD-ROM drive. MIDI files can be played with the MIDI Player. Finally the Mixer controls the volume and recording level of these various devices.
To start the AudioRack, double click the AudioRack icon in the AudioRack group.
![]()
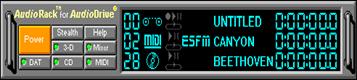
This will open the AudioRack window displaying all five parts of the AudioRack.
Note: If you don't have a CD-ROM drive or the MCI CD audio driver is not installed, the CD Player portion of the AudioRack will not be displayed.
The Command Center controls which parts of the AudioRack are displayed. You can display or hide any part of the AudioRack you choose, customizing its appearance to suit your needs or desires. It also provides access to the On-line Help.
![]()
![]() displays or hides the Digital Audio Player.
displays or hides the Digital Audio Player.
![]() displays or
hides the MIDI Player.
displays or
hides the MIDI Player.
![]() displays or hides the Compact Disk Player.
displays or hides the Compact Disk Player.
![]() displays or hides the Mixer.
displays or hides the Mixer.
![]() accesses the
On-line Help.
accesses the
On-line Help.
![]() closes the AudioRack
window.
closes the AudioRack
window.
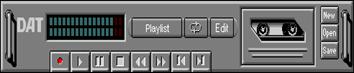
The Digital Audio Player enables you to play, record, and compress sound as .WAV or .AUD files.

![]() starts recording to your hard disk.
starts recording to your hard disk.
![]() plays the wave file currently loaded.
plays the wave file currently loaded.
![]() activates or deactivates the Pause.
activates or deactivates the Pause.
![]() stops
the file currently playing.
stops
the file currently playing.
![]()
![]() goes
back/forward one second in the wave file.
goes
back/forward one second in the wave file.
![]()
![]() goes to the
beginning/end of the wave file.
goes to the
beginning/end of the wave file.
![]() enables the
Auto Repeat.
enables the
Auto Repeat.
![]() opens the
Audio Recorder window.
opens the
Audio Recorder window.
![]() makes a new
audio file.
makes a new
audio file.
![]()
![]() opens/save an
audio file.
opens/save an
audio file.
![]() The Level Meter displays the output from the left (top)
and right (bottom) channels when a wave file is played.
The Level Meter displays the output from the left (top)
and right (bottom) channels when a wave file is played.
![]() The time index shows how many hours, minutes, seconds and tenths of
seconds you are into a wave file. It also displays when Play, Pause, and Auto
Repeat are activated.
The time index shows how many hours, minutes, seconds and tenths of
seconds you are into a wave file. It also displays when Play, Pause, and Auto
Repeat are activated.
![]()
![]()
![]()
By clicking on the image of the tape deck you can display information about the file currently loaded in the Digital Audio Player. The display will tell you the file name, size, number of bits per sample, sample rate, and whether the file was recorded in stereo or mono. Click again to return to the image of the tape deck.
The MIDI Player enables you to play .MID or MIDI files.. Or you can put together a compilation of MIDI files, called a playlist, and play them back in any order you choose.

![]() plays the MIDI file currently loaded.
plays the MIDI file currently loaded.
![]() activates or deactivates the Pause.
activates or deactivates the Pause.
![]() stops the file currently playing.
stops the file currently playing.
![]()
![]() goes
back\forward one second in the MIDI file.
goes
back\forward one second in the MIDI file.
![]()
![]() goes
back\forward one file in the playlist.
goes
back\forward one file in the playlist.
![]() enables the Auto
Repeat.
enables the Auto
Repeat.
![]() opens the Set Playlist
window.
opens the Set Playlist
window.
![]() The Time Index shows hours, minutes, seconds, and tenths of seconds. It
also has indicator lights to show when Play, Pause, and Auto Repeat are active.
The Time Index shows hours, minutes, seconds, and tenths of seconds. It
also has indicator lights to show when Play, Pause, and Auto Repeat are active.
![]() This readout shows which
file is currently selected in the playlist.
This readout shows which
file is currently selected in the playlist.
![]() To the left of the Time
Index is a 16 channel level meter. It shows the output level for each of the
active MIDI channels when a file is being played.
To the left of the Time
Index is a 16 channel level meter. It shows the output level for each of the
active MIDI channels when a file is being played.
![]()
![]()
![]()
By clicking on the picture of the floppy drive, you can display the name and length of the current MIDI file in the playlist. Click again to return to the picture of the floppy drive.
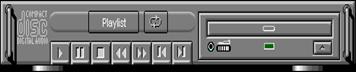
If you have a CD-ROM drive, you can play audio CDs. Check your hardware manual about hooking up CD audio. Also be sure to install the MCI CD Audio driver from Control Panel in Windows.

![]() plays the
current track in the playlist.
plays the
current track in the playlist.
![]() activates or
deactivates the Pause.
activates or
deactivates the Pause.
![]() stops the track
currently playing.
stops the track
currently playing.
![]()
![]() goes back\forward
five seconds in the current track.
goes back\forward
five seconds in the current track.
![]()
![]() goes back
\forward one track in the playlist.
goes back
\forward one track in the playlist.
![]() enables or disables
the Auto Repeat.
enables or disables
the Auto Repeat.
![]() opens the Set
Playlist window.
opens the Set
Playlist window.
![]() ejects the CD
from the CD-ROM drive.
ejects the CD
from the CD-ROM drive.
![]() This readout shows which
track is currently selected in the playlist.
This readout shows which
track is currently selected in the playlist.
![]() The Time Index shows hours, minutes, seconds, and tenths of seconds. It
also has indicator lights to show when Play, Pause, and Auto Repeat are active.
The Time Index shows hours, minutes, seconds, and tenths of seconds. It
also has indicator lights to show when Play, Pause, and Auto Repeat are active.
![]() This light blinks when the CD-ROM drive is playing a CD.
This light blinks when the CD-ROM drive is playing a CD.
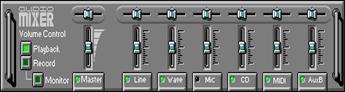
The Mixer is really two devices in one, Volume Control and Recording Control. Volume Control controls the volume output and balance to your speakers. Recording Control controls the volume input and balance to Digital Audio Player.

Line: sound from an audio device outside your computer, hooked up to the Line In jack.
Wave: sound from the Digital Audio Player.
Mic: sound from a microphone hooked up to the Mic jack.
CD: sound from the Compact Disk Player.
Synth: sound from the MIDI Player.
AuxB: sound from the MPU-401 port.(i.e.Wavetable).
Master: controls the volume of all the channels mixed together before it goes to your speakers or the recorder.
|
|
The balance knob adjusts the stereo balance of the selected audio source. Click to the left of the knob to shift the sound output one step towards the left channel, and click to the right of the knob to shift the sound output towards the right channel.
|
|
Volume slider adjusts the volume of selected audio source. Slide the slider up to increase the volume and slide it down to decrease the volume.
Note: each source has a mute button with the name of source on it. Click on the button with the mouse to toggle the mute on and off. When the green light is off, no sound will come out of that channel.
|
|
Record-Monitor button enables you to hear what your recording will sound like as you record it.
The Audio Recorder
The Audio Recorder enables you to record, compress, store and playback voice, music, and other sound. It provides settings for sound attributes such as mono/stereo, compression level, and sampling rate. You can use it to embed sound objects in documents created in applications that support object linking and embedding (OLE).
The Audio Recorder's record, edit and playback capabilities are compatible with the Windows Sound Recorder and other recorders that record and playback in the PCM format.
The Audio Recorder can record to and playback from both .WAV and .AUD formats. .WAV is the Microsoft Windows 3.1 audio file format. The .AUD format uses ESPCM/ADPCM compression to produce an audio file. The Audio Recorder provides a choice of linear PCM, ADPCM and low, medium and high ESPCM compression.
To start the Audio Recorder, open the Audio Applications program group and double-click the Audio Recorder icon.
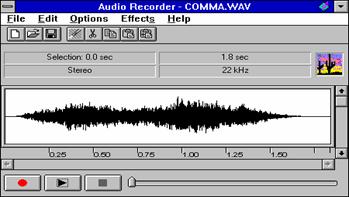
The Audio Recorder window appears:
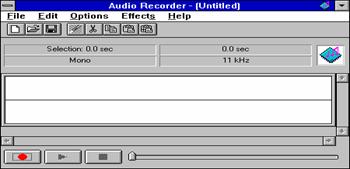
The Audio Recorder can receive input through the Recording Control from a microphone, a CD-ROM drive, a music synthesizer, or a number of other sources depending on the capabilities of your hardware.
Areas under the button bar show the length of a selected part of the current audio file, the total time, mono or stereo, and the sampling rate in kilohertz.
The large area in the center of the window shows the waveform of the current audio file. Note that waveform of files in ESPCM or ADPCM format (.AUD) cannot be displayed. The display will be blank.
The buttons at the bottom of the Audio Recorder window enable you to start and stop recording and playback.
![]()
![]()
![]()
RECORD PLAY STOP
New begins a new audio file. The Audio Recorder starts with a new file.
Open enables you to load an existing audio file.
Save stores the current audio file to disk under its existing file name.
Save As enables you to change the name of the audio file before saving it. Choosing this command displays the Save As Sound File dialog box.
Revert restores the previously saved version of the current audio file.
Properties displays the Properties dialog box, from which you can see and change properties of the current audio file.
Exit closes the Audio Recorder window.
Undo reverses the last change you made to the current audio file.
Cut removes the selected audio portion and stores it on the Clipboard.
Copy copies the selected audio portion to the Clipboard without removing it.
Paste inserts the Clipboard audio at the cursor, pushing other material ahead or replacing selected material with the Clipboard audio.
Paste Mix mixes the Clipboard audio with the audio beginning at the cursor.
Delete removes the selected portion of the recording. To recover a deleted sound, use the Undo command immediately after using Delete.
Mute silences the selected portion of the audio file, reducing the amplitude of that portion of the waveform to zero. To recover a muted sound, use Undo immediately after using Mute.
Select All select the entire recording.
Zoom In displays a smaller unit of time.
Zoom Out displays a larger unit of time.
Insert File displays the Insert File dialog box. From here you select an audio file to be inserted into the current file at the cursor. If audio is selected, the inserted audio file replaces the selected audio. The inserted file will take on the properites of the host file.
Mix with File displays the Mix with File dialog box. From here you selectan audio file to be mixed with the current file, beginning at the cursor.
Options menu commands enable you to display the Volume Control, Recording Control, and Mixer windows.
Auto Repeat will repeat the file endlessly when play is pushed.
Volume Control launches the Volume Control program.
Recording Control launches the Recording Control program.
Mixer launches the Mixer program.
Always On Top displays the Audio Recorder on top of other windows.
The Audio Recorder's Effects commands change the waveform of the audio you have selected. If there is no selection, the entire file is affected. To change the audio back to what it was before you used an Effects command, choose Undo from the Edit menu before using any other command.
Normalize amplifies the selected audio to the maximum volume possible without distortion.
Volume increases or decreases the amplitude of the selected audio by 25%.
Speed changes the selected audio to be 100% faster or slower.
Fade causes the selected audio to Fade In from silence to its highest amplitude, or Fade Out from its highest amplitude to silence.
Echo displays the Echo Rate dialog box. From here you set the echo delay and echo volume for the selected audio.
Reverse flips the selected audio backwards, so the end becomes the beginning and the beginning becomes the end.
For your convenience, eight often-used menu commands are also available as toolbar buttons at the top of the Audio Recorder window. Here is the meaning of each button:
![]()
![]()
![]()
![]()
New Open Save Undo
![]()
![]()
![]()
![]()
Cut Copy Paste Paste Mix
1. Select New from the File menu.In the Sound Attributes dialog box, choose settings for Sampling Rate, Stereo (on or off), and Format, then click the OK button.
Choose one of the PCM (uncompressed) formats if you want the highest sound quality, or if you wish to edit or modify the recording with Effects commands before you save it.
Choose one of the ESPCM or ADPCM compression formats if you wish to save disk space and don't mind sacrificing some sound quality.
2. In the Audio Recorder window, click the Record button. Speak into the microphone or turn on whatever audio device(s) you are recording from. You can use the Recording Control window to regulate the mix of audio from several sources. To display this window, choose Recording Control from the Options menu. If you do not open the Recording Control window, the Audio Recorder uses the source settings previously in effect. See the Recording Control section for more information.
3. Click the Stop button to end the recording.
4. Select Save As from the File menu. The Save As dialog box appears:
5. In the Save As dialog box:
If the file is uncompressed and you wish to save it uncompressed,do not click the Options button. Just choose a directory location,enter a name for the audio file, then click the OK button to save it.The extension for an uncompressed audio file is .WAV.
If the file is uncompressed and you wish to compress it, click the Options button and select the compression you want, then click the OK button. The extension for a compressed audio file is .AUD.
At this point you also have the option of giving the file the Read Only attribute. This prevents the accidental recording over of a file at a later date.
1. Load an audio file into the Audio Recorder. It can be a recording you have made, or use the Open command (File menu) to load a file stored on disk.
2. Click the Audio Recorder's Play button to hear the audio file. The file will play to the end unless you interrupt it by pressing the Stop button.
The Audio Recorder's waveform display provides a graphic representation of the audio file currently in memory. You control the display with the vertical and horizontal scroll bars.
To zoom in on (or magnify) the waveform, move the vertical scroll button down. To zoom out, move the vertical scroll button up.
To see more of the waveform ahead or behind the part currently displayed, click the right or left area of the horizontal scroll bar.
To mark a portion of the audio file for playback, use the mouse to select that portion in the waveform display by clicking at the beginning of the desired section, dragging the mouse while holding down the mouse button, and releasing the mouse button at the end of the desired section. Then choose Play to hear the selected section.
To deselect a selected portion of the waveform, click anywhere in the waveform display.
To select the entire file, double-click anywhere in the waveform display.
To regulate the playback sound level or stereo balance, choose Volume Control from the Options menu. The Volume Control window appears. See the Volume Control Section for more information.
To play the current audio file together with other sound sources, choose Mixer from the Options menu. The Mixer window appears. See the Mixer section for more information.
Use the Open command (File menu) to load an audio file from disk to the Audio Recorder. You can also edit a file you just recorded.
1. With the mouse, select the portion of the audio data to be deleted.
2. Press the Del key, or choose the Delete command. The selected audio disappears, joining the audio before and after it. If you wish to save the deleted section, use the Cut command instead of Delete.
To restore a deleted audio section, choose the Undo command before making any other changes to the audio file.
1. Select the waveform of the audio to be muted.
2. Choose Mute from the Edit menu. The selected audio is silenced; it is reduced to a flat line.
To restore a muted audio section, choose the Undo command before making any other changes to the audio file.
1. Select the portion of the audio data to be moved or copied.
2. Click the Cut button to erase the selected audio and place it on the Clipboard, or click the Copy button to leave the selected audio as is while copying it to the Clipboard.
3. Place the cursor where you want the Clipboard material to appear and click the Paste button.
1. Place the cursor at the end of the waveform display, or play the file to the end.
2. With input source(s) ready, click the Record button to record new material. Click the Stop button to finish.
3. Use the mouse to select the section just recorded, then click the Cut or Copy button to put that audio section onto the Clipboard.
1. Place the cursor at the point in the waveform display where you want to insert audio from the Clipboard.
2. Click the Paste button. The Clipboard audio waveform appears at the cursor. No audio is erased.
1. Use the mouse to select the waveform of the audio to be replaced.
2. Click the Paste button. The Clipboard audio appears in place of the selected audio.
1. Place the cursor at the beginning of the audio to be mixed, or select a section of audio to be mixed.
2. Click the Paste Mix button. The Clipboard audio is combined with the audio after the cursor. If a section of audio was selected, the Clipboard audio is combined with the selected audio until the end of either the Clipboard or the selected audio.
1. Place the cursor at the point in the waveform display where you want to insert an audio file, or select the audio you want to replace with an audio file.
2. From the Edit menu, choose Insert File to display the Insert File dialog box. Then choose an audio file to insert into the current file. If audio is selected, the inserted audio file replaces the selected audio.
1. Place the cursor at the beginning of the audio to be mixed.
2. From the Edit menu, choose Mix with File to display the Mix With File dialog box. Then choose an audio file to combine with the current file, beginning at the cursor.
The Effects commands are described in the section above on Audio Recorder Menu Commands--Effects Menu. These commands alter the audio you have selected. If there is no selection, the entire file is affected. The commands are:
Normalize : highest amplitude possible Fade : In or Out
Volume : Increase or Decrease Echo : delay and intensity can be set
Speed : Faster or Slower Reverse : reverses time axis of the recording
The Audio Recorder's drag and drop feature enables you to embed audio files in documents.
1. Open a document in the appropriate Windows application.
2. Load an audio file from disk to the Audio Recorder, or use an audio file you just recorded.
3. Move the cursor to the icon at the top right of the Audio Recorder. The cursor changes into a hand. Hold the mouse button and drag the icon to the document window, then release the button at the place you want the audio icon to appear.
4. To play an audio object in a document, double-click its icon.
You can also add audio to a document from the document's application. Place the cursor where you want the audio icon to appear, choose the application's command for inserting an object, then select Audio Recorder in the list box. Refer to the OLE section of Windows User Guide for more information.
An audio file contains more than audio data. You can attach a title, description, and an icon to an audio file. To do so, choose Properties from the File menu. The Properties dialog box appears.
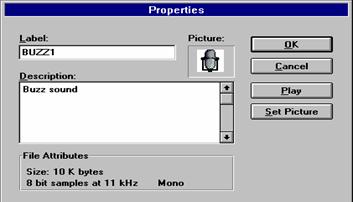
In this dialog box, you can place the cursor in the Label or Description area to add or change the label or description for the audio file.
Click the Play button to hear the audio file.
The Audio Recorder assigns a default picture of the AudioDrive logo to each audio file. To select your own icon for a given sound file, click the Set Picture button.
In the Setup Picture Window, select the picture to appear with the audio file. It can be any graphic contained in a (.BMP or .DIB), wave (.WAV), icon (.ICO), executable (.EXE) or library (.DLL) file.
The picture you select will appear in the Audio Recorder. It will also appear in any document in which you embed the audio file.
When you are finished, click the OK button.
The Spatializer Control
The Spatializer Control enables you to enjoy the spatializer 3D Sound effect.
To start the Spatializer Control, double click the Spatializer icon in the AudioRack group.

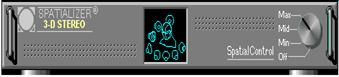
The Spatializer Control window appears:
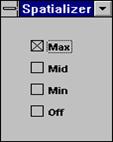
The Spatializer check box is used to change 3D Sound effect strength level. There is four level: Off means no 3D Sound effect), Min (means the least 3D Sound effect), Mid (means more 3D Sound effect), Max (means the most 3D Sound effect). It is very easy to change the setting, clicking on the check box (you will see a X in the check box) will make the changing.
The AudioRack32 allows you to take advantage of your computer's audio capabilities with the convenience of the controls all being in one place. You can play audio CDs, wave files (in .WAV and .AUD formats), and MIDI files. With the multi-source mixer, you can blend these sources with line in and microphone sources in any way you choose. Then you can record these creations as wave files and edit them with the Audio Recorder.
The AudioRack32 has six main parts.:
The Command Center: customizes the appearance of the AudioRack32
3D Controller: adds 3D control to the AudioRack32
Digital Audio Player: plays and records files in the .WAV formats
Compact Disk Player: enables you to play audio CDs on a CD-ROM drive
MIDI Player: enables you to play MIDI files.
Audio Mixer:controls the volume and recording level of these various devices
To run the application program of the AudioRack32, click the option that you want
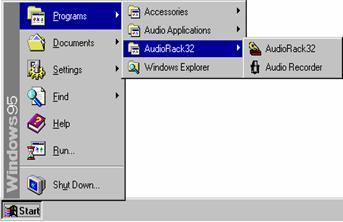
The Command Center controls which parts of the AudioRack32 are displayed. You can display or hide any part of the AudioRack32 you choose, customizing its appearance to suit your needs or desires. It also provides access to the On-line Help.
![]() enables the Miniature mode, minimizing the AudioRack32
display..
enables the Miniature mode, minimizing the AudioRack32
display..
![]() displays or
hides the 3-D controller.
displays or
hides the 3-D controller.
![]() displays or hides the Digital Audio Player.
displays or hides the Digital Audio Player.
![]() displays or
hides the MIDI Player.
displays or
hides the MIDI Player.
![]() displays or
hides the Compact Disk Player.
displays or
hides the Compact Disk Player.
![]() displays or
hides the Mixer.
displays or
hides the Mixer.
![]() accesses the
On-line Help.
accesses the
On-line Help.
![]() closes the AudioRack32
window.
closes the AudioRack32
window.
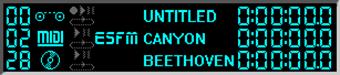
counter icon state file name time index
Counter: shows you which track or file in the playlist is playing.
Component Icon: is displayed when the associated component is shown and is not displayed when the component is hidden.
Transport State Indication: shows the state of a component. It indicates when the component is playing, pause, has the Auto Repeat enabled, or in the case of the Digital Audio Player, in recording.
Track or File Name Display: shows the name of the current track or file in the playlist.
Time Index: display the amount of time elapsed for the track or file in hours, minutes, second, and tenths of a second.
The Command Center has an indicator to show when you are listening to ESFM . When the ESFM light is lit in the MIDI Player's row, the MIDI Player is using ESFM synthesis.
The miniature mode is designed to give you full control of the AudioRack32 while using minimum of space. You are able to effectively use the AudioRack32 and still have enough room on your desktop to run other applications. In the miniature mode, you can play, pause, stop, and control the master volume of the AudioRack32.
![]()
![]() stops currently
playing tracks or files of active components.
stops currently
playing tracks or files of active components.
![]() plays currently
loaded tracks or files of active components.
plays currently
loaded tracks or files of active components.
![]() pauses currently
playing tracks or files of active components
pauses currently
playing tracks or files of active components
![]() calls a popup
menu to restore the AudioRack32, select or deselect
active components, or invoke the Always On Top command.
calls a popup
menu to restore the AudioRack32, select or deselect
active components, or invoke the Always On Top command.
![]() controls the
master volume.
controls the
master volume.
The spatial Control allows you to give your computer ambient 3-D stereo sound.
|
|
Controls the amount of spatialization from off to minimum level to mid level to maximum level.
|
|
Shows the amount of spatialization by the number of speakers that are illuminated. The two speakers at the lower left are illuminated at all times. If you set the Spatial Control to min, the next set of speaker will blink and so on until with max, all speakers are blinking
The Digital Audio Player enables you to play, record, and compress sound as .WAV or .AUD files.
![]() starts recording to your hard disk.
starts recording to your hard disk.
![]() plays the wave file currently loaded.
plays the wave file currently loaded.
![]() activates or deactivates the Pause.
activates or deactivates the Pause.
![]() stops the file currently playing.
stops the file currently playing.
![]()
![]() goes
back/forward one second in the wave file.
goes
back/forward one second in the wave file.
![]()
![]() goes to the
beginning/end of the wave file.
goes to the
beginning/end of the wave file.
![]() enables the Auto
Repeat.
enables the Auto
Repeat.
![]() opens the Audio
Recorder window.
opens the Audio
Recorder window.
![]() makes a new
audio file.
makes a new
audio file.
![]()
![]() opens/save an
audio file.
opens/save an
audio file.
![]() The Level
Meter displays the output from the left (top) and right (bottom) channels when
a wave file is played.
The Level
Meter displays the output from the left (top) and right (bottom) channels when
a wave file is played.
![]()
![]()
![]()
By clicking on the image of the tape deck you can display information about the file currently loaded in the Digital Audio Player. The display will tell you the file name, size, number of bits per sample, sample rate, and whether the file was recorded in stereo or mono. Click again to return to the image of the tape deck.
The MIDI Player enables you to play .MID or MIDI files.. Or you can put together a compilation of MIDI files, called a playlist, and play them back in any order you choose.

![]() plays the MIDI file currently loaded.
plays the MIDI file currently loaded.
![]() activates or deactivates the Pause.
activates or deactivates the Pause.
![]() stops the file currently playing.
stops the file currently playing.
![]()
![]() goes
back\forward one second in the MIDI file.
goes
back\forward one second in the MIDI file.
![]()
![]() goes
back\forward one file in the playlist.
goes
back\forward one file in the playlist.
![]() enables the Auto
Repeat.
enables the Auto
Repeat.
![]() opens the Set Playlist
window.
opens the Set Playlist
window.
![]()
![]()
![]()
By clicking on the picture of the floppy drive, you can display the name and length of the current MIDI file in the playlist. Click again to return to the picture of the floppy drive.
If you have a CD-ROM drive, you can play audio CDs. Check your hardware manual about hooking up CD audio. Also be sure to install the MCI CD Audio driver from Control Panel in Windows.
![]() plays the
current track in the playlist.
plays the
current track in the playlist.
![]() activates or
deactivates the Pause.
activates or
deactivates the Pause.
![]() stops the track
currently playing.
stops the track
currently playing.
![]()
![]() goes back\forward
five seconds in the current track.
goes back\forward
five seconds in the current track.
![]()
![]() goes back
\forward one track in the playlist.
goes back
\forward one track in the playlist.
![]() enables or
disables the Auto Repeat.
enables or
disables the Auto Repeat.
![]() opens the Set
Playlist window.
opens the Set
Playlist window.
![]() ejects the CD
from the CD-ROM drive.
ejects the CD
from the CD-ROM drive.
The Mixer is really two devices in one, Volume Control and Recording Control. Volume Control controls the volume output and balance to your speakers. Recording Control controls the volume input and balance to Digital Audio Player.
Line: sound from an audio device outside your computer, hooked up to the Line In jack.
Wave: sound from the Digital Audio Player.
Mic: sound from a microphone hooked up to the Mic jack.
CD: sound from the Compact Disk Player.
Synth: sound from the MIDI Player.
AuxB: sound from the MPU-401 port.( i.e.Wavetable).
Master: controls the volume of all the channels mixed together before it goes to your speakers or the recorder.
|
|
The balance knob adjusts the stereo balance of the selected audio source. Click to the left of the knob to shift the sound output one step towards the left channel, and click to the right of the knob to shift the sound output towards the right channel.
|
|
Volume slider adjusts the volume of selected audio source. Slide the slider up to increase the volume and slide it down to decrease the volume.
Note: each source has a mute button with the name of source on it. Click on the button with the mouse to toggle the mute on and off. When the green light is off, no sound will come out of that channel.
|
|
Record-Monitor button enables you to hear what your recording will sound like as you record it.
Application Hints for AUDIO RACK 32 (Win 95)
If the Knob of the Spatializer Control is clicked ON (set to MAX.) and OFF repeatedly, the AUDIO RACK 32 software may reduce the sound volume level. In this case, simply click the "MASTER" icon in the MIXER section to restore the sound volume to the normal level.
Introduction.......... ..... ...... .......... ..... ...... ......................
Features.......... ..... ...... .......... ..... ...... .......... ..... ...... ...
Installation of the Card.......... ..... ...... ..........................
Introduction.......... ..... ...... .......... ..... ...... ......................
System Requirements.......... ..... ...... .......... ..... ...... ......
To install the MF-1869.......... ..... ...... .......... ..... ...... .....
Connecting Devices to MF-1869.......... ..... ...... ...................
Utilities & Driver Installation using Windows 3.1
Windows 3.1 Driver Installation.......... ..... ...... ...........
Windows 3.1 Utilities Installation.......... ..... ...... .......
Driver & Utilities Installation using Windows 95.
Windows 95 Driver Installation.......... ..... ...... ............
Windows 95 Utilities Installation.......... ..... ...... ........
Modify MF-1869 Configuration using DOS Utility......
ESSCFG.EXE.......... ..... ...... .......... ..... ...... .......... ..... ...... .
ESSVOL.EXE.......... ..... ...... .......... ..... ...... .......... ..... ......
The AudioRack Introduction.......... ..... ...... ....................
Starting the AudioRack.......... ..... ...... .......... ..... ......
The Command Center.......... ..... ...... .......... ..... ...... ....
The Digital Audio Player.......... ..... ...... ...........................
The MIDI Player.......... ..... ...... .......... ..... ...... ..................
The Compact Disk Player.......... ..... ...... ...........................
The Mixer.......... ..... ...... .......... ..... ...... .......... ..... ......
The Audio Recorder.......... ..... ...... .......... ..... ...... ......
Starting the Audio Recorder.......... ..... ...... .................
Audio Recorder Menu Commands.......... ..... ...... ........
Making a Recording.......... ..... ...... .......... ..... ...... .......
Playing an Audio File.......... ..... ...... .......... ..... ...... ....
Using the Waveform Display.......... ..... ...... ...................
Opening the Volume Control and Mixer.........................
Changing the Waveform with Effects Commands..
Adding Sound to a Document: Drag and Drop............
Changing an Audio File's Properties.......... ..... ...... ...
The Spatializer Control.......... ..... ...... .........................
Starting the Spatializer Control.......... ..... ...... ......
The AudioRack32 Introduction.......... ..... ...... ..............
Starting the AudioRack.......... ..... ...... .............................
The Command Center.......... ..... ...... .......... ..... ...... ....
The Miniature mode.......... ..... ...... .......... ..... ...... .......
3D Controller.......... ..... ...... .......... ..... ...... ....................
The Digital Audio Player.......... ..... ...... ...........................
The MIDI Player.......... ..... ...... .......... ..... ...... ..................
The Compact Disk Player.......... ..... ...... ...........................
The Mixer.......... ..... ...... .......... ..... ...... .......... ..... ......
User's Guide
for
MF-1869
Plug and Play
3D Sound
December, 1997
|

