
MIND-iPhonEX
Eclipse IDE Manual
November 30, 2003
MIND-iPhonEX
Eclipse Manual
November 30, 2003
MIND CTI Ltd. shall bear no responsibility or liability to a client or to other person or entity with respect to liability, loss or damage caused or alleged to be caused directly or indirectly by MIND-iPhonEX®. This includes but is not limited to any interruption of service, loss of business or anticipatory profits or consequential damage resulting from the use or operation of MIND-iPhonEX®.
Information in this document is subject to change without notice. Companies, names, and data used in examples herein are fictitious unless otherwise noted. No part of this document maybe reproduced or transmitted in any form or by any means, electronic or mechanical, for any purpose without the express written permission of MIND CTI Ltd.
Windows, as used in this manual, shall refer to the Microsoft implementation of a Windows system.
Rev 01
PN - IPX50040-COM
2002 MIND CTI Ltd. All rights Reserved.
Document Modification Track Changes
|
Author |
Version |
Date |
Comments |
|
Yoni Roit |
1.0 |
30/11/03 | |
Installation and Projects
How to install Eclipse
How Eclipse works with projects
How to start Eclipse
How to edit Eclipse preferences
How to tell Eclipse which JDKs you will be using
How to create a new project
Standart views and perspectives
What is a view?
What is a perspective?
Package Explorer
Outline
Navigating
Open a Java file editor
Fast switching between windows, views and perspectives
Opening another Eclipse window.
Open function/variable/class declaration
History - back/forward buttons
Open function implementation
Open super implementation
Bookmarks
Key configurations
Writing code
How to remove read-only property from a file
Code completion & errors
Source changes
Refactoring
Type hierarchy
Local history
Call hierarchy
Search usages
Compiling and running
Build and Rebuild
Compilation errors
Run configurations
Debug
Keyboard shortcuts
Threads view
Breakpoints
Variables and Expressions views
Display view

Advanced
How to start Eclipse in different workspace
How to use another internal JDK
Color configuration
Code templates
What are Folder links
Alternative project structures
JAR Wizard
Plugins
JAD support
Jalopy plugin
Profiler
External tools
Tomcat project (Java API)
Extract the following file to an arbitrary directory of your choice:
K:\Dev Soft\Eclipse 2.1\eclipse-SDK-2.1.2-win32.zip
In general, Eclipse has a very tight project structure.
At the top of it all, there is a Workspace directory. Here, all your projects must be stored.
Since most of us use the same sources structure we can assume that:
JW - is a Workspace directory. The workspace files will be located there
jw/mb* - project directory. We will use each source version as a project, so there will be one project for MB50, one for MB521, etc
Sources - located under MB*, starting with com
To sum up, here is how your directory structure must look like, in order to start working with Eclipse.

eclipse.exe -data d:\jw
-data option specifies where is your workspace folder located. Read more about it in "advanced" section of the document.
Eclipse has the IDE preferences stored under Windows->Preferences menu. It is highly recommended to take a close look at the preferences before you start working. In addition, you may want to import a configuration file which has most features (keyboard shortcuts, build options) set up like we're used to.
The file's name is eclipse-workspace-settings.epl and it is located under Eclipse root. To import settings, open preferences window and click an 'Import' button at the bottom of the dialog.
File->New->Project
Java->Java Project
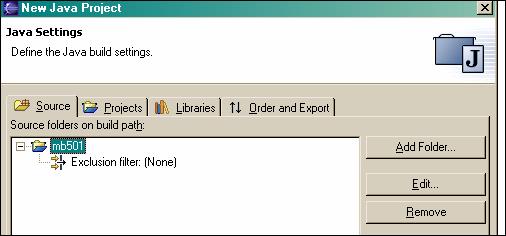
Project name must be the same as a name of the source directory. If you are creating a project for mb53, it will be mb501. Click Next.
Eclipse will automatically discover all the sources. If you want your project to contain only specific packages (for example, only common, utils and mediation), you can filter out the unwanted folders using the "Exclusion filter".
Select Exclusion filter, click Edit, then Add multiple. Multi-select the unneeded packages
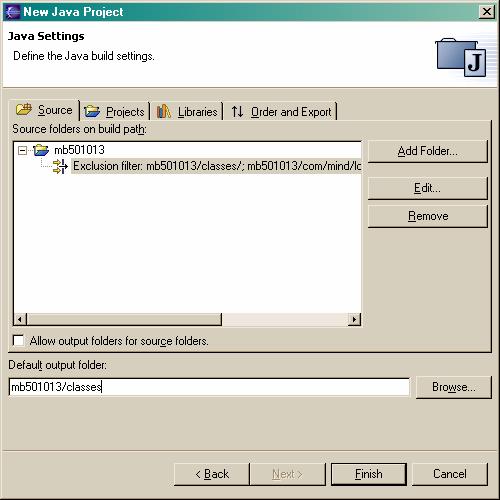
Default output folder is where the class files will be located
Open Libraries tab. By clicking "Add External JARs" specify all the jars we need for our source to compile.
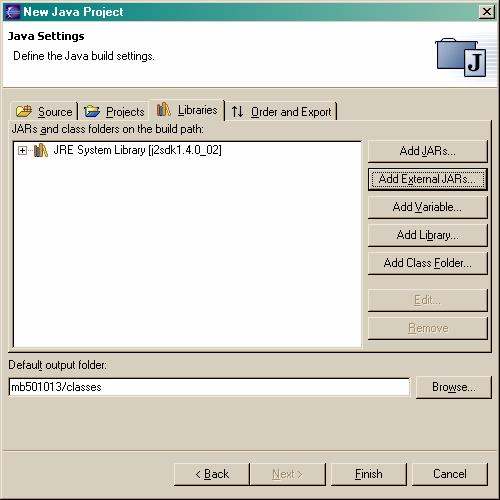
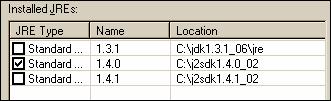
By double clicking the "JRE system library" you can choose JRE for your project
By now, the project is ready. You will want to create projects for other versions. All of them will be located in the same workspace. Since many operations that eclipse does are workspace-related, it is highly recommended to close projects that you aren't using at a moment (right click on the project, Close, or Project menu->Close)
View, simply, is a window with some kind of information about your source. When you start Eclipse for the first time, you see several views:
Text editor
Package explorer (tree-like navigator which shows your workspace with all the projects and file structure)
Outline - information about a class which is currently opened in text editor
These are few of all the views that exist in Eclipse. For the list of all views available, use Window->Show View menu.
Perspective is a logical way to group all the views you need for different working modes. For example, when you're writing code, you don't need to see views with threads, evaluations, expressions, watches and other debugging stuff. On the other hand, when you're debugging you don't want to see views related to editing-only (tasks, compile problems and so on).
Most IDEs switch those windows automatically when you are changing working modes. Eclipse lets you control how your desktop looks like anytime.
So, all the views are grouped by perspectives. Of course, you can always open any view that you want, regardless of the perspective, and you can define and customize everything. Perspectives are just useful defaults.
There are two predefined perspectives that you will use constantly: Java and Debug. They are switched automatically as you are writing code or debugging.
By defult, Java Browsing consists of Package Explorer, Outline, Search, Tasks and Bookmarks. Debug consists of Debug view, Variables, Breakpoints, Expressions, Display and Console.
Package Explorer shows all the projects, packages and files in the workspace. Things to pay attention to:
Pulldown menu opened by a down-arrow in the top of the view
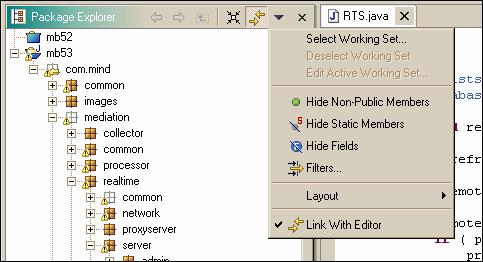
Filters - can show/hide non-java files, libraries and many others. Open it to define what you want to see in package explorer and what you don't.
Layout - packages can be seen in hierarchial way, and can be seen flat.
Link with editor - very useful. If selected, package explorer will automatically locate and select the file which is currently opened in editor.
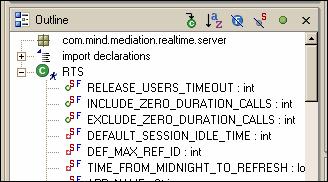
Outline view shows variables, functions and other information about currently opened class.
Pay attention to the filters at the top of the view. They can show or hide static, private, inner classes, fields, or sort contents alphabetically.
These are the most commonly used views. Others will be described along with the actions that they are used for.
Can be done by:
Locating file in Package Explorer
Using "Open Type" function, which allows a fast search-by-name scan of the classes in project. If there are classes with the same name, the list of packages will be shown. The keyboard shorcut for it is Ctrl+Shift+T.
Having too much opened editors is not always comfortable. Eclipse can close recent unused windows as you reach the max editors number, which is defined in Window->Preferences, Workbench->Editors.
To switch between open editors, press and hold Ctrl+F6 (works like Windows Alt-Tab feature)
To switch between open views, press and hold Ctrl+F7
To switch between open perspectives, press and hold Ctrl+F8
More features can be used by displaying a "Switch to editor" window, Ctrl+Shift+W.
Window->New window.
You will have a new clear Eclipse desktop.
Can be done in one of three ways:
Hover over the function, press Ctrl, left click
Right click->Open declaration
Shift+F3
![]()
Navigating history can be browsed using one of the following ways:
Buttons on the main toolbar
![]()
Alt-Left Arrow, Alt-Right Arrow on the keyboard
If you know that the function you're currently in, is overridden in the inherited class, you can quickly jump to its implementation. Cursor on the name of the function, press Ctrl+Shift+I. Or open popup menu, click "open implementation". If there're more than one class which overrides this function, the list of all classes is shown.
If the function you're currently in, overrides a virtual function in superclass, you can quickly jump to it using Alt+Shift+I or popup menu.
Using Alt-B you can add a bookmark. All of the boomarks are displayed in the bottom of the screen, in 'Bookmarks' view. Unfortunately, there is no keyboard shortcut for each specific bookmark, but having this view opened when you're writing code makes scrolling fast enough.
Everything is configurable. For every action, there is a keyboard shortcut. To edit a list of shortcuts, open Window->Preferences, Workbench->Keys. The most frequently used default keys are listed in this document.
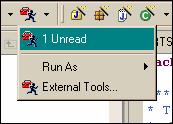
Unread is supplied as an external tool. You can run it from toolbar with "run external tool" button
Another way to remove 'read-only', is to open file properties in package explorer (popup menu), and to uncheck a read-only checkbox.
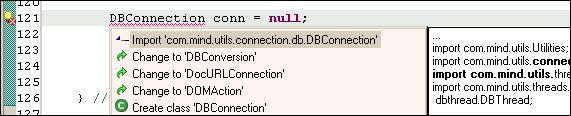
Java errors are displayed as you type. They are shown either by a red underline of the code, and/or by a yellow lamp sign near the erroneous line.
![]()
The errors with the "lamp" near them can be fixed automatically. Clicking on a lamp or just pressing Ctrl+1 on the keyboard will bring up a menu with actions that can be performed to fix the error, along with a preview of what will be done in each case.
What else can be fixed automatically?
Exceptions handling. Create a try-catch block, or add a throws declaration to function header
Implement abstract methods specified in the base class, or turn the current class to abstract
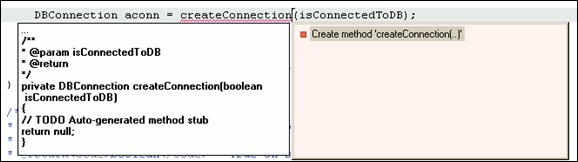
Auto-create function header. If you're use a yet-undefined function in the code, Eclipse can automatically add its declaration and parameters to code
Note: Along with the keyboard shortcuts listed below, all these features are available through the right-click menu->Source.
There are some additional automations that make programmers life easier in many cases. Here is the short list of most useful code-writing features presented in Eclipse.
Override methods. If there're methods you wish to override from a superclass (not only abstract) you can click Ctrl+I for the list of available methods, and auto-create function headers for the selected ones
Comment/uncomment block. Select a block in code, press Ctrl+/ to comment, Ctrl+\ to uncomment. Very fast and useful
Format code. Number of spaces before brackets, word wrapping, new lines and other style-related definitions for your code can be found and changed under Window->Preferences, Java->Code formatter. The new code that you type will be automatically formatted in the defined way. If you want to format the already existing code, select the block and press Ctrl+Shift+F.
Organize imports. Eclipse shows you unused imports (yellow underline). You can either press Ctrl+1 to bring up menu with fixes, or just open popup menu, select Source->Organize imports to remove all the unrelevant stuff.
Generate getter and/or setter for a class variable. Hides a variable as protected and generates a set() and get() functions
Add constructors from superclass.
Add JavaDoc to a function header
Note: All these features are available through the right-click menu->Refactor.
Another level of automation is presented with refactoring features.
Automatic renaming of variables/functions/classes. Eclipse will search for all the usages of an item, in the whole source, preview changes, and rename accordingly,
Moving of files and entire packages from folder to folder. Eclipse will search for usages of an item, in the whole source, preview and move.
Automatic change of method signature in current class and all overriding/super classes.
Move methods from class to super-class, and vice versa.
Extract interface from a class
Replace function usages with inline code
Extract a method from the selected code
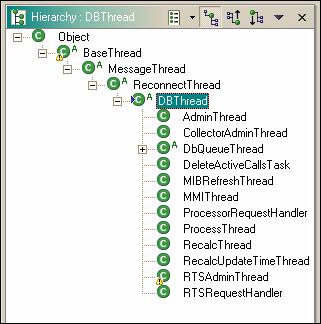
Opening type hierarchy for a class will show all its superclasses and implementing classes. For example, type hierarchy for DBThread will open the following view:
Saves a local file change history on your computer. By defaults, all changes are saved for 7 days. You can compare file and see changes in SourceSafe-like way, using local history popup menu. Very useful in case you've lost/overwritten your source files 5 minutes before the check-in time.
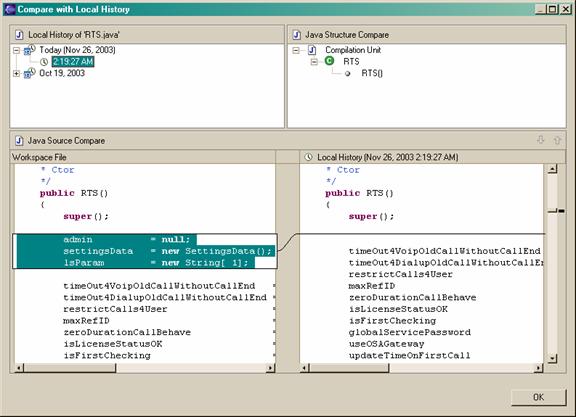
To see a Local History for a specific file, open popup menu in the package explorer, and select a Compare With -> Local History menu.
The view will show you every file change (saving to disk) that was done in the last 7 days.
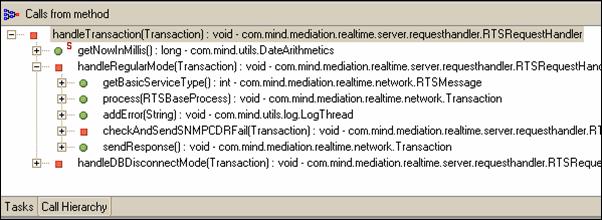
Popup menu->Open call hierarchy.
Opens additional view with hierarchy of all the method calls from the selected function.
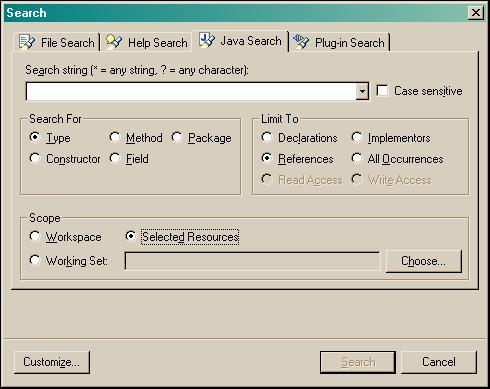
Eclipse allows you to search for usages/references/declarations of any class, variable or function from any place of code. The most frequently-used search is finding references (usages) of type in the whole code. Press Ctrl+G, when a cursor is placing under the type you want to search for. The "Search" view will be opened with a search results.

All the actions below can be done using a rightclick menu->Search.
In addition to searching in the whole workspace, you can
Search in a hierarchy of this class, i.e. only in superclasses and inheriting classes
Search in working sets. Working set is a predefined logical grouping of classes in your project. For example, after selecting 'search in working set', you can define a set which contains only com.mind.common package and use it for searches in "common" only.
In addition to searching references, you can search for declarations of type, implementators (of an interface), read-access and write-access (of variables).
If you wish to perform a more complex search, press Ctrl-H to bring up the advanced dialog.
Note: code must be saved in order for it to apply.
Compilation errors and warnings are displayed in Tasks view. You can use filter to see only errors, only warnings, or errors/warnings related to specific resource. You can use 'Quick fix' menu option to automatically fix errors.
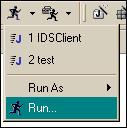
When expanding the Run button menu, you can find a 'Run.' menu option. There you define run configurations.
In the 'Main' tab select the main class for a configuration
In the 'Arguments' tab select the VM/program arguments and working folder
That's it. You're ready to run/debug. The new run configuration is added to a 'Run' button popup menu, as well as to 'Debug' button popup menu.
When pressing Run/Debug button (without the popup menu), the last-used configuration is launched.
Keyboard shortcuts: Run - F11, Debug - Shift+F9
|
Step over |
F8 |
|
Step into |
F7 |
|
Step out of current method |
Shift+F8 |
|
Run to line |
F4 |
|
Resume running |
F9 |
|
Terminate application |
Shift+F2 |
You can see state of each thread in the threads view. You can suspend/resume any thread or any group of threads anytime. For suspended threads, you can see a full stack trace and you can watch/evaluate expressions.
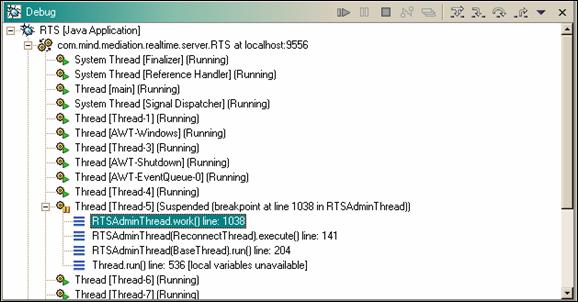
Keyboard shortcut - F5. All breakpoints appear in a breakpoints view. You can open a breakpoint property to specify advanced behaviour definitions
Hit count - counts how many hits we had on the breakpoint
Suspend VM policy - on breakpoint hit, suspend only current thread or the whole VM (all threads). Very useful when debugging a multi-threaded application, and having a breakpoint in a class with more than one thread instances running. For example, if you have 'suspend VM' defined on breakpoint in RTSRequestHandler, the first breakpoint hit will suspend the whole program, and wont cause all the RTSRequestHandlers to fall on this breakpoint.
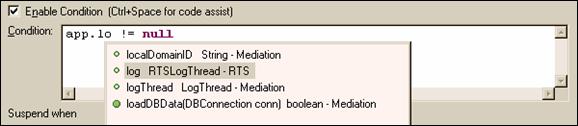
Breakpoint condition. Here you can write code, a Java boolean expression which will enable or disable this breakpoint. Code completion is supported.
Restrict breakpoint to selected threads. Very strong feature. Breakpoint will be enabled only in context of selected threads.
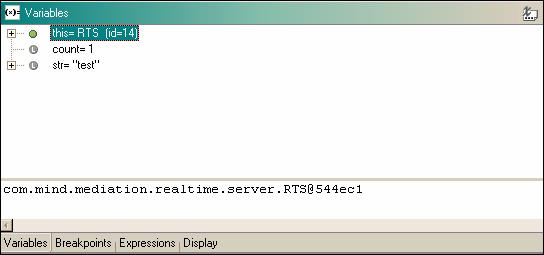
Variables view will show all the variables/classes in current scope, in a hierarchial way.
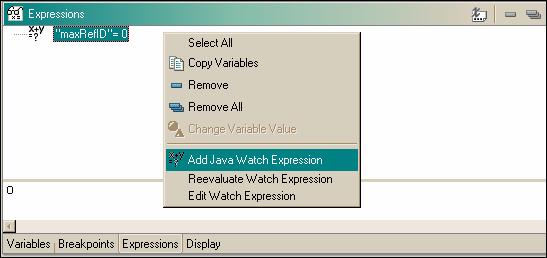
Selecting a code, right-clicking and pressing 'Watch' or 'Inspect' will add this particular variable or function to 'Expressions' view, where you can watch or change value of expressions. To manually add item to watch, right click inside the 'Expressions' view and choose 'Add Java watch expressions'
Display view allows you to write portions of Java code in the middle of your program execution. Everything you write and select to execute (rightclick menu), will affect your program. You can write any Java code in display window, from simple variable assignments, to creating new classes, instances, etc.
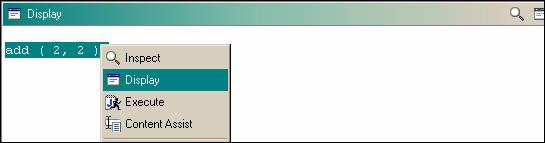
In addition to typing code in the Display window, you can simply select the needed code in your Java editor, open popup menu and select a 'Display' option.
Eclipse.exe -data <workspace-directory>
A new workspace will start with default configurational values, which you don't want, since they have another keyboard shortcuts and unuseful options defined. What you shall do to preserve your previous workspace configuration is to copy the .metadata directory from your previous workspace directory to the new one, before starting Eclipse
Eclipse uses default system JDK as an internal one, as the one which runs Eclipse itself and performs all the automatic code completions/error checking. In some cases you may want to run another JDK as internal.
Eclipse.exe -vm c:\jdk\bin\java.exe
You can supply VM arguments for an internal JDK.
Eclipse.exe -vm c:\jdk\bin\java.exe -vmargs '<arguments>'
Using the arguments list, you can, for example, specify minimum and maximum amount of memory needed to run the Eclipse application.
You can change default Eclipse coloring model in several places, all of them under Window->Preferences
|
Workbench->Appearance |
workbench colors (error text, hyperlinks) |
|
Workbench->Editors->Text editors |
Current line highlight, line number foreground |
|
Java->Editor->Appearance Java->Editor->Syntax Java->Editor->Code Assist Java->Editor->Annotations |
Java editors and syntax highlight |
Code templates can be defined in Workbench->Preferences, Java->Code Templates.
To insert a code template into the code, type its name and press Ctrl-Space for code assist.
Eclipse has a very tight project structure. There is a project root, and all the sources must be under that root directory. In addition, two projects can not share the same project root.
Link can be seen as a virtual directory. You create a folder inside your project root which does not physically exist on a disk, but points to another,existing directory anywhere on the drive.
To create a link, you must open the 'create folder' dialog wherever you want to put it in your project source tree (New->Folder). There, click 'Advanced', check the 'Link to folder in file system' and select the target directory.
Now you will see this folder as usual folder in your source, with only difference that it is located in another directory, not neccesserily under your project root.
The way we defined project until now is having one project for each source version, and filtering all unnecessary packages. Here we will take a look at the ways to have different projects for the same source version.
The problems that we have in these approaches is that all our projects use the same mb*\com.mind.* package structure, but we can not have mb* as a root directory for two different projects.
If you intend to have different projects for the same source version, you should have an empty project and folder links for each source folder you need.
Start Eclipse in another workspace, not d:\jw. The empty project dirs you'll create will be directories under your workspace dir, and you don't want to add garbage to your d:\jw
Create a new project. No sources under project directory
Add links to all the packages that you specifically need (i.e. for common, utils, mediation, etc.)
Now you can add another project with links to the same sources (for example, API project which has links to the same common and utils sources).
That's how the projects share sources.
There is another thing you can do if you don't want to create links every time you define a probject. Projects can import each other. Which means that
You create one project for common, utils and images packages. Call it 'common'.
You create project for mediation only, and in project properties, in 'Import' tab, you specify a 'common' project as imported.
You create an IPE project, which will import a mediation project.
This 'uses' chain can be reused, and is basically another way for project to share sources.
You can export your classes to a JAR file using File->Export menu. After picking 'JAR file' option for a list, you will see the wizard which allows you to select packages, you want to be included in a jar. After clicking 'Next' you will be able to create a manifest file and/or to save JAR description at the workspace (for quicker access next time).
Eclipse is a universal platform, it can include and run any Java code. There are hundreds of plugins for eclipse, in a wide variety of issues. You can find and download them at https://eclipse-plugins.2y.net/eclipse/index.jsp or https://www.eclipse-workbench.com. Installation is easy - just unzip the file into eclipse's plugins directory.
The most useful plugins can be found at \\ryoni\eclipse-plugins, along with their explanation, but you can check out the sites to see what more you can add to your Eclipse.
JADClipse is a plugin which allows automatic decompilation of Java .class files, in case that the source file does not exist. Each time you open filewithout a source (most frequently happens when debugging Java's own classes, java.*), a class file will be automatically decompiled into a source and displayed in regular text editor window. JADClipse is pre-installed, all you have to do is to open preferences, Java>JADClipse and fill out the location of JAD executable. The latest version of JAD installation is located in jadnt168.zip under Eclipse root.
Jalopy is supplied as a plugin to Eclipse.
To install it, just unzip the plugin installation archive (k:\devsoft\Eclipse2.1\plugins\jalopy-eclipse-0.2.6.zip) into your Eclipse plugins directory and restart Eclipse.
To change Jalopy settings, open Window->Jalopy Preferences menu. Here you can define number of braces, white spaces, blank lines and all the other style-related settings for your code. Since we want to work with a standart code-style convention, please import a Jalopy settings file (N:\Jalopy\Mind Coding Conventions.xml), using the Import button in General tab of Jalopy Preferences.
A Java profiler is a plugin, which is included with this installaiton of Eclipse. It allows you to perform full application profiling without a need to use external tools like OptimizeIt or JProbe. To use it, create a run configuration as 'Profiled Java application', and check out the Profiler views (CPU snapshots, heap allocations, etc.). There are another profiler plugins available at the Eclipse site, so if this profiler dissatisfies you, try downloading another one.
Setting up an external is much like creating a run configuration for project. You need to open a 'Run external tool' button on the toolbar (located next to the 'Run' button), and specify the tool path and parameters.
Creating a Tomcat project does not differ from creating a regular one. All you have to do is to include all Tomcat jars in Required Libraries tab. When creating a run configuration for a tomcat project, make sure you have the following parameters specified:
|
Working dir |
<tomcat_root> |
|
Main-class |
org.apache.catalina.startup.Catalina |
|
VM-arguments |
-Dconfig.file.path=<billing_root_dir> |
|
Program-arguments |
start |
|
