All text in FreeHand starts inside a text block. There are two types of text blocks. Standard text blocks have a fixed height and width.
To create a standard text block:
Select the Text tool from the Tools panel
![]()
Drag across the page. How far you drag determines the size of the text block.
Release the mouse button to see the text block and the text ruler
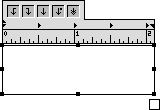
Start typing. The text automatically wraps within the text block.
TIP
If you do not see the text ruler, choose View > Text Rulers.
Auto-expanding text blocks shrink or expand depending on the amount of text.
To create an auto-expanding text block:
Click with the Text tool. A blinking insertion point and a text ruler appear.
Start typing. The text block is set to horizontal auto-expandsion. (See the sidebar on this page for a description of the auto-expansion settings.)
TIP
If your text does wrap within the box, check your Preferences settings for autoexpansion of text blocks (see page 392).
If you deselect the text block before typing in it, you leave an empty text block on the page. These empty blocks contain font information that may confuse your print shop.
To delete empty text blocks:
Choose Xtras > Delete >Empty Text Blocks. All text blocks with no characters in them are automatically deleted.
Standard or Auto-expanding Text BlocksA standard text block is a fixed-size container. As you type, the text wraps from one line to another. The text block fills from the top and automatically wraps to the next line until it reaches the bottom. Auto-expanding text blocks never fill up. If the horizontal control is set to auto-expand, the text block just keeps growing wider. You have to manually type a Return/Enter or Shift-Return/ Enter to start a new line. If the vertical auto-expand feature is selected, the text wraps within the text block, but the height of the text block continues to grow taller and taller. Text blocks set to auto-expand never overflow (see page 224). |
To change the auto-expansion settings:
Select the text block selected.
In the Object inspector, click to change the expansion icons as follows
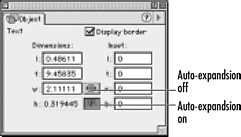
o If the icon is light (the up state), the field is not set for auto-expansion.
o If the icon is dark (the down state), the field is set for auto-expansion as new text is entered.
Change the handles on the right and bottom as follows:
o Double-click a black handle to turn it white. This indicates that autoexpansion is turned on.
o Double-click a white handle to turn it black. This indicates that autoexpandsion is turned off.
To change the size of a standard text block:
Use the Selection tool and drag one of the corner points of the text block
or
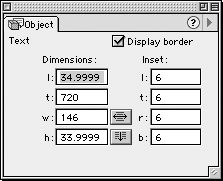
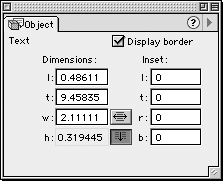
With the text block selected, open the Object inspector. Under Dimensions, change the measurements in the w (width) or h (height) fields
TIP
(Mac) Hold the Control key as you drag horizontally to create a fixed-width text block.
TIP
(Mac) Hold the Control key as you drag vertically to create a fixed-height text block.
To position a text block numerically:
Select the text block.
In the Object inspector set the Dimensions fields as follows:
o l controls the position of the left edge of the text block.
o t controls the position of the top edge of the text block.
Press Return or Enter.
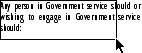
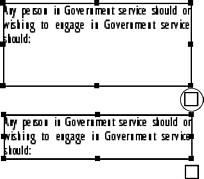
The little square at the bottom of the text block is called the Link box. The different states for the Link box convey important information about the text.
To recognize the status of the Link box:
If the Link box is white, then all the text in the block is visible
A black circle inside the Link box means there is more text than can fit inside the text block . This is called an overflow.
![]()
Small arrows inside the Link box mean the text block has been linked to another object (see page 239)
![]()
Another way to resize a text block is to shrink the block to fit the size of the text.
To automatically shrink a text block:
Select a text block that has extra space not filled by text.
Using the Selection tool, double-click the Link box of the block . The text block automatically shrinks to fit the text.
TIP
If there is no text in a text block, double-clicking the Link box deletes the text block.
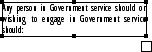
Just as in a page layout program, FreeHand lets you stroke or frame the outside border of a text block.
To apply a border to a text block:
Select the text block that needs a border.
In
the Object inspector, click the Display border
To apply a stroke, choose the Stroke Inspector.
Apply a stroke using any of the stroke styles. The border appears around the text block
Once you have given a text block a border, you will probably want to inset the text to add some white space between the text and the border.
To inset text:
Select the text block.
In the Object inspector set the Inset fields as follows
o l controls inset for the left edge.
o t controls the inset for the top edge.
o r controls the inset for the right edge.
o b controls the inset for the bottom edge.
Press Return/Enter to set the amounts
TIP
Negative values extend the text outside the borders of the block.
|
