3 Devices (2 DVD's and 1 HD) on ONE IDE cable with a drive selector switch (v0.1)
Tutorial written by :
XtraBOX.co.uk Xbox Services
Last edited: August 10, 2003
Erm.., I didn't have a digital camera, so I
took a movie of my Xbox with a camcorder, and took screenshots. You will notice
that I forgot to turn off the date and time on the camcorder - ignore that if
you can!
What is this tutorial?
This tutorial demonstrates how to connect up 3 IDE devices (in this case, the Xbox DVD drive, a Hard Drive, and another PC-DVD drive) to the Xbox, and switch between the drives you want to use without unplugging wires and such.
Normally, you would have to leave the Xbox case open to connect up the PC-DVD drive, and switch between the 2 drives by unplugging the IDE cable and power cable.
This is not acceptable - so an easier, neater workaround has been devised
Why bother?
As you will probably know, the Xbox is useless at reading cheap CDRs. You may not have a DVD writer, and have run out of hard disk space - or can't be bothered to continuously FTP to the Xbox to upload a movie or a game.
Fortunately, PC-DVD drives will read cheap 838f510i unbranded CDR media flawlessly, and lucky for us, they can be connected to the Xbox and used instead of the original XBOX drive to read CDR disks.
However, a PC-DVD drive will not read original Xbox games, so if you have connected your PC DVD drive to the Xbox - you will have had to unplug it and swap it around whenever you want to play a game. Until now...
What do I need?
To perform this modification, you will need:
* Torx 10 and 20 screwdrivers for opening
the Xbox
* A Custom made IDE cable which supports 3 devices (Very rare, since IDE
controllers only really support 2 devices. You can however ask around https://www.xbox-scene.com if anyone knows where to buy them. Note, you can get them from my site
XtraBOX.co.uk, if you live in the UK - or you can make your own with an IDE
crimping tool, cable, and the right connectors).
* Wire strippers
* Soldering equipment (E.g., Iron, Flux, Solder etc)
* Some thin wire (similar to the thickness of an IDE wire)
* An SPDT switch (Single Pole, Double Throw - which basically means it has one
leg for each input, and 2 positions it can be in - see diagrams)
* Ideally - A Dremmel tool for drilling and cutting your case slightly. Don't
worry if you haven't got one - I didn't have one, so I ended up using a
serrated kitchen knife even thought it took me ages!.
* A pair of pliers
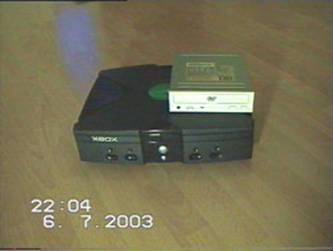
* A PC-DVD drive - Most will work, I bought a cheapo LiteON 16X drive which was
only about £30.
* A fire extinguisher and goggles (Safety first!)
* Some other stuff which I might mention in this tutorial
What now?
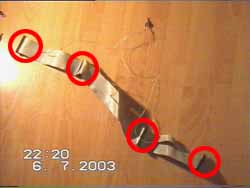 The red circles denote the IDE connectors.
Ok, firstly - if you are making your own IDE cable, here is the information you might need:
*
Important!: Look carefully at your
existing Xbox IDE cable and note the way in which the connectors are connected.
Some face one side of the cable, and others face the other way - this is so
that the connectors finally end up facing the device you are connecting them to
when you have them all twisted around inside your Xbox.
* Try and keep the cable as short as possible - If you have it longer than 28
inches or something, you might get problems since IDE cables have a maximum
length constraint.
* The dimensions of your Original Xbox cable are:
Motherboard connector - 190mm - HD - 360mm - DVD
* The dimensions of the cable I use for this mod are:
Motherboard connector - 190mm - HD - 360mm - Xbox DVD - 190mm PC DVD
It is a good idea to stick to these dimensions since they work ok for me...
Now, we need to prepare the IDE cable. This will involve making a few cuts here and there, and installing a switch.
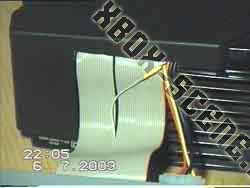
Thanks to some clever person on the XboxHacker.net forums - it was discovered that wire 23 of a 40 wire IDE cable is the Bus enable line. This means that if this wire is cut - the device after the cut will not be active - and so the IDE controller will not see it as being on the cable.
Using this idea, we can fool the Xbox into thinking there are only ever 2 devices connected to the IDE cable at any one time - and the Xbox is happy.
What's really happening is, we have 3 devices on the cable - and we place a switch in such a way, that if it is in the down position - the 23rd wire is disabled for the Xbox DVD drive, and enabled for the PC DVD drive, and if it is in the up position, vice versa.
Take a look at this diagram:
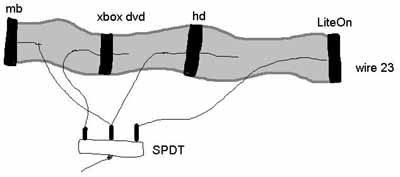
You can see where you have to make the relevant cuts. You have to solder on the wires for the switch to the correct position:
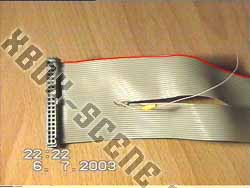
I have outlined the red wire - that is always wire 1, you have to count up to the 23rd wire and cut it - making sure you cut it in such a way that you can solder on the wire that goes to the switch. That yellow stuff is heat-shrink tubing that I use to insulate the join.
Make sure that you use plenty of wire joining the switch to the IDE cable. The IDE cable bends around quite a lot when its inside the Xbox, so there needs to be enough wire to allow it to do so.
Now you have prepared the IDE cable in accordance to the sketch above - you can start hacking away at the Xbox case with a massive knife!.
I didn't have any electric cutting tools
when I did this - I used a kitchen knife and ended up cutting my hand with it -
but it worked ok, it just took a while.
You only need to make a slight cut in the case to allow the IDE cable and power
cables to reach outside the Xbox.
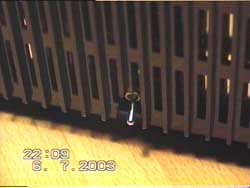
Take a look at the following diagrams to see what you need to do:
This may have been easier for me, because I removed the metal lining that you will find in the top half of your case. Fiddle around with it until you have just enough room for the cables to pass through.
When you have done this, you need to find a place to mount the drive selector switch:
Notice how I have cut away some of the black plastic so the case can fit over the switch.
I got the switch to mount in the pre-existing grill, by bending the metal a bit with a pair of pliers.
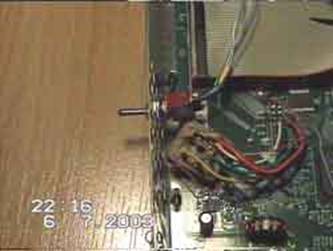
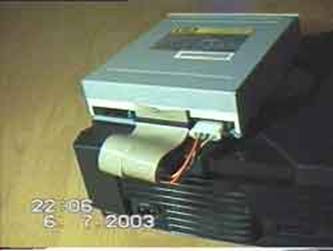
My switch is mounted on the left of the Xbox (looking from the front) at the part underneath where the Xbox DVD goes. You can install it wherever you like. That socket with the wires coming out of it is my mod-chip, and has nothing to do with this tutorial so ignore it!
Now, before you plug everything back together - you need to adjust the jumper settings slightly. Cable select wont work - because if you look at the IDE cable sketch above - when the Xbox DVD is selected, the HD would be cable set to master, and when the External DVD is selected, the HD would be cable selected to slave.. not good.
Instead, you need to change your HD jumper settings to Master, and the PC DVD to slave (leave the Xbox drive as it is. It is factory set to cable select I think, but this is ok because it will always be slave).
Anyways, now, jam everything back into the Xbox making sure that nothing is getting stretched or crushed etc.
Using the HD power cable, add a Y power splitter to it so you can connect one end to the HD, and the other to power the external drive, and poke all the wires out, then close the box.
Boot up, and if all goes well - enjoy. If not, open up the Xbox - check your IDE cable and connections again. If necessary, try playing around with the jumper settings.
With that said, I'm done. Thanks to Xbox-Scene and all the other big names behind the scene (including that guy who's name I forgot who discovered what the 23rd wire did).
Tutorial written by : XtraBOX.co.uk Xbox Services
|
