|
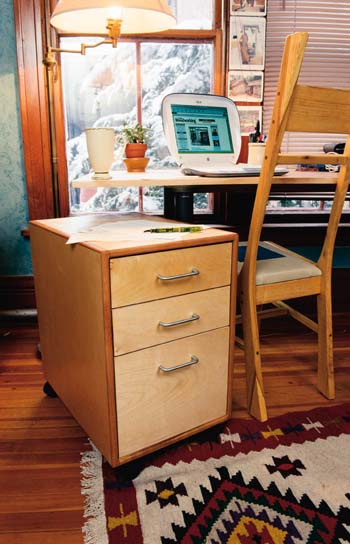
An elegant design that provides no-nonsense
functionality.
A few years ago I
built some office furniture for a local internet consulting company, and
recently they called me back: Not only had they survived the dot-com crash,
but they needed some mobile file cabinets. I had already developed a unique
look for their computer workstations: birch surfaces surrounded by
rounded-over solid cherry edge-banding. The style was crisp, clean and a
nice fit for the company's bright and airy office.
My clients had a
few ideas in mind: They planned to move the cabinets around so that people
could share files, and they wanted to wheel the cabinets underneath their
desks to be easily accessible without occupying extra floor space. Locking
casters and the ability to hold letter-size hanging file folders would also
be nice. These guidelines created a set of dimensions to work from, and the
fact that these cabinets are mobile also dictated that they be finished on
all sides so that they could be enjoyed from all angles.
In terms of
materials, we ruled out solid-wood panels because of their inevitable
cross-grain expansion and contraction, and laying up the veneers myself would've been prohibitively expensive.
Fortunately I was
able to locate some nicely figured ¾"-thick birch plywood, and this
allowed us to keep the look we were after without spending a fortune or
sacrificing durable construction.
Cutting and Edge-banding the
Cabinet Parts
First inspect the edges of the plywood, because the joint between the
solid-wood edge-banding and the plywood panel needs to be crisp. Although
it is tempting, you can't assume that a factory edge is up to snuff, and a
quick glance may reveal numerous dings, dents and scratches. I often end up
ripping ½" off of each factory edge. To minimize tear-out on
cross-cuts, I use a sharp plywood blade and a zero-clearance throat plate.
Feeding the panels more slowly, good-side facing up, also helps keep the
cuts free of tear-out.
Once your panels
are neatly trimmed to size, it's time to mill some edge-banding. I use
cherry because I like the color that it darkens
to, but substitute as you like: I've also used walnut with pleasing
results. I simply plane the cherry t 22422h73w o ¾", then
rip it into ¼" strips. Precision is critical, as inaccurately sized
strips will either overhang the plywood panels and
need to be trimmed, or they won't cover the edge entirely and you'll have
to make new ones. I usually mill some extra stock in case I notice a defect
in one of the strips that wasn't evident beforehand. The cut list calls for
12 strips, which allows for one extra.
I own a few clamps
that are designed for attaching solid-wood edge-banding, but they end up
gathering dust for several reasons. To edge-band a number of panels requires more clamps than I'm willing to buy, and some
clamps seem to lack the clamping pressure that I'd like. I also hate
lugging heavy, clamp-laden panels around the shop while I wait for glue to
dry. My solution is probably not original, but it is highly practical: I
use blue painter's-grade masking tape. It is quick, inexpensive and
lightweight. You can even stack a series of panels on top of each other to
use space efficiently. And because an ounce of prevention is worth a pound
of cure, I use just enough glue to create a tiny amount of squeeze out,
which I then wipe up.
Because the
edge-banding may overhang a bit, I use a router with a flush-trim bit to
carefully remove the offending cherry; a careful touch with a random-orbit
sander will remove any glue residue left over. The side panels need to be
edge-banded on all four edges, and the top and bottom panels get
edge-banded on their front and back edges only. The back receives no
edge-banding at all. As a word of caution, veneered plywood is notoriously
unforgiving when it comes to sanding. I've learned the hard way that there
is no adequate method for repairing sand-through in the top layer of veneer,
so work carefully to ensure that you'll have to do a minimal amount of
sanding.
Assembling the Cabinet
I use biscuits here because they are strong and reliable. In addition, they
are invisible once the cabinet goes together, and I didn't want any filled
nail holes or plugged screws interfering with the lines of the piece or
interrupting the flow of the grain.
I assemble the
cabinet in two steps: First I sandwich the back between the top and bottom,
and once the glue there has set, I sandwich that assembly between the
sides. For the first step, I clamp the three parts together and line them
up precisely. After marking the locations for biscuits, I pull off the
clamps and cut the slots. After dry-fitting, I glue it up and wait a few
hours. For the second step, I place one side panel flat on the table,
inside facing up. I position the top-back-bottom assembly correctly on top
of that, and finally place the remaining side on top of it all. With a
couple of clamps holding the parts snugly in place, I mark the biscuit
locations, then repeat the process I used on the
first half of the cabinet assembly.
With a round over
bit in a router, I ease each edge, which softens the sharp lines of the
cabinet. By routing the edge-banding after the cabinet is assembled, the
inside corners of the edge-banding flow together smoothly, and the eye is
swept through graceful little curves that add a fine detail to the finished
piece.
Making the Drawers
I build the drawers out of Baltic birch plywood because it is attractive,
stable and inexpensive. If you like, you can mill solid-wood panels for the
drawer parts - if you do, dress the stock to 7/16", as the Baltic
birch plywood sold as ½" actually measures out at 1/16" less.
Refer to the cut list for the quantities and dimensions you'll need here.
Once you've got the drawer parts cut, rip a groove in the bottom of each -
you could use a dado blade here, but for a small number of parts like this,
I don't take the time to change blades: I just make two passes side-by-side
for the ¼" groove.
For this project,
I use a rabbet-dado joint to lock the drawer parts together. It is a strong
mechanical joint with plenty of surface area for glue. I sketch it
full-sized on paper, then set up my table saw to cut the dado on the inside
face of the sides.
I use my mitre
gauge with a stop attached to make sure the dados are cut at a consistent
distance from the ends of the drawer sides. This will take two passes. I
then cut the rabbet in the drawer fronts and backs
with a similar set-up - just change the blade height and move the stop on
your mitre gauge to correctly position the cut. Test the fit of the joint
now while you're still set up to make changes.
Once the rabbets
and dados fit snugly, cut out the drawer bottoms.
During glue-up, check that the drawers are square by measuring their
diagonals. This ensures that the drawer fronts will line up evenly. If a
drawer is slightly out of square, clamp it across the longer diagonal and
apply pressure until it conforms. Once the glue dries, it should remain in
the correct position.
So that hanging
file folders can be easily slid forward and backward in the bottom drawer,
you'll need to make two rails that mount on the top edges of the drawer
sides. I mill two 20" strips of cherry to ½"x 5/16". I then
make two cuts with the table saw to create the "L"-shaped piece needed. The
piece can then be screwed into the tops of the drawer sides - be sure to
countersink the heads so that they don't stick up and interfere with the
movement of files across the rails.
Installing the Drawers
I use 20" Accuride slides because they're
smooth and reliable. Each drawer requires one pair of slides, and each
slide can be separated into two pieces: The larger one mounts inside the cabinet, and the smaller one attaches to the drawer. I
keep the slides together during installation, and I use plywood spacers to
lay them out evenly. With the cabinet on its side, I insert the lower
spacer (4-5/8" wide), the first drawer slide, the middle spacer
(6-¼" wide), the second drawer slide, the upper spacer (2-7/8"
wide), and finally the upper drawer slide. Then I simply screw the slides
in place with three screws. After flipping the cabinet onto its other side,
I repeat the process.
With the cabinet
upright on my bench, I push the bottom drawer halfway in and place
1/8" shims underneath it to establish a consistent and correct height
for the drawer. I pull out the slides (it should be a snug fit, but not
excruciatingly tight) and line them up with the front edges of the drawer.
I screw in the front edges of the slides, and then pull the drawer out all
the way. With the shims still under the back edge of the drawer, I screw in
the back-ends of the drawer slide. The top two drawers go in the same way,
except I use thicker shims on top of the bottom drawer because it receives
a taller drawer front to hide the tabs on file folders that protrude above
the drawer box.
Trim your false
drawer fronts to size on the table saw and iron on veneer tape to all four
edges. To attach the drawer fronts, I remove the top two drawers and push
the bottom drawer all the way into the cabinet. I then set the drawer front
into position, using 1/8" shims on the bottom and sides to ensure a
correct reveal all the way around. I use spring clamps to hold the drawer
front in place, then I run screws into it from the inside of the drawer.
The middle drawer front attaches the same way, but the top one doesn't have
room to get a clamp around it. I solve this dilemma by dabbing some
quick-set epoxy on the back of the drawer front then pressing it into
position. Flipping the cabinet onto its back and shimming around the edges
of the drawer front assures that it will remain aligned. Once the epoxy has
cured, the drawer front can be secured with screws like the others.
To attach the drawer
pulls, I make a template from a scrap of ¼"-thick plywood and cut it
to the same size as the upper drawer fronts. I draw lines across the
vertical and horizontal centres of the template, and centre my pull
relative to these crosshairs. Once the holes are drilled on your template,
you can place it directly on the drawer fronts and drill through your
pre-positioned holes. Using a template like this might seem like extra work
but, it saves time and guarantees consistent placement on each drawer
front.
Finishing it Up
For an office environment, I favour the durability of oil-based
polyurethane's, although if I were building this for my home, I might be
tempted by the hand-rubbed feel of the newer gel varnishes. When your
finishing process is completed, simply screw on four 2"-diameter
wheels (locking casters will keep it from rolling around while you open and
shut drawers), and bolt on the drawer pulls.
|
During the second stage of cabinet
assembly, laying the cabinet on its side keeps you from fighting with
gravity. The cabinet comes together relatively easily, and the alignment is
a snap thanks to the biscuits.
Go slowly while rounding over the
edges, as the cherry can tear out and splinter if a cut is rushed. The
round over is key to the smooth, clean feel of the piece.
Using spacers to position the drawer
slides eliminates one of the leading causes of poor-fitting drawers:
inconsistent spacing of slides. Before putting in the spacers, be sure to
brush out any sawdust or woodchips that may have accumulated inside the
cabinet. A 1/16" discrepancy at this point could cause an annoying
misalignment that you'll have to backtrack to correct later on.
A consistent reveal is key to
the crisp feel of the piece. The shims shouldn't bow the cabinet sides out
at all, but should fit snugly to ensure that the drawer front is centred
and that the reveal is even on both sides.
|