CMI8330
SOUND CARD
ENGLISH MANUAL
Notice
The information in this document is subject to change in order to improve the reliability, design, or function of this product without prior notice and does not represent a commitment on the part of this company.
In no event will the manufacturer be liable for direct, indirect, special, or consequential damages arising out of the use the product or documentation, even if advised of the possibility of such damages.
No part of this reference manual may be reproduced or transmitted in any form or by any means without the prior written permission of this company.
Trademark Acknowledgments
Microsoft, MS, and MS-DOS are registered trademarks, and Windows is a trademark of Microsoft Corporation. Sound Blaster is a trademark of Creative Technology, Ltd. AdLib is a trademark of AdLib Inc. IBM PC is a registered trademark and PC/XT, PC/AT are registered trademarks of International Business Machines Corporation. All other trademarks and registered trademarks are property of their respective holders and are hereby acknowledged.
Information in this manual is subject to change without notice.
FCC Compliance Statement
Certified to comply with the limits for a Class B computing device according to Subpart J or Part 15 of FCC rules. See instructions if interference to radio reception is suspected.
FCC WARNING
This equipment has been tested and found to comply with the limits for a Class B digital device, pursuant to Part 15 of the FCC Rules. These limits are designed to provide reasonable protection against harmful interference in a residential installation.
This device complies with Part 15 of FCC Rules. Operation is subject to the following two conditions: (1) This device may not cause harmful interference and, (2) this device must accept any interference received, including interference that may cause undesired operation.
However, there is no guarantee that interference will not occur in a particular installation. If this equipment does cause harmful interference to radio or television reception, which can be determined by turning the equipment off and on, the user is encouraged to try to correct the interference by one or more of the following measures:
* Reorient or relocate the receiving antenna.
* Increase the separation between the equipment and receiver.
* Connect the equipment into an outlet on a circuit different
from that to which the receiver is connected.
* Consult the dealer or an experienced radio/TV technician for
help.
In order for an installation of this product to maintain compliance with the limits for a Class B device, shielded cables must be used for the connection of any devices external to this product.
|
Hardware/Software Contents |
1. Hardware Introduction
1.1 Product Overview
1.2 Product Features
1.3 Hardware and Software requirements
1.4 What is Plug and Play ISA Standards ?
1.5 Surround Sound
1.6 Wave-Table Upgrade Board
What is SPDIF IN/OUT?
2. Installation of the CMI8330
2.1 Installing the CMI8330 into your Computer
2.2 DOS and Windows 3.1 Applications Installation
2.3 DOS Utilities Installation only
2.4 Set DOS environment variables for Sound Blaster compatible
3. Utilities Software
3.1 Introduction
3.2 CMINIT
3.3 CMMIX
3.4 CMTEST
3.5 CMUTIL
3.6 CMORGAN
3.7 CMPLAY
3.8 CMREC
3.9 CMCDPLYR
3.10 PLAYWAV
|
Hardware/Software Contents |
4. Installation of Windows 95
4.1 Installing the Windows 95 driver
4.2 Un-installing the Windows 95 driver
4.3 Windows 95 Drivers Important Note
4.4 About Full Duplex :
4.4.1 How to test the Full-Duplex function of CMI8330
(PLAY and RECORD at same time)?
4.4.2 Prepared for recording.
Software Wave-Table
W95 DOS mode MPU-401 MIDI emulator
MPU-401 MIDI input functions setting
C3D HRTF Positional Audio
What is HRTF?.
4.8.2 How to listen to C3D sound correctly and properly?
and properly?
DirectX 5.0 Direct Sound 3D interfaces.
A3D interfaces.
Install DOS drivers under Windows 95 DOS
4.10 Dual Mixer :
5. Installation of Windows NT 4.0
Installing the Windows NT4.0 non-PnP drivers
Installing the Windows NT4.0 non-PnP drivers
6. Windows Applications(Audio Rack)
Introduction
MIDI Player, Wave Player, and CD Player
System Mixer
7. Questions & Answers
CMI8330
Hardware Introduction |
The CMI8330 is a stereo 16 bit PnP sound card. It is compatible with Sound Blaster 16 and Microsoft Windows Sound System. Especially it provides C3D HRTF positional audio, you can enjoy real 3D positional audio in games or applications that supports DirectX 5.0 Direct Sound 3D or A3D. What we provide at the side of sound card are line-in jack, micro-phone jack, audio output jack, and a 15 pin D-SUB multiplexed joystick/MIDI connector. The proper ways of jumper setting are all clearly marked in Figure 2.1 and Table 2.1.
If your PC motherboard BIOS supports Plug and Play (PnP) function, While PC booting, motherboard PnP BIOS will locate I/O resource for all interface automatically to avoid I/O conflict. But, at first, all of your interface card that using I/O resource must support PnP function. Otherwise, I/O conflict still occurs at sometimes. Because PnP BIOS cannot find the interface card which does not support PnP function.
. Special Features
S/PDIF (Sony/Philips Digital Interface) digital audio in/out
C3D HRTF positional audio (DirectX5.0 Direct Sound 3D and A3D interfaces)
ISA bus Plug and Play (PnP)
device support : WSS, MPU401, GAME PORT, SB16
Full duplex playback and recording
Support Windows 95 and Window NT 4.0
Auto hardware switching mode between WSS and SB without program
setting
Hardware/Software Section 1- Hardware Introduction
. Compatibility
Windows Sound System
Sound Blaster 16/PRO/2.0
MPU-401 UART MIDI
Wave Table Synthesis
AdLib
Windows 3.1/95/NT4.0
Meets and exceeds Multimedia PC Level 2 Specifications
. Digitized Audio
Up to 16 bit stereo 44KHz sampling rate voice playback/recording
Full duplex playback and recording
(Play wave file and recording wave at same times)
. Stereo Mixer
Stereo analog mixing from CD-Audio, Line-in
Stereo digital mixing from Voice, FM/Wave-table,Digital CD-Audio
Mono mixing from MIC
Software adjustable volume
. SPDIF(IN/OUT)
Support 44.1KHz 16 bits stereo digital audio IN/OUT, 5Vp-p TTL level
. FM Music Synthesizer
OPL3 FM synthesizer (4 operators)
Up to 15 melody sounds and 5 rhythm sounds (20 voices)
. MIDI Interface
Fully compatible with MPU-401 MIDI UART mode
and Sound Blaster MIDI mode
. Game Port
Standard IBM PC joystick/game port (dual channel)
External MIDI port for external MIDI keyboard
. Wave Table Synthesis
MPU-401 interface for Wave Table Synthesis (optional)
. Surround Sound
Built-in Surround sound (software control ON/OFF)
Hardware/Software Section 1- Hardware Introduction
. Software Wavetable
128 instruments and percussion sets
Up to 32 dynamically allocated voices
Hardware mixing: MIDI and Wave
. Software configurable I/O Address, IRQ, DMA channel for all interface (Jumperless)
The CMI8330 can be installed in any IBM PC/XT, AT or compatible computer. To successfully install the CMI8330, you must have the following hardwares and softwares.
A) Hardwares
IBM PC/XT, AT or compatible computer with the following:
|
. |
One or more 3.5" floppy drive |
|
. |
One available 16-bit ISA slot |
|
. |
MGA, CGA, EGA or VGA (VGA recommended) |
|
. |
Minimum of 40 MB Harddisk with at least 4 MB of free space |
|
. |
At least 1 MB of RAM (conventional & extended), 4 MB recommended |
|
. |
Microsoft or compatible serial mouse |
|
. |
80486 or above CPU (Pentium is recommended) |
B) Software
|
. |
MS-DOS 5.0 or greater |
|
. |
Microsoft Windows 3.1 / Windows 95 |
NOTE:
Above requirements are minimum requirements. You may be required to aquire more hardwares or softwares to use the CMI8330 functions to its full extent.
Hardware/Software Section 1- Hardware Introduction
The ISA bus architecture allows allocation of I/O address spaces, DMA channels, and interrupt levels among multiple ISA cards. However, the ISA interface has no defined hardware or software mechanism for allocating these resources. As a result, configuration of ISA cards is typically done with jumpers that change the decode maps for I/O spaces and steer the DMA and interrupt signals to different pins on the bus. Further, system configuration files may need to be updated to reflect these changes. Users typically resolve sharing conflicts by referring to documentation provided by card manufacturer. For the average user , this configuration process can be difficult and frustrating.
A Plug and Play-compliant system can identify the Plug and Play ISA cards and the resources they use, then program these resources so they do not conflict. The conflict-resolution scheme used on Plug and Play ISA cards essentially puts all cards 'to sleep', then reads the card identification and the information about what the card can do and the resources it requires. This information can include what resources are programmable and over what ranges they can be programmed. With this information, the system can configure the card in a way that prevents conflicts with other cards in the ISA bus.
Our surround sound upgrade board takes any ordinary stereo signal as input and produces an output signal with dramatically widened stereo imaging and enhanced realism. And requires no extra speakers or special encoding of input signals.
You can turn surround sound on or off by program CMMIX.COM at DOS. At Windows you also can turn it on or off by Audio Rack mixer. And you can run Windows applications DEMO3D to test surround sound functions.
Hardware/Software Section 1- Hardware Introduction
For saving one I/O port and one IRQ channel, we disable MPU-401 MIDI device as default value. If you want to output by wave-table (MPU-401 MIDI device):
In DOS (also Windows 3.1), please run CMINIT.EXE to enable MPU-401 MIDI device.
In Windows 3.1, please add MPU-401 device drivers at first. Click on "Drivers" icon in "Control Panel" of "Main" group. Click "Add" button and select "ROLAND MPU-401" to add device drivers. After reboot, please click on "MIDI Mapper"icon in "Control Panel" of "Main" group. Select item 'MPU-401 MIDI' in 'Name' and click 'Close' button.
In Windows 95 system, please run En_Disable MPU-401 MIDI device program(MDEVSET.EXE) to enable MPU-401 MIDI device. After reboot, click "Start" button, and then click "Control Panel" at "Settings" Menu. Double click on the "Multimedia" icon and click "MIDI". In "Single Instrument", select "C-Media inc. External MIDI (MPU-401)" item.
SPDIF is a digital audio IN/OUT standard. It support a non-distortion stereo 44.1K 16bit digital audio transmission. The S/PDIF IN/OUT voltage level is 5Vp-p TTL level. You can get digital audio through SPDIF IN from CD-Audio digital output or the other digital audio output (ex. Minidisc,DAT). You also can output digital audio through SPDIF OUT to those equipments that accepted SPDIF IN format.
This sound card's SPDIF IN function is design for non-distortion digital recording from digital audio output of CD-ROM (or other equipments), not for playing from these equipments. Therefore, if you want to record from your CD-ROM digital audio output through SPDIF IN, please connect CD-ROM analog and digital audio cable to sound card. Make sure that volume of CD(analog audio) in mixer is ON and volume of Dig-CD(digital audio) is OFF. Then you can playing from analog audio and recording from digital audio for the best effect. If you turn on the volume of Dig-CD(digital audio) in mixer, due to some CD-ROM drive design,there is noise input during CD-ROM door open or close. Besides, SPDIF can not adjust volume. So we recommended you to follow the steps that describe above.
CMI8330
Installation of the CMI8330 |
|
|
WARNING: Before installing the CMI8330, you should familiarize yourself with major parts of it. Improper use of it may cause permanent damage to itself and/or your PC and/or external equipment's.
Please follow the steps carefully for a typical system.
1. Turn off your computer and disconnect all power cords.
2. Remove the cover from your computer. Refer to your computer system user's guide for more details.
3. Choose an empty 16 bit ISA slot. (Preferably away from other cards to cut down on noise and interference).
4. Remove the expansion slot cover by unscrewing slot cover screw. Keep the screw for later use.
5. Pick up your CMI8330 by its top edge. Firmly slide the CMI8330 into the slot. Anchor the CMI8330's mounting bracket with the screw you kept from step 4.
6. Put the computer cover back on and reconnect the power cords.
Note: At step 5, if the CMI8330 will not slide in smoothly, do not force it. Make sure the CMI8330 is lined up properly, and try again. You may need to loosen the adjacent slot's rear cover to make the CMI8330 fit properly.
Hardware/Software Section 2- Installation the CMI8330
Table 2.1 The CMI8330 Jumper Setting Description
|
JPx |
Function |
Jumper Setting |
|
|
JP1 |
Output select |
|
Power Amplifier |
|
|
Line-out |
||
|
JP3 |
Micphone type |
open |
normal Micphone |
|
short |
special Micphone |
||
Attention :
If your sound card doesn't have power amplifier built-in, there is no JP1 jumper to set.
Figure 2.1 The CMI8330's I/O Connection

Hardware/Software Section 2- Installation the CMI8330
Table 2.2 Connector function
|
Connector |
Function |
|
J1 |
Connect Wave Table Upgrade Board (optional) |
|
J2 |
Connect with joystick or MIDI cable |
|
J4 |
Connect IDE/Sony CD-ROM Audio output |
|
LINE |
Connect with the audio output(line-out) from stereo |
|
MIC |
Connect with microphone(mono) |
|
SPK |
Output to speaker or audio-in of stereo |
Please make sure that your hard disk has 4MB free spaces at least. Insert the drivers disk.
1. Change to DOS/W31 drivers directory, type in
INSTALL [Enter]
2. Type DOS utilities path that you want to install.
3. Type the path of Windows 3.1 when asking Windows path.
4. Program will expand file to path that you specify.
5. After expanding DOS utilities, program CMINIT.EXE will be executed and showing current value of all I/O. Please adjust I/O to avoiding conflict, if you were in non-PnP mode. Press ESC key to exit.
6. Mixer program CMMIX.COM will be executed too. You can adjust default volume to your favorite value. Press ESC key to exit.
7. Install program will continue execute testing program CMTEST.EXE to check output of sound card.
Hardware/Software Section 2- Installation the CMI8330
8. Program will launch Windows 3.1 to install device drivers and applications.
9. Please restart PC after installation completed.
P.S. :
1. After installation, if you want to change I/O of Windows device drivers, please execute file CMINIT.EXE to adjust item 'WSS I/O','WSS IRQ' and 'WSS DMA'.
2. If you didn't install Windows applications (only install DOS utilities) this time, run 'WSETUP.EXE' in disk root directory to install Windows applications.
To install DOS utilities only , please follow steps that described above. Press ENTER key when asking Windows path for none.
The CMI8330 is compatible with Sound Blaster, so you can execute programs which can run with it. Some games or applications need read hardward setting from DOS environment variables 'BLASTER', CMINIT.EXE will automatically add to AUTOEXEC.BAT for you. You can check value in AUTOEXEC.BAT with CMINIT.EXE shown. It like below :
SET BLASTER = A2x0 Iy Dz Hv T4
x = 2 or 4 (This is voice(SB) I/O address number)
y = 5 or 7 or 9 or 10 (This is voice(SB) IRQ number)
z = 0 or 1 or 3 (This is voice(SB) DMA number)
v = 5 or 7 (This is voice(SB) 16 BIT DMA number)
CMI8330
Utilities Software |
It is always a good idea to make backup copy of your original software. Make a backup copy of your "CMI8330 software disk" now and store your original diskettes in a safe place.
NOTE: In the following paragraphs, Utilities are assumed to be installed in default Drive:\Path directory, which is C:\CM8330.
The CMI8330 provides utility software as following :
CMINIT.EXE I/O setting program
CMMIX.COM Mixer
CMTEST.EXE CMI8330 test program
CMUTIL.EXE Integrated voice utility program
CMORGAN.EXE Electronics organ and MIDI file playback program
CMPLAY.EXE Voice(.VOC) playback at DOS command program
CMREC.EXE Voice record at DOS command program
CMCDPLYR.EXE CD-Audio player
PLAYWAV.EXE Wave(.WAV) file playback at DOS command program
The CMINIT.EXE can change the CMI8330's I/O address, DMA channel, IRQ channel, Game port and MPU-401 MIDI port without jumper setting.
Hardware/Software Section 3- Utilities Software
In main menu, you can use arrow keys to select items that you want to change. The sub window will display the I/O you can select. If any PCI or PnP card use this I/O , item will grey to avoiding conflict and display the PnP card title that use it. In Windows 95, "DOS prompt" or "shut down to DOS" are still in Windows 95 protected mode, changing I/O by user are not expected. So program will display current value of all I/O, called "status" mode.
At DOS prompt, type CMINIT [Enter]
You can see all I/O settings in the main Menu.
WSS Base I/O Address Select WSS mode base I/O address
WSS IRQ Channel Select WSS mode IRQ channel
WSS DMA Channel Select WSS mode DMA channel
Voice I/O Address Select SB mode base I/O address
Voice IRQ Channel Select SB mode IRQ channel
Voice DMA Channel Select SB mode DMA channel
Voice 16bit DMA Channel Select SB mode 16-bit DMA transfer channel
MPU-401 MIDI Device Enable or Disable MIDI device
MPU-401 I/O Address Select MIDI base I/O address
MPU-401 IRQ Channel Select MIDI IRQ channel
Game Port I/O Address Display Game Port base I/O address
FM(OPL3) I/O Address Display FM(OPL3) base I/O address
Using arrow key to move to the item that you want to change and press [ENTER] key to execute. To quit or save change, press [ESC] key.
Program will automatically update file "AUTOEXEC.BAT" if selecting "save setting & exit". Otherwise, it will remain unchanged. Once you save the change, a new I/O setting will be got ever since.
P.S.: The arguments after CMINIT in the file AUTOEXEC.BAT are updating by file CMINIT.EXE.
Hardware/Software Section 3- Utilities Software
CMMIX.COM is a mixer control program.
At DOS prompt, type CMMIX [Enter]
You can adjust the volumes of all channels or change recording channel.etc.
Master MASTER volume control
FM FM music volume control
WAVE WAVE volume control
LINE-IN LINE-IN volume control
Ext. synth wave-table output volume control
Analog CD-IN Analog CD-Audio volume control
Digital CD-IN Digital CD-Audio(SPDIFIN) control
MIC Micphone volume control
3D SURROUND Enable/Disable 3D surround sound
LOUDNESS Enable/Disable output gain
SB Mixer emu. Enable/Disable SB mixer emulation
Recording Setup Recording gain and channel selection
Exit Save setting and exit to DOS
When exit this program, it will automatically update AUTOEXEC.BAT file for next time reboot (power ON) initialization.
P.S.: We set default SB mixer emulation functions to disable. It fits to almost applications and GAME. If there is any applications using SB panning functions to separate left and right sound channel, you can set this functions to enable.
CMTEST.EXE checks the CMI8330 I/O address, IRQ channel, DMA channel, and tests the CMI8330 hardware functionality including synthesized music, voice playback and voice recording. At DOS prompt, type
CMTEST [Enter]
Hardware/Software Section 3- Utilities Software
CMTEST scans I/O address, IRQ channel and DMA channel jumper settings on the CMI8330.
After I/O settings are tested, you may proceed to choose to test synthesized
music, output voice and test recording functions. Speakers connected to the CMI8330 are necessary for all the tests. Microphone is necessary for test recording.
Synthesized music test generates music output with the CMI8330 on board synthesizer. Output voice test generates voice with the CMI8330 digitized output channel. For test recording, you need to speak to the microphone. Your speech will be reproduced on the digitized output channel.
If you can't hear sound during any of the above tests, check connections between the CMI8330 and speakers, microphone then run the test again.
If your CMI8330 passes these tests it is OK for your applications.
According the CMTEST shows the I/O address, IRQ and DMA information's, please add the follow setting to your AUTOEXEC.BAT file.
SET BLASTER=A220 I7 D1
Note: A# # is the I/O address
I# # is the IRQ number
D# # is the DAM channel
This setting in AUTOEXEC.BAT will be helpful to some softwares to recognize the CMI8330.
CMUTIL.EXE is an integrated voice utility program to help you create and replay voice files. At DOS prompt, type CMUTIL [Enter]
Integrated environment of CMUTIL appears on screen.
Play voice from disk: Play disk file (.VOC) contents.
Use arrow key to highlight and press Enter to activate. You will see the same pop up menu as in LOAD command. You can select a file the same way you do as in LOAD command. You will hear the sound that is stored in the selected file in digitized form.
Hardware/Software Section 3- Utilities Software
Play voice from memory: Play Working Memory contents.
Use arrow key to highlight and press Enter to activate. This command is not executable if Working Memory is not filled. You can hear the sound that is stored in Working Memory in digitized form. Press Esc to stop playing.
Record voice to disk: Sample voice from microphone to disk file.
Use arrow key to highlight and press Enter to activate. You will be asked to specify the file name with .VOC extension to record. Program will save it to the current directory.
Record voice to memory: Sample voice from microphone to working memory Use arrow key to highlight and press Enter to activate. Time duration of the recording depends on sampling rate that you use. The higher the sampling rate, the shorter the duration. A pop up menu will tell you the duration in seconds that you have at current sampling rate. Press Esc to quit recording or any other key to begin recording. Press Esc to stop recording when you have done recording.
Note that Working Memory contents will be lost if you record TO MEMORY, so SAVE the last file before you record TO MEMORY.
Data packing (memory): compress working memory data.
Use arrow key to highlight and press Enter to activate. The pop menu let you select 4 bit, 2.6 bit, 2 bit or silence method. This function only activate to working memory, so after compressed you have to Save voice to disk .
Load voice file to memory: Loads voice file (.VOC type) into memory.
Use arrow key to highlight and press Enter to activate. A pop up menu appears : At the top, Drive:\Path is shown indicating the current directory for loading files. In the menu, files with .VOC type in the current directory is listed. Sub directory under default directory are listed too. Directories are enclosed in [ ]. [ .. ] is the parent directory. Select it to move up one level from current directory. If the current directory is a root directory, all logical drives are listed .
Drivers are enclosed in < >. Use arrow keys to highlight on the file you want to load or driver or directory you want to move to. Press Enter to load it or move. The file name will appear on Working File window after successful loading.
Hardware/Software Section 3- Utilities Software
Save voice (memory) to disk: Saves memory contents to .VOC type file.
Use arrow key to highlight and press Enter to activate. You will be prompted to enter file name to save. Key in the file name with .VOC extension. VOC is the standard file type used by CMUTIL. The file will be saved in the directory where you start CMUTIL.
Exit to DOS: Quit CMUTIL and return to DOS environment. Use arrow key to highlight on EXIT. Press Enter to activate or press ESC key to quit. You will be asked to confirm that you want to exit. Type " Y " to exit.
This program lets you play PC keyboard like an electronic organ. There are 128 tones can be changed by pressing F1. Press F2 can play MIDI file (*.MID).
CMPLAY.EXE lets you play voice file at DOS prompt. Voice is played in a background process. You may specify optionally a foreground process running at the same time voice is playing. To run CMPLAY, at DOS prompt, type in
cmplay [-Bxx] [-H] [-E"execute-command"] filename [Enter]
example: CMPLAY -b16 -h -e "DIR" DEMO.VOC
Note: Items in [ ] are optional. Default values are assigned if they are not specified.
-H sets quiet mode. When specified, no message is displayed during playing. Default is not quiet mode.
-xx is a buffer size in aggregate of 2K bytes. It must fall between 1 and 31.
Default value is 16, i.e., 32 K bytes. The bigger buffer, the fewer accesses to disk are necessary during playing.
-E"execute-command" is the DOS command to be executed in foreground process. Default is no foreground process.
-filename is the name of the file to play. It must be a voice file in .VOC format. To stop playing before it ends, press Esc key.
Hardware/Software Section 3- Utilities Software
CMREC.EXE lets you record voice into file at DOS prompt. Voice is recorded in a background process. You may specify optionally a foreground process running at the same time voice is being recorded. To run CMREC, at DOS prompt, type in
cmrec [-Bxx] [-Syy] [-Mz] [-H] [-E"execute-command"] filename
example: CMREC -b16 -s8000 -m1 -h -e"DIR" DEMO.VOC
Note: Items in [ ] are optional. Default values are assigned if they are not specified.
-xx is a buffer size in aggregate of 2K bytes. It must fall between 1 and 31. Default value is 16, i.e., 32 K bytes. The bigger buffer, the fewer accesses to disk are necessary during recording.
-yy is the desired sampling rate for recording. It must fall between 4,000 and
44,100 Hz(mono) or 22,050Hz(stereo). Default is 8,000Hz.
-z is the recording mode. 0 for mono mode and 1 for stereo. Default value is 0, i.e. mono mode .
-H sets quiet mode. When specified, no message is displayed during recording. Default is not quiet mode.
-E"execute-command" is the DOS command to be executed in foreground process. Default is no foreground process.
-filename is the name of the file to record. It must be a voice file in .VOC extension. To stop recording, press Esc key.
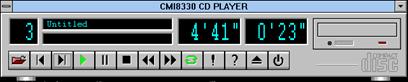
CMCDPLYR.EXE lets you play CD-Audio at DOS prompt.
At DOS prompt, type
CMCDPLYR [Enter]
The following functions available:
Hardware/Software Section 3- Utilities Software
> is play button,
![]() is stop button,
is stop button,
|| is pause button,
>| is next track,
|< is previous track,
>> is fast forward button,
<< is reverse button.
PLAYWAV.EXE lets you play wave file at DOS prompt. To run PLAYWAV, at DOS prompt, type in
PLAYWAV filename [Enter]
example: PLAYWAV DEMO.WAV
Then the following text displayed:
" CMI8330 Sound Card WAVE file play program Version 1.00
During playing, you can use
[Esc] -Stop and Exit
[Space] -Pause [C] -Continue
SBPort=220 IRQ=5 DMA=5
WAVE file type= 16 Bits Stereo 44100 Hz
PLAY "
CMI8330
Installation of Windows 95 |
ATTENTION:
1. We recommend that you have already installed Microsoft Windows 95 before installing CMI8330. And you didn't install any other sound card device drivers in your current system.
2. If you got any problem with installing Windows 95, please contact your local dealer.
Steps of installing Windows 95 driver of CMI8330:
1. Power off your system, install CMI8330 sound card, audio cable, speaker, microphone, etc. (refer section 2.1)
2. Before reboot the computer, insert the CMI8330 Windows 95 installation diskette into drive A:(or B:
3. Turn on the computer, and enter into Microsoft Windows 95.
4. You will see a windows prompt like this:
"New Hardware Found
CMI8330 Audio Adapter
Windows has found new hardware and is installing the software for it"
, then the dialog box shown.
Hardware/Software Section 4- Installation of Windows 95
5. Select "Driver form disk provided by hardware manufacturer", click "OK".
6. When system requests for CMI8330's Windows 95 installation disk. Please make sure the path is point to drive that installation disk is in, and click "OK".
7. Now, system is installing PnP device drivers automatically. After a while, system finished installation. Then enter Windows 95 main screen. You will hear a wave playing from the system if you have installed speakers.
8. Click "start" key
9. Select "Run"
10. Please make sure your CMI8330's Windows 95 driver disk is in floppy A(or B).
11. Please Key in the path name of Windows applications install program as "A:\WSETUP.EXE"
12. Click "OK" to start the procedure of installation, and follow questions to finish installation.
13. Shut down Windows 95 system and reboot your system , when all of application softwares have been installed.
14. Now, you have already installed CMI8330 sound card on Microsoft Windows 95 successfully.
1. Click "start" key, select "Run".
2. Inserts drivers disk.
3. Please key in the path name that program UINSTDRV.EXE is in, and Click "OK".
4. Select the "Uninstall" button, the setup will do an automatic cleaning up of the 8330 Windows 95 drivers.
5. Shutdown and turn off your PC.
6. Turn PC on, Win95 will now detect new hardware, create an information database, and proceed with the installation of CMI8330 device drivers.
Hardware/Software Section 4- Installation of Windows 95
As we recommended in this manual before, you should install Win95 to your PC system before you installed CMI8330. If you do the installation VICE VERSA, then, the drivers of CMI8330 cannot be installed automatically and "Device Manager" in Win95 will detect CMI8330 as "Other devices", an "?CMI8330 Audio Adapter" will also appear on the screen. If this happens, please follow the steps to remove the existing drivers in your system and re-install all the CMI8330 drivers again:
Press "Start", move cursor to "Setting" then press "Control Panel"
Select "System", then press "Device Manager" and find the "Other devices".
Select "?CMI8330 Audio Adapter" and "Remove". There are total 4 '?CMI8330 Audio Adapter"'s, so you should "Remove" them one by one.
Press "Refresh", Win95 will automatically execute the installation of the sound card drivers. Please follow the previous chapters of this manual to complete the installation.
1. Press "Start" key
2. Select "Programs" "Accessories" "Multimedia" and press "Media Player".
3. Please click item of "Device" and click "Sound".
4. Press the left key of your mouse.
5. Select "The Microsoft Sound", and press "Open".
6. Click item of "Edit" and "Options".
7. Please click "Auto Rewind" and "Auto Repeat" , then "OK".
Hardware/Software Section 4- Installation of Windows 95
8. Press play key of "Media Player".
At this moment , you can hear the sound from "The Microsoft Sound"
1. Click "Start" key
2. Moved the mouse cursor to "Programs".
3. Then move the cursor to "CMI8330 Audio Rack"
4. Select item "Audio Rack" and click.
5. Now you can see the Audio Rack program shown on your screen.
6. Set recording channel into "Wave" from mixer program
7. Click the red spot on wave player to start recording.
8. Now you can see the recording function works fine here.
Note: If there is no problem when playing WAV in "Media Player" and recording WAV in "Audio Rack", then your Full-Duplex sound system should work OK now.
If you want to use Software Wave-Table drivers as MIDI output device, please open Multimedia icon in "Control Panel" selecting "MIDI" page, and click on "C-Media SoftMidi Driver" then select "OK" button to confirm.
Because of Software Wave-Table output use one wave device to output, for Software Wave-Table can play with wave file at same time, We switch FM channel of mixer to output second wave source. That is if you play MIDI file (Software Wave-Table) and play another wave file at same time, you must adjust wave or FM channel of mixer to control volume.
Note: Software Wave-Table Driver only supports Windows 95 system and will spend more CPU time when play MIDI files. For more finest executing performance, we recommended that use Pentium CPU and 16M DRAM(or above).
Hardware/Software Section 4- Installation of Windows 95
You can select MIDI output device as 'MPU-401 MIDI' in DOS games or applications that run in W95 DOS box. Please make sure that I/O port address is match to resources in "MPU-401 MIDI emulator" device in 'Sound,video and game controller' of 'System' of 'Control Panel'. Please note, the DOS mode MPU-401 emulator uses WSS mode to output, so please select SB16 mode as wave (voice) output device.
Because of saving one IRQ channel, we turn off MIDI in functions by default. (It needs to enable MIDI in functions only when record from external MIDI keyboard.) You can run MPU-401 MIDI device setting program in Audio Rack group to enable or disable it.
The technology of C3D using an audio filter called Head Related Transfer Functions (HRTFs). HRTF is a set of audio filters which are varying locations of sound effects (spatial hearing cues) in three-dimension measured from listener's eardrum. Using this technology and special digital signal processing to re-create spatial hearing cues makes our ears to hear a realistic and three-dimensional sounds coming from a pairs of loud speakers or headphones.
1. Use headphones to have much better effect
When you use headphones in listening, there will less interference such as outside voices or room reflections comparing to using speakers.
2. Choose correct output devices
Choose the correct output devices in the options of demo program in accordance with what listening devices you want to listen to. Because listening through speakers must be proceeded by crosstalk cancellation, if you choose the wrong output devices, there won't be any 3D positional audio effect..
Hardware/Software Section 4- Installation of Windows 95
3. Location of speakers
If you listen through speakers, please do not inverse the left and right speakers. They must be in equal distance from the listener. That means the listener,the left, and the right speaker must be in the topmost of a right triangle. The point of the listener is called "sweet spot". In addition, the height of the listener's ears must be equal to that of the speakers.
4. Turn the surround sound effect OFF
The surround sound effect will affect 3D positional audio. So, Please make sure that the surround effect is disabled before listening to 3D positional audio.
C3D HRTF positional audio supports DirectX 5.0 Direct Sound 3D interfaces, and meets all of Direct Sound 3D functions. You can enjoy 3D positional audio in the games that support DirectX 5.0 Direct Sound 3D.
Some games support only A3D interfaces for 3D positional audio, so we provide A3D interfaces (our Windows 95 drivers are included), enabling you to enjoy 3D positional audio in those games.
If you enter DOS and executing applications or games by press "Alt-F5" or "F8" key before Windows 95 system booting. You need to install DOS drivers. Please run "INSTALL.EXE" program in DOS/W31 drivers path.
(Refer user manual section 2.3). Please do not specify Windows path when program request. You need only DOS drivers.
If you just running applications and games in Windows 95 system or shut down to DOS, you don't have to install DOS drivers.
Hardware/Software Section 4- Installation of Windows 95
Because of we provided two wave devices WSS and SB16 in Windows 95. If you use Windows 95 mixer to control volume and recording gain, you must select device that match to playback or record device in "Multimedia" of "Control Panel". For example, If playback and recording device is Windows Sound System in "Multimedia" of "Control Panel", you must select "Sound System Mixer" in "Mixer Device" of "Properties" of "Options" to control. We recommended you to use mixer that we provided(audio rack), you don't have to select mixer device.
CMI8330
Installation of Windows NT 4.0 |
ATTENTION:
1. We recommend that you have already installed Windows NT 4.O before installing CMI8330. And you didn't install any other sound card device drivers in your current system.
2. Please make sure your PC BIOS PnP AUTO CONFIG is set to ENABLE, if your PC BIOS supports PnP function.
3. If you got any problem with installing Windows NT 4.0, please contact your local Windows agent.
Please follow the following steps to install CMI8330 device drivers into Windows NT 4.0.
1. Click "Start" button, move highlight bar to "Setting", select "Control Panel".
2. Double click "Multimedia" icon.
3. Select "Devices" page and press "Add" button.
4. Select "Unlisted or Updated Driver" item in "List of Drivers".
5. Specify path that NT drivers is in (ex. A:\).
6. Select "C-Media CM8330" item and press "OK" button.
7. Select proper value of I/O.
8. Press "OK" button.
9. Restart system when asking.
Hardware/Software Section 5- Installation of Windows NT 4.0
10. Now, you have already installed CMI8330 sound card on Microsoft Windows NT 4.0 successfully.
If you want to install Windows applications of CMI8330, Please follow the following steps:
1. Click "start" key.
2. Select "Run" item.
3. Please make sure your CMI8330's Windows NT driver disk is in floppy A(or B).
4. Please Key in the path name of Windows NT applications install program as "A:\NTSETUP.EXE"
If you want to use MPU-401 MIDI device, please follow the steps describe above. But in steps 4, select "MPU-401 MIDI compatible driver" item. Specify the path of Windows NT 4.0 CD-ROM directory \I386, system will add MPU-401 MIDI device for you.
1. How to activate NT4.0 PnP functions?
If your NT4.0 system PnP functions are inactive, you can use Windows explorer to find PNPISA.INF (it should be in NT4.0 CD directory \DRVLIB\PNPISA\X86). Select it and press mouse right button. Select 'Setup' item, NT4.0 system PnP functions will activate, and the system will ask you to reboot the PC.
2. How to remove old audio drivers?
If you have installed the old audio NT4.0 drivers, please remove WSS device in 'Audio Devices' of 'Advanced' page of 'Multimedia'. Shut down system to DOS, change directory to NT subdirectory INF, then search OEM*.INF files, delete our INF file. Delete all of old audio drivers in SYSTEM32 and SYSTEM32\DRIVERS subdirectory. Then reboot the PC, NT system will automatically detect our audio adapter (If not, please activate NT PnP functions first!), please follow those steps described later to install drivers.
Hardware/Software Section 5- Installation of Windows NT 4.0
3. First time installation
If you have installed an all-new NT4.0 system, and NT PnP functions is active, then NT system will automatically detect our audio adapter. The PnP device that NT system detects will show on the screen, double click on the device, while the next dialog shown press "Set Configuration Manually" button to enter resources dialog then press 'OK' button, NT system will install drivers. Repeat the above steps until all of PnP device drivers are installed.
CMI8330
Windows Applications(Audio Rack) |
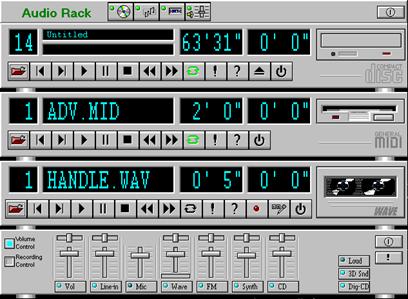
Audio Rack gives you control over your PC's audio functions through a user interface as simple to use as a home stereo system.
Hardware/Software Section 6- Audio Rack
Audio Rack consists of several major components:
Control Center: Controls the display of Audio Rack's components.
![]()
MIDI Player: Plays MIDI music files. Lets you create song playlists and play the song files.
Wave Player: Records and plays digital audio (wave) files. Lets you create wave file playlists and playback the wave files.
CD Player: Plays standard audio CDs. Allows you to create playlist collections of CD tracks (songs).
System Mixer: Sets the volume level of your audio inputs and outputs.
Showing or Hiding Audio Rack Components
To remove or add a component from display, click on the component's button on the Control Center's Button Bar or toggle it off.
CD Player (above, similar to Wave Player and MIDI Player)
Sel (or Trk) field: If you have multiple selections in your playlist, this shows the number of the current selection or CD track.
Current File or Track: The name of the current MIDI file, wave audio file, or CD track.
Total Length field: displays the total length of files or tracks in minutes and seconds.
Hardware/Software Section 6- Audio Rack
Current Time field: displays the current time of files or tracks in minutes and seconds when playback or recording.
Please refer to help screen for more detail button functions description. (click on help "?" button on player)
System Mixer lets you control all audio output and input levels.
System Mixer displays the volume controls that your audio drivers make available. The names for these controls may vary.
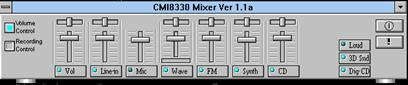
Volume Control: Clicking on this button shows and lets you use the output level controls.
Recording Control: Clicking on this button shows and lets you use the input level controls.
Input and Output Level Sliders and Buttons: For each input or output signal type, a control slider controls the loudness, a horizontal slider controls balance between the two speakers, and the mute button temporarily stops input or output without changing slider positions.
Hardware/Software Section 6- Audio Rack
Control types and names vary. Some common types are listed below:
Vol: The master control for all outputs. The strength of an output signal is determined by both the Vol slider and the slider for the individual output. To affect all outputs, move the Vol slider. To change the output of an individual output type, move its slider.
Line-in: Controls the audio hardware's Line In or Line Out levels. Line levels might be for an externally attached cassette player, e.g.
Mic: Controls the microphone input level.
Wave: Controls wave (voice) playback or record levels.
FM: Controls the FM music play or record level.
Synth: Controls the external MIDI synthesis(wave table) play or record level.
CD: Controls the CD drive output level, for CD drives configured to play their audio output through the PC's audio hardware.
Dig-CD: Turn on or off the CD drive digital audio output.
3D Snd: Toggle the 3D surround sound effect.
Loud: Toggle the output loudness gain.
Mute Buttons: Toggle between muting and enabling the signal. A button with a lit LED is enabled, while one with its LED not lit is muted. Several output signals can usually be enabled at once.
CMI8330
Questions & Answers |
Q1: Can we keep the PnP function of CMI8330 even on a Non-PnP motherboard?
A1: Yes, but you have to use Win 95 and install the drivers properly.
Q2: When CMI8330 and other NON-PnP interface cards are installed on a same motherboard, anything we need to do during the installation?
A2: In this case, please install the NON-PnP cards first and make sure that the cards work normally (no matter under DOS or Win 95), then install CMI8330 sound card. Thus, the motherboard can reserve the I/O resources for the NON-PnP cards first and afterwards makes the installation of PnP card easier. If there is any conflict happen still, you have two way to go. One is adjust NON-PnP device driver setting and jumper on card. Another is click "System" icon at "Control Panel" group, press "Device Manager" and find the "sound,video and game controllers" item. Double-click on it, There are interrogation mark shown in front of confilcted device. Double-click on these device, press "Resources" and clear "Use automatic settings", choose lastest item of "Setting base on:" and press "Change setting..." button then select a no conflict value and press OK button. Make sure all item of "resource type" are no conflict. Reboot Windows 95 system, conflicted will disapper.
Q3: When execute DOS Games, what kind of the compatible modes do we have to choose?
Hardware/Software Section 7- Question & Answers
A3: CMI8330 can auto-switch among SB16, WSS, and SB Pro modes. All you have to do is to setup the I/O, IRQ, DMA correctly (refer to AEINIT). Usually, we suggest you to choose SB16 or WSS mode under DOS to get real 16 bit sound effect.
(Note: SB Pro is a 8 bit mode, so if you have bought a sound card which supports only SB Pro mode instead of SB 16 or WSS mode then you cannot enjoy a true 16 bit sound quality under DOS.)
Q4: How can we execute DOS Games in Win 95?
A4: You can execute DOS Games in Win 95 by three means:
1) DOS Prompt - Because this is under Win 95 protect mode, some S/W's cannot be executed 100%.
2) Shut down to DOS - Most of the DOS Games can be executed.
3) Press "ALT-F5" or "F8" when boot-up - 100% DOS Games can be executed.
Q5: What is "Full-Duplex"?
A5: "Full-Duplex" can manage "Recording" and "Playback" (WAV) at the same time.
This function makes the two-way dialogue under Internet IPHONE possible.
Q6: Does "Full Duplex" function of CMI8330 work in Win 3.1?
A6: We're sorry that "Full Duplex" can only work in Win 95 and NT4.0 at the moment.
Q7: Why the person on the other end of IPHONE cannot hear my voice?
A7: 1) Make sure you have set the "Recording Control" under "Mixer" of "Audio Rack" to "Mic". Then use the "Mixer" and "Wave Player" of Audio Rack to test whether MIC can record and playback normally. Finally use the MIC test function in IPHONE to assure the volume table of the MIC will re-act.
2) Please set the "recording device" and "playback device" under IPHONE to "WSS(534)".
3) Set the "record and playback" under Win 95 to WSS(534) too.
Q8: I've already setup "Full-Duplex" in IPHONE, but why the sound card still works like "Half-Duplex"?
A8: Please note that there must be Full Duplex's on both sides of IPHONE users then Full Duplex can work properly.
Q9: Why there are no sound on MIDI play in Windows?
A9: Perhaps, you don't have wave-table synthesizer, but your MIDI device set to MPU-401.
Please check by following procedure:
1. Click "Start", "setting", "control panel"
2. Double click "Multimedia"
3. Select item "MIDI"
4. Check the informat of "Single instrument', in normal case, it has:
"C-Media inc. External MIDI (MPU-401)"
"OPL2/OPL3 FM Synthesis" (Default device for MIDI)
5. Make sure, your are setting to "OPL2/OPL3 FM Synthesis"
Q10: Why there are no sound or a little bit sound when using speaker that no power amplifier?
A10: Please connect to loudspeaker for more powerful sound.
Q11: Why there are repeat sound playing while Windows starting?
A11: I/O(IRQ DMA) conflicted with others adaptors! Please adjust I/O resource of all interface card, especially non-PnP cards.
Hardware/Software Section 7- Question & Answers
Q12: Why there are no sound output during play MPEG file by MPEG card?
A12: Maybe Line-out of MPEG card didn't connect to Line-in of sound card or Line-in volume be muted in mixer.
Q13: Why some games auto detect sound card to WSS mode, but I/O can not fit to current setting?
A13: Windows Sound System (WSS) supports registers for applications (GAME) to setting IRQ and DMA channel. Auto detect function of some games use these registers to setting IRQ and DMA channel by itself. But, because of our sound card supports Plug and Play functions, I/O resource must allocating by PnP BIOS or Windows 95. Allocating I/O resource by applications will cause I/O conflicted with other interface cards. User should be decided sound card mode by yourself.
Q14: Why detect sound card to half-duplex when MS NetMeeting setup?
A14: Because of our sound card use two wave devices when use full-duplex function. You must select playback device to "Sound System Playback" and set record device to "SB16 Record" when setup.
|
