ALTE DOCUMENTE
|
|||||||||
Although there are hundreds of thousands of different looks you can create with blends, they are all variations of three basic effects: color change, shape change, or distributing objects.
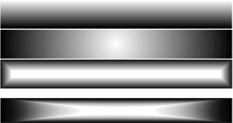
Color changes are similar to the look of gradients. However, blends give you more control over the look of the color change
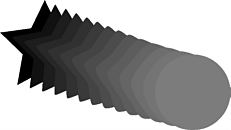
Shape changes create the effect of one object turning into another. Some shape changes use 222w2212c hundreds of intermediate styles which make a subtle change between the objects . Other shape changes use 222w2212c few steps which lets you see how each object changes


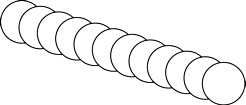
You can distribute objects by blending one object to an identical copy of itself. The intermediate steps are also identical objects, but they can easily be distributed in a straight line or along a path
No matter what type of blend effect you create, they all start with the same basic blend command.
To create a simple blend:
Select two or more shapes you want to blend

Choose Modify > Combine > Blend. The objects blend together
TIP
Blends are created in straight lines between objects. To make a blend follow a curve, you align the blend to a path (see page 219).
Once you have a blend, you may want to change the number of steps. You might want to make the blend as smooth as possible or modify it to show the intermediate steps.
To change the number of steps in a blend:
Select the blend.
In the Object inspector, enter the number of steps between the original objects in the Steps field

Press Return/Enter. The blend re-forms with the new number of steps.
The default number of blend stepsFreeHand calculates the default number of steps in a blend from the Printer resolution in the Document inspector. Higher resolutions give you a greater number of steps. If you change the resolution you change the number of steps for new blends. Blends made before you changed the resolution do not change. You can use the Find and Replace Graphics dialog box to find all blends with a certain number of steps and change them to a different number of steps (see page 276). |
You may find your blends do not look as smooth as you would like. Or that the objects do not change in the manner you expect. This is because FreeHand automatically calculates the blend using the points from which it wants to blend . You can create a custom blend by forcing FreeHand to use specific points for the blend.

To create a custom blend:
Use the Pointer tool to select a point on the first of the objects from which you want the blend to begin.
Hold the Shift key to select a point on the second object.
Continue to select additional points on each of the objects in the blend.
Choose Modify > Combine > Blend. The intermediate steps of the blend are created by creating shapes between the selected points


TIP
To make blends as smooth as possible, pick points on each object that are in equivalent positions.
The Rules of BlendsThere are limitations to which objects can be used in a blend. The blend command does not work in the following instances: You cannot blend between paths that have different types of strokes or fill. For example one object cannot contain a basic fill and the other a gradient. Pattern fills do not blend; they switch abruptly from one to the other. Texture and custom fills must be identical at both ends of the blend. (See the next page for more rules.) |
|
