A FreeHand document must contain at least one page. That means you can never delete the only page in a document. However, if you have added pages to a document, you can delete one page at a time.
Before you delete a page, you need t 535d38f o select the page you want to delete.
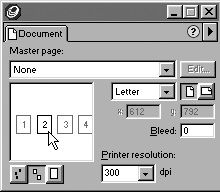
To select a page in the Document inspector:
Click the page you want to select in the Preview Area of the Document inspector. The selected page is indicated by a dark outline in the Preview Area
To select a page in the FreeHand document window:
Click the page you want to select in the document window.
or
Scroll through the document window so that the page you want to select is in the center of the window area.
or
Use the Page tool to select the page you want to delete.
TIP
Although you can select multiple pages with the Page tool, only one page will be selected in the Document inspector.
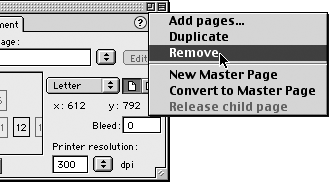
To delete a selected page:
Choose Remove from the Document inspector menu
Ordinarily, FreeHand doesn't print any part of an image that lies outside the page. If you want the artwork to print right to the edge of a page, you need to extend or bleed the artwork outside the edge of the page. (See the sidebar on this page Why do I need to bleed?
To set a bleed size:
Enter the desired bleed size in the Bleed field of the Document inspector
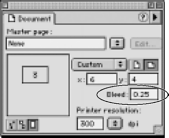
Press Return or Enter. A light gray line appears around your work page. This is the bleed area

TIP
Use the bleed area to hold elements that should print outside the live area of your artwork.
Why do I need to bleed?The reason is that the people who cut paper don't always trim pages exactly evenly. Take a look at the thumbtabs on the sides of this book. If you flip from page to page you will see that the gray area isn't always the same size. That's because when the paper for the book is cut to the final trim size, some of the pages will be cut slightly differently from others. (Yes, I know this will happen, even before the book is printed.) If I had laid out the page so the gray area stopped right at the edge of the page, there might be some pages where the trim showed the white outside the page. So instead of trusting that the trim position would always be perfect, I set a bleed to extend the gray area outside the size of the page. That way I don't have to worry if the trim is slightly off. I know that the gray area will still be visible outside the trim. Unless your print shop is trying to trim pages in the middle of an earthquake, you shouldn't need more than a quarter-inch bleed. However, if you are in doubt, ask your print shop for the size they would like for a bleed. |
|
