Objective |
This chapter introduces:
Failures During Feature Creation
Regeneration Failures
Resolving Failures
Failures can occur when creating a new feature or during regeneration after a model has been modified. In either situation, the failure must be resolved to continue work 949c211j ing with the model.
Failed Creation |
When a feature fails during
creation, the ![]() button becomes available in the feature dialog
box. Selecting this button accesses the
RESOLVE FEAT menu. At anytime while the
dialog box is open, any of the elements can be redefined by simply selecting
the element and then selecting the
button becomes available in the feature dialog
box. Selecting this button accesses the
RESOLVE FEAT menu. At anytime while the
dialog box is open, any of the elements can be redefined by simply selecting
the element and then selecting the ![]() button.
button.
Failed Regeneration |
When a part is altered by operations such as Modify, Redefine, and Reorder, features may fail during the part regeneration. When this occurs, the Failure Diagnostics window and the RESOLVE FEAT menu become available.
Resolve Feat Menu |
Figure 2-1 shows the RESOLVE FEAT menu. It contains the options shown in Table 2-1.
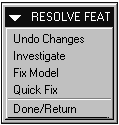
Figure 2-
Table 2-
|
Option |
Description |
|
Undo Changes |
Undoes the changes that caused the failure. |
|
Investigate |
Provides tools to aid in determining the problem. |
|
Fix Model |
Provides access to several functions for resolving the problem. It brings up the FIX MODEL menu (shown in Figure 2-2) which enables work to be done on any feature in the model. |
|
Quick Fix |
Provides access to standard functions that apply to the failed feature only. It brings up the QUICK FIX menu (shown in Figure 2-2). |
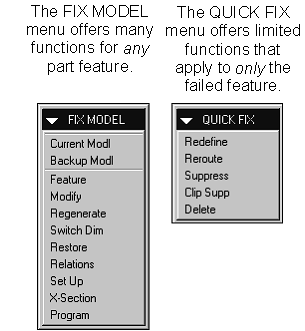
Figure 2-
Exercise 2a Quick Fix |
Objective |
After you complete this exercise, you will be able to:
Resolve Failed Features Using Quick Fix
Create a new part with an extruded base feature.
Create a new part called quick_fix.
Create default datum planes.
Center the cylindrical protrusion on the default datum planes as shown in Figure 2-3.

Figure 2-
Create a second protrusion.
Create the extruded protrusion shown in Figure 2-4 on Both Sides of datum plane DTM1.
|
Figure 2- |
Sketch the geometry as an open section (i.e., do not sketch a line entity between the arc endpoints).
Dimension, Align, and Regenerate successfully.
When prompted for the direction to add material, incorrectly (for illustration purposes) flip the arrow so it is pointing away from the part.
Enter a blind depth value. The Message Window indicates that the feature was aborted. Why could it not create the feature?
Select the ![]() button from the dialog box.
button from the dialog box.
Click on each of the options available in the Failure Diagnostics Window and familiarize yourself with the information in each: <Overview>, <Feature Info>, <Resolve Hints>.
Close each window after reading the information contained within.
Choose Quick Fix, Redefine, Confirm and redefine the Material Side element. Flip the arrow in the proper direction.
Complete the creation of the feature.
Modify the part.
Modify the radius of the cylindrical base to [6].

Figure 2-
Read the Message Window. A failure occurs because the arc shaped protrusion was sketched as an open section. When it hangs off the base feature there is no geometry defining what happens to the bottom of the arc.
Resolve the feature failure.
Choose Quick Fix, Redefine, Confirm.
|
The QUICK FIX menu applies to the failed feature, the arc shaped protrusion in this case. |
Redefine the section sketch by adding a line between the arc's endpoints.
When the feature failure is resolved successfully, choose Yes to exit the Resolve Feature Mode.
Save the part and Erase it from memory.
Exercise 2b Fix Model |
Objective |
After you complete this exercise, you will be able to:
Resolve Failed Features Using Fix Model
Create a new part.
Create a new part called fix_model.
Create default datum planes.
Create the rectangular base feature.
Create rounds.
Create the hole.
Create the shell.

Figure 2-
Modify the diameter of the hole.
Modify the diameter of the hole to [8]. The shell feature fails because the shell surface around the hole intersects the shell surface of the box.
Resolve the feature failure.
Choose Fix Model.
|
Choosing Fix Model enables work to be done on any feature (including the hole), rather than just the failed feature (the shell). Quick Fix only allows work on the failed feature (the shell). |
Modify the diameter of the hole to [5] and Regenerate.
Save the part and Erase it from memory.
|

