Once the rulers are visible, you can use them to create guides on your page. Guides can be used to divide pages into different areas as well as to help you align objects.
To create guides by dragging:
Choose View > Guides > Show. (If Show is checked, the command is selected.)
Move your pointer so that it touche 11411c21l s either the top (horizontal) ruler or the left (vertical) ruler.
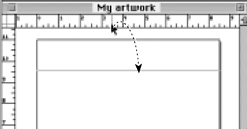
For a horizontal guide, press and drag the arrow from the top ruler down into the page
or
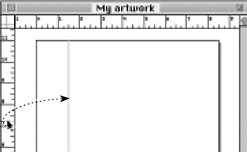
For a vertical guide, press and drag the arrow from the left ruler onto the page
TIP
Drag your arrow from the ruler onto the page, not the pasteboard.
TIP
As you drag from the rulers a line appears that shows where your guide will be when you release the mouse.
Release the mouse to set the guide.
TIP
To turn a path into a guide, you need to place the path on the Guides layer (see page 156).
To move a guide to a new position:
Use the Pointer or Subselect tool to drag the guide into the new position.
To delete a single guide:
Use the Pointer or Subselect tool to drag the guide off the page onto the pasteboard.
If you want to work with many guides at once, you should use the Guides dialog box.
To add guides at numerical positions:
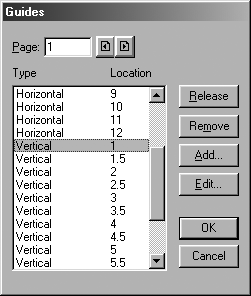
Double-click any guide or choose View > Guides > Edit. The Guides dialog box appears
Click
Add to open the Add Guides dialog
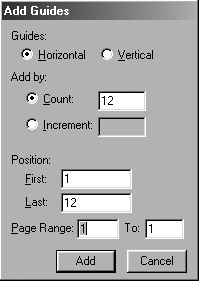
Choose Horizontal or Vertical.
To set a specific number of equally spaced guides, click Count and enter the number.
To set a specific distance between guides, click Increment and enter the spacing.
Use the First and Last fields to specify where the guides should start and end.
Use the Page range to set the pages on which the guides should appear.
Click Add to return to the Guides dialog box.
Click OK in the Guides dialog box. The new guides are listed in the Guides dialog box and inserted on the page.
TIP
If you want the guides in front of the artwork, you need to change the order of the Guides layer (see page 154).
To reposition guides using the Guides dialog box:
Double-click the guide or choose View > Guides > Edit to open the Guides dialog box.
Select the guide from the list.
Click Edit. This opens the Guide Position dialog box
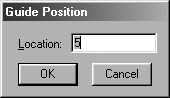
Enter a new location in the field and click OK to return to the Guides dialog box.
Click OK to close the Guides dialog box and institute the changes.
Don't Cover Your Page With GuidesYou may be tempted to cover your page with many guides. Try to avoid that. Each guide you create adds to the size of the file. You may also find it distracting to work with all those guides. Any time you find yourself about to create many guides, think about using FreeHand's automatic grids (see the following page). Unlike guides, they don't add to the file size, and they can be automatically changed to new increments. |
To delete guides using the Guides dialog box:
Double-click the guide or choose View > Guides > Edit to open the Guides dialog box.
Select the guide or guides from the list.
Click Delete/Remove.
When you have finished, click OK.
TIP
Hold Cmd/Ctrl to select multiple noncontiguous guides or hold Shift to select contiguous guides in the Guides dialog box.
TIP
Any path can be turned into a guide by selecting it and then double-clicking the Guides layer in the Layers panel. (See Chapter 12 Layers and Layering
TIP
The Release button in the Guides dialog box turns the selected guide into a regular path.
You can lock guides to prevent them from being moved.
To lock the guides:
Choose View > Guides > Lock. If you choose Lock when it is checked, you unlock the guides.
TIP
You can also lock guides using the Layers panel (see page 158).
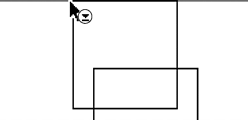
As you move objects, you may want them to jump so that they align with guides. This is called snapping to guides. The Snap To Guide cursor indicates that the object has jumped into alignment with a guide
To turn on Snap To Guides:
Choose View > Snap To Guides. If Snap To Guides is checked, the feature is already on.
TIP
The Preferences let you control the snap to distance - how close the object has to be before it will jump to the guide (see Appendix C
|
