One of the most dramatic features in FreeHand is the set of lens fills. These allow you to create transparency effects and to use one object to magnify others.
To create a transparent lens fill:
Choose Lens from the pop-up menu in the Fill inspector.
Choose Transparency from the mode pop-up menu
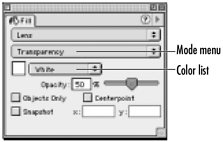
Choose a color from the color pop-up menu.
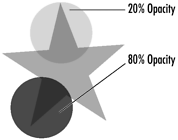
Use the Opacity slider or the field 24324p1511y to set the amount of transparency for the lens . The lower the opacity, the more you will be able to see through the object.
Click Objects Only to have the effects of the lens seen only on objects, not the page

See the exercise on the facing page for working with the Centerpoint control.
Click Snapshot to freeze the lens effect within the object. The object may then be moved to another spot without changing the image within the lens

Working with spot colorsAll of the lens effects convert spot colors to process. When you apply the lens effect, an alert box appears with the message that spot colors viewed through a Lens fill are converted to process colors. This means that if you work with spot colors you most likely will not want to apply any of the lens effects. To turn off the warning, check the Don't Show Again box. |
The magnify lens lets one object act as a magnifying glass on whatever objects it covers.
To create a magnify lens fill:
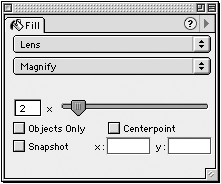
With Lens chosen, choose Magnify from the mode pop-up menu.
Use the Magnification slider or the field 24324p1511y to set the amount of magnification for the lens
TIP
Magnification can be set from 1 (actual size) to 20 times bigger.
The object appears inside the lens as if it were scaled larger

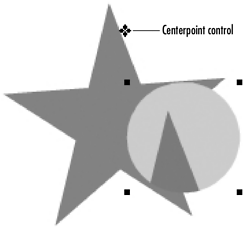
There may be times when you want the lens object to affect an area that it is not located over. This is especially helpful for callouts of technical drawings or insets of maps. To accomplish this, use the centerpoint control.
To use the centerpoint control:
Position the magnify lens where you want it in your image - do not worry yet about what shows in the lens.
Check the Centerpoint box in the Fill inspector. A centerpoint control appears.
TIP
If the centerpoint is not visible, check to see if the object is part of a group. If so, ungroup it.
Drag the centerpoint control to the center of the area you want to be visible within the lens
Stacking lens objectsIf you position one lens object over another, you will combine the lens effects. However, there is a limit of eight lens fills stack over each other. If you add more than eight objects, the bottom-most objects will not be active as lens fills. |
The Invert lens inverts the colors of objects. This means that black objects turn white, red objects turn green, yellow objects turn blue, and so on.
To use the Invert lens fill:
With Lens chosen, choose Invert from the mode pop-up menu . This causes the selected object to invert the colors in the objects it passes over
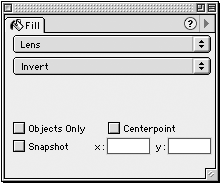

Set the Objects Only control as described on page 184.
Set the Snapshot control as described on page 184.
Set the Centerpoint control as described on page 185.
To use the Lighten lens fill:
With Lens chosen, choose Lighten from the mode pop-up menu. This causes the selected object to lighten the colors in the objects it passes over . This is similar to adding white to the colors
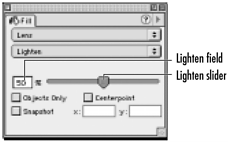

Use the Lighten slider or the field 24324p1511y to increase or decrease the effect.
Set the Objects Only control as described on page 184.
Set the Snapshot control as described on page 184.
Set the Centerpoint control as described on page 185.
To use the Darken lens fill:
With Lens chosen, choose Darken from the mode pop-up menu . This causes the selected object to Darken the colors in the objects it passes over . This is similar to adding black to the colors.
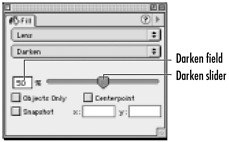

Use the Darken slider or the field 24324p1511y to increase or decrease the effect.
Set the Objects Only control as described on page 184.
Set the Snapshot control as described on page 184.
Set the Centerpoint control as described on page 185.
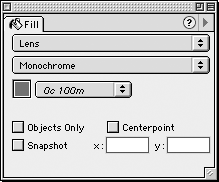
To use the Monochrome lens fill:
With Lens chosen, choose Monochrome from the mode pop-up menu . This causes the selected object to convert all the colors in the objects it passes over to a shade of the monochrome object

TIP
The monochrome lens is a great way to tint part of a placed image.
Use the Color list to choose the monochrome color.
Set the Objects Only control as described on page 184.
Set the Snapshot control as described on page 184.
Set the Centerpoint control as described on page 185.
|
